Multi-Region YugabyteDB Deployments on Kubernetes with Istio
July 2, 2021
This blog post is written by guest author Bhavin Gandhi, Software Engineer at InfraCloud Technologies, Inc., in collaboration with teams at Yugabyte. InfraCloud helps startups, SMBs, and enterprises scale by adopting cloud native technologies.
As organizations deploy applications across multiple cloud regions to better meet user demand and comply with regulations such as GDPR, there is a need to distribute data across geographic regions. With row-level geo-partitioning, synchronous and asynchronous replication capabilities, the ability to serve queries from the nearest geographic region and support for a rich set of security features, YugabyteDB supports a wide variety of multi-region deployment configurations. In this article, we will explore setting up a synchronously replicated multi-region YugabyteDB cluster on Kubernetes. To explore other multi-region deployment topologies supported by YugabyteDB, refer to the Multi-Region Deployments section of YugabyteDB docs.
Managed Kubernetes clusters are typically limited to a single region. In order to enable discovery and connectivity across multiple Kubernetes clusters in different regions, service mesh solutions like Istio are a useful building block. Istio provides features like reliability, security, and observability along with support for different deployment topologies. DevOps teams can stitch together a variety of multi-region Kubernetes deployment topologies using Istio.
In a previous blog post, we saw how we can leverage features provided by Istio to secure YugabyteDB services. Istio also has support for connecting multiple Kubernetes clusters together by enabling the discovery and connectivity of pods and services across different clusters seamlessly. We will be using Istio’s multicluster mesh to set up a secure Kubernetes environment across three different Kubernetes clusters from different regions. We will then deploy a YugabyteDB cluster in this environment which will span over three geographical regions and enable synchronous replication across these three regions.
Before we begin
Before we get started with the setup, make sure you have the following:
- Three Kubernetes clusters each in a different region. We are using 3 GKE clusters with n1-standard-8 node size in us-east1, us-west2, and us-central1 with the kubectl context names
gke_proj_us-east1_east-cluster,gke_proj_us-west2_west-cluster, andgke_proj_us-central1_central-cluster. - kubectl binary compatible with the clusters.
- Istio 1.10.0+ with istioctl available in the path. Follow the Download Istio section of the Getting Started documentation page.
- Make sure your clusters satisfy the requirements given in the Requirements section of the Istio documentation.
Setting up Istio on the clusters
We will be using the multi-network, multi-primary deployment model to do the Istio multi-cluster setup. In this setup, each cluster will have its own Istio control plane and will be on its own network. You can read more about this deployment model on Install Multi-Primary on different networks documentation page.
Once you have access to all the clusters through kubectl, you can rename the context names to east, west, and central for simplicity.
To rename the contexts, run the following command.
kubectl config rename-context gke_proj_us-east1_east-cluster east
kubectl config rename-context gke_proj_us-west2_west-cluster west
kubectl config rename-context gke_proj_us-central1_central-cluster central
We will be using these context names to perform similar actions on all the clusters. All the commands in this post are run from the Istio package directory, for example istio-1.10.0.
To establish trust between all the clusters, we will create and install CA certs on all the clusters. Run the following command to generate and apply the certs on all the clusters.
{
  mkdir -p certs
  pushd certs
  make -f ../tools/certs/Makefile.selfsigned.mk root-ca
  for ctx in east west central; do
    echo -e "Creating and applying CA certs for ${ctx} .........\n"
    make -f ../tools/certs/Makefile.selfsigned.mk ${ctx}-cacerts || break
    kubectl create namespace istio-system --context ${ctx} || break
    kubectl create secret generic cacerts -n istio-system \
      --from-file=${ctx}/ca-cert.pem \
      --from-file=${ctx}/ca-key.pem \
      --from-file=${ctx}/root-cert.pem \
      --from-file=${ctx}/cert-chain.pem \
      --context=${ctx} || break
    echo -e "-------------\n"
  done
  popd
}
The above steps are taken from the Plug in certificates and key into the cluster section of Istio documentation.
To perform various Istio installation steps on the cluster, run the following commands.
{
  mkdir multi-cluster
  for ctx in east west central; do

    echo -e "Set the default network for ${ctx}-cluster .........\n"
    kubectl --context ${ctx} get namespace istio-system && \
      kubectl --context="${ctx}" label namespace istio-system topology.istio.io/network=${ctx}-network
    echo -e "-------------\n"

    echo -e "Configure ${ctx}-cluster as a primary .........\n"
    cat <<EOF > multi-cluster/${ctx}-cluster.yaml
apiVersion: install.istio.io/v1alpha1
kind: IstioOperator
spec:
  meshConfig:
    defaultConfig:
      proxyMetadata:
        ISTIO_META_DNS_CAPTURE: "true"
        ISTIO_META_DNS_AUTO_ALLOCATE: "true"
  values:
    global:
      meshID: mesh1
      multiCluster:
        clusterName: ${ctx}-cluster
      network: ${ctx}-network
EOF

    istioctl install --context ${ctx} -y -f multi-cluster/${ctx}-cluster.yaml
    echo -e "-------------\n"

    echo -e "Install the east-west gateway in ${ctx}-cluster .........\n"
    ./samples/multicluster/gen-eastwest-gateway.sh \
    --mesh mesh1 --cluster ${ctx}-cluster --network ${ctx}-network | \
    istioctl --context="${ctx}" install -y -f -
    echo -e "-------------\n"

    echo -e "Expose services in ${ctx}-cluster .........\n"
    kubectl --context ${ctx} apply -n istio-system -f \
    samples/multicluster/expose-services.yaml
    echo -e "-------------\n"

  done
}
The above set of commands perform these tasks:
- Create the istio-system namespace and annotate it with a unique network label.
- Create IstioOperator YAML for the Istio installation.
- Install a gateway named eastwest which will be used by Istio from other clusters to communicate with the current cluster (it is not limited to east-west communication).
- And finally, we expose the
*.localservices from the current cluster, so that other clusters can access them.
Note that we have added ISTIO_META_DNS_CAPTURE and ISTIO_META_DNS_AUTO_ALLOCATE to the IstioOperator configuration YAML, so that Istio can take care of DNS traffic as well. That way a pod from one cluster can resolve services from other clusters. This is an additional configuration that is not present in the official Istio guide. Checkout DNS with multiple clusters and DNS Proxying pages from Istio documentation for more details.
Each cluster needs to have a secret which grants access to the other two clusters. To create these remote secrets in all the clusters, run the following commands.
{
  for r1 in east west central; do
    for r2 in east west central; do
      if [[ "${r1}" == "${r2}" ]]; then continue; fi
      echo -e "Create remote secret of ${r1} in ${r2} .........\n"
      istioctl x create-remote-secret \
        --context ${r1} \
        --name ${r1}-cluster \
        --namespace istio-system | \
        kubectl apply -f - --context ${r2}
      echo -e "-------------\n"
    done
  done
}
To check the status of all the pods from the istio-system namespace across the clusters, execute the following command. Wait until all the pods have a Running status.
{
  for ctx in east west central; do
    echo -e "Pods in istio-system from ${ctx} .........\n"
    kubectl get pods --namespace istio-system --context ${ctx}
    echo -e "-------------\n"
  done
}
Pods in istio-system from east .........

NAME                                     READY   STATUS    RESTARTS   AGE
istio-eastwestgateway-849445c4f8-rnsss   1/1     Running   0          17m
istio-ingressgateway-55f9cf6448-9r846    1/1     Running   0          18m
istiod-76764f7ddb-s4gdg                  1/1     Running   0          18m
-------------
…
The above steps are from the Install Multi-Primary on different networks section of Istio documentation.
Installing YugabyteDB using Helm
With Istio running successfully, let’s install the YugabyteDB Helm chart on all the clusters. To add the Helm chart’s repository, run the following commands.
$ git clone https://github.com/yugabyte/charts.git
Create a namespace for our installation and enable the sidecar injection:
{
  for ctx in east west central; do
    echo -e "Create ybdb namespace in ${ctx} .........\n"
    kubectl create namespace ybdb --context=${ctx}
    # Enable the automatic istio-proxy sidecar injection
    kubectl label namespace ybdb istio-injection=enabled --context=${ctx}
    echo -e "-------------\n"
  done
}
When sidecar injection is enabled, Istio will add its istio-proxy container to every pod from that namespace.
To download the values files for each region, run the following commands.
curl -O https://gist.githubusercontent.com/bhavin192/ad3e0a7be5e23c00784fca864db9e1fc/raw/east-values.yaml
curl -O https://gist.githubusercontent.com/bhavin192/ad3e0a7be5e23c00784fca864db9e1fc/raw/west-values.yaml
curl -O https://gist.githubusercontent.com/bhavin192/ad3e0a7be5e23c00784fca864db9e1fc/raw/central-values.yaml
Take a look at this Gist to know details about all the options used in the values files.
To provision a YugabyteDB cluster spanning across three regions, run the following commands:
{
  for ctx in east west central; do
    echo -e "Install YugabyteDB chart in ${ctx} .........\n"
    helm install ${ctx} charts/stable/yugabyte/ \
      --namespace ybdb \
      --values ${ctx}-values.yaml \
      --kube-context ${ctx}
    echo -e "-------------\n"
  done
}
To check the status of all the pods from the ybdb namespace across the clusters, execute the following command. Wait until all the pods have a Running status.
{
  for ctx in east west central; do
    echo -e "Pods in ybdb from ${ctx} .........\n"
    kubectl get pods --namespace ybdb --context ${ctx}
    echo -e "-------------\n"
  done
}
Configuring global data distribution
We will now configure YugabyteDB to replicate data in multiple regions. This global distribution of data allows the database to survive the failure of any single region.
We already have a region and cloud name set for every YugabyteDB deployment across Kubernetes clusters. We will now set up the placement_info configuration, which tells YugabyteDB how to replicate data. To configure YugabyteDB with data placement in the east, west, and central regions, run the following commands:
# get shell access to the master pod
$ kubectl exec -it east-yugabyte-yb-master-0 \
  -n ybdb -c yb-master --context east -- bash

# set the placement_info to correct region and replication factor 3
yb-admin --master_addresses east-yugabyte-yb-master-0.ybdb.svc.cluster.local,west-yugabyte-yb-master-0.ybdb.svc.cluster.local,central-yugabyte-yb-master-0.ybdb.svc.cluster.local \
  modify_placement_info  \
  gcp.us-east1.rack1,gcp.us-west2.rack1,gcp.us-central1.rack1 3

# check the universe configuration
yb-admin --master_addresses east-yugabyte-yb-master-0.ybdb.svc.cluster.local,west-yugabyte-yb-master-0.ybdb.svc.cluster.local,central-yugabyte-yb-master-0.ybdb.svc.cluster.local \
  get_universe_config
Running a sample application
Now that we have the cluster running, we will run a sample application on it. We will be using the YugabyteDB workload generator container image to do so.
$ kubectl run yb-sample-apps \
    -it --rm \
    --image yugabytedb/yb-sample-apps \
    --namespace ybdb \
    --context east \
    --command -- sh

$ java -jar yb-sample-apps.jar java-client-sql \
    --workload SqlInserts \
    --nodes yb-tserver-common.ybdb.svc.cluster.local:5433 \
    --num_threads_write 4 \
    --num_threads_read 6

…
83979 [Thread-1] INFO com.yugabyte.sample.common.metrics.MetricsTracker  - Read: 0.00 ops/sec (0.00 ms/op), 0 total ops  |  Write: 496.48 ops/sec (4.02 ms/op), 21199 total ops  |  Uptime: 45028 ms |
Fault tolerance
One of the advantages of having a database cluster spread across different regions is the ability to tolerate the failure of an entire region. We have a sample application running against our YugabyteDB cluster, which is inserting and retrieving data. Let us try to simulate a failure of YB-TServers from one of the regions.
To remove YB-TServers from east cluster, run the following command in a separate terminal.
$ kubectl scale statefulset east-yugabyte-yb-tserver \
    --replicas 0 --namespace ybdb \
    --context east

statefulset.apps/east-yugabyte-yb-tserver scaled
As soon as you run this command, both the YB-TServer pods from east cluster will go into Terminating state. And you will notice that the application is still able to communicate with the database. It is able to read and write the data. That is because the requests are now routed to a different cluster where YB-TServer pods are running.
You can read more about fault tolerance in the Replication and High Availability sections of the documentation.
Kiali dashboard
Istio has an add-on called Kiali, which provides observability and dashboards for the mesh. To install Kiali on all the clusters, run the following command:
{
  for ctx in east west central; do
    echo -e "Install Prometheus & Kiali in ${ctx} .........\n"
    kubectl apply -f samples/addons/prometheus.yaml --context ${ctx}
    kubectl apply -f samples/addons/kiali.yaml --context ${ctx}
    echo -e "-------------\n"
  done
}
If you face any errors, run the above command again.
To open the dashboard of east cluster, execute:
istioctl dashboard kiali --context east
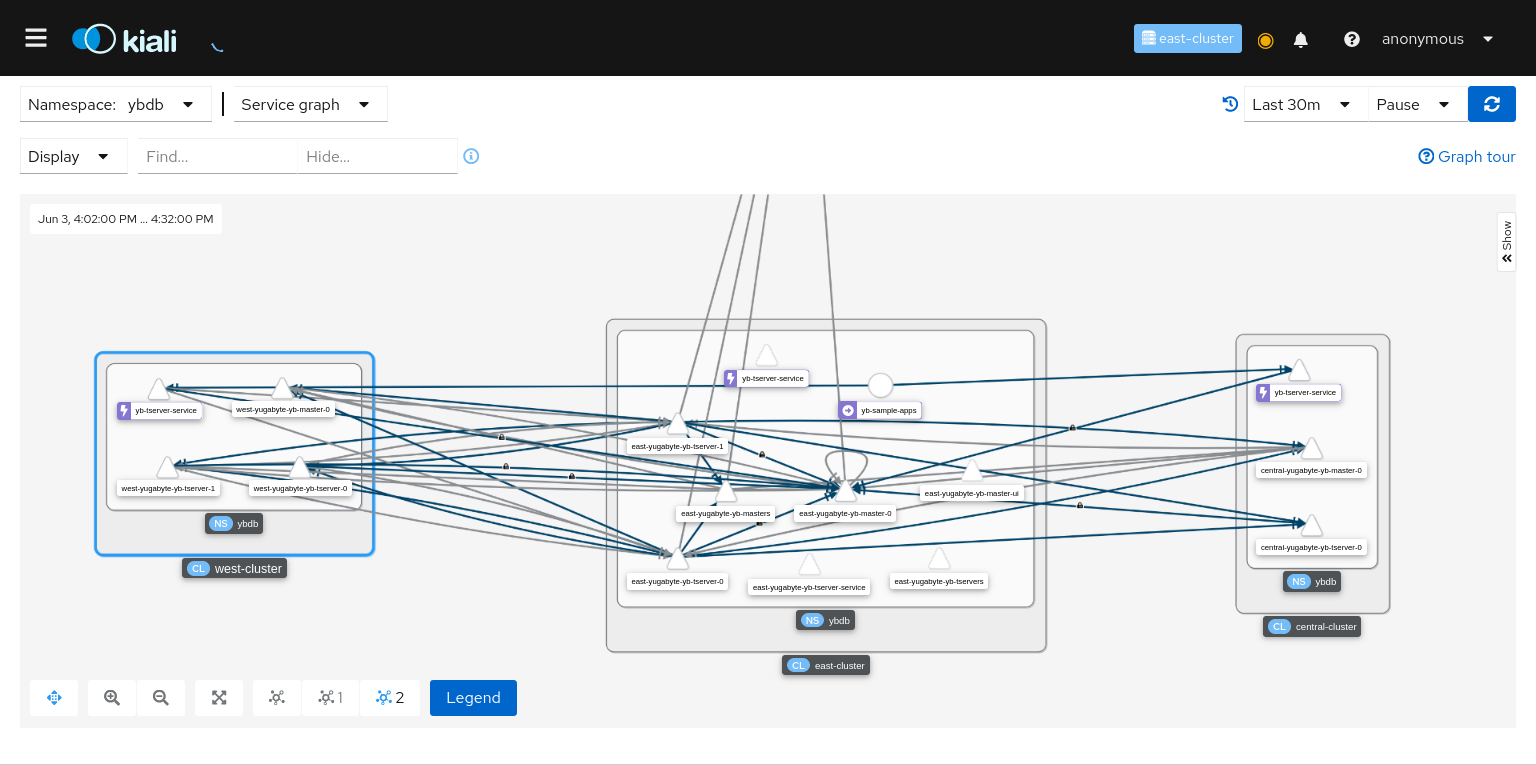
Go to Graph > Select ybdb and Service Graph from dropdown, and enable Cluster Boxes, Namespace Boxes, Idle Edges, and Idle Nodes from Display section. You will see a graph similar to this:
Next steps
This setup opens the door for you to try out other features of YugabyteDB. Some of them are specific to multi-region deployments:
- Row-level geo-partitioning
- Synchronous replication (3+ regions) in YSQL
- Explore multi-region deployment configurations
- Take a look at the Explore features section for more examples
You can also try Istio features on this setup:
(Optional) Cleaning up the resources
To delete all the resources that we created as part of this post, run the following commands. The resources to be cleaned up include Helm releases of YugabyteDB, the volumes created by the YugabyteDB chart, and everything installed by Istio.
# Delete YugabyteDB components
{
  for ctx in east west central; do
    echo -e "Delete YugabyteDB chart from ${ctx} .........\n"
    helm delete ${ctx} --namespace ybdb \
      --kube-context ${ctx}
    echo -e "-------------\n"

    echo -e "Delete volumes from ${ctx} .........\n"
    kubectl delete pvc --namespace ybdb \
      --selector component=yugabytedb,release=${ctx} \
      --context ${ctx}
    echo -e "-------------\n"

    echo -e "Delete namespace from ${ctx} .........\n"
    kubectl delete namespace ybdb \
      --context ${ctx}
    echo -e "-------------\n"
  done
}
# Delete the Istio components
{
  for ctx in east west central; do
    echo -e "Remove Istio from ${ctx} .........\n"
    istioctl x uninstall --purge -y --context ${ctx}
    echo -e "-------------\n"

    echo -e "Delete Prometheus and Kiali from ${ctx} .........\n"
    kubectl delete -f samples/addons/prometheus.yaml \
      --context ${ctx}
    kubectl delete -f samples/addons/kiali.yaml \
      --context ${ctx}
    echo -e "-------------\n"

    echo -e "Delete namespace from ${ctx} .........\n"
    kubectl delete namespace istio-system \
      --context ${ctx}
    echo -e "-------------\n"
  done
}
Conclusion
To summarize, in this blog post, we showed you how you can set up a multi-cluster Kubernetes environment spanning across multiple regions with the help of Istio. We walked you through the steps of installing YugabyteDB and Istio along with Kiali for observability. Make sure you read all the linked documentation pages from both Istio and Yugabyte to get a better understanding.
As always we are here to help and answer any questions you may have. Join us on our community Slack channel, and star us on GitHub.


