Better Developer Experience: Getting Started with YugabyteDB on Gitpod
February 24, 2022
Developer onboarding and experience gets simplified every day. But while developers use many modern software development techniques—including 12-factor, cloud native, and continuous integration—developer onboarding remains a challenge. Therefore, what developers need is an integrated, self-contained platform that helps them get started with ease.
Gitpod is one such way we can steer into that problem space to create a better developer experience. More specifically, Gitpod provides git-based, fully automated, integrated cloud-native development workflows with the prerequisites configured. This “GitDev” approach offers a preconfigured environment that seamlessly provides a consistent development environment for stream-aligned teams.
In this post, we’ll explore how to get started with YugabyteDB in a Gitpod-driven workspace covering the following workflows:
- Creating a single-node instance
- Creating a cluster with multiple nodes
- Customizing the cluster configuration
First steps
Gitpod is a configurable, ready-to-code cloud development environment accessible via a browser. A Gitpod workspace includes everything we need to develop, such as the Visual Studio Code editor, common languages, tools, and utilities. Instantly, this sets up a cloud-hosted, containerized, and customizable editing environment that is ready to go.
Gitpod doesn’t require anything other than a code editor and Git CLI on your local computer. Therefore, much of the development happens in the cloud through a web browser. But you can refer to the QuickStart section to get started with Gitpod.
We’ll use GitHub as our source code repository. For starters, create a new empty repository yb-git-pod and clone that to the local workstation.
| git clone https://github.com/[user]/yb-git-pod.git
You can find the complete code in this GitHub repository.
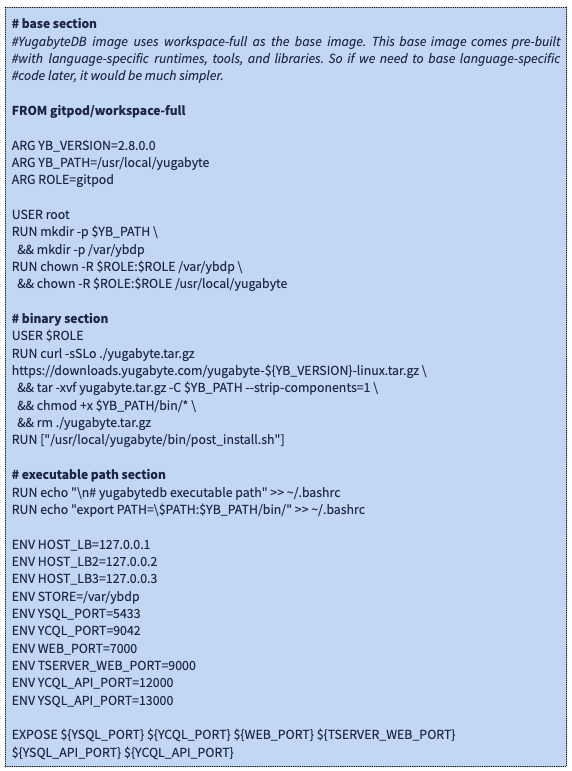
Creating the base image
Let’s make a new file—.gitpod.Dockerfile—inside the yb-git-pod directory we cloned to the local workstation. The content of the YugabyteDB Dockerfile is as follows:
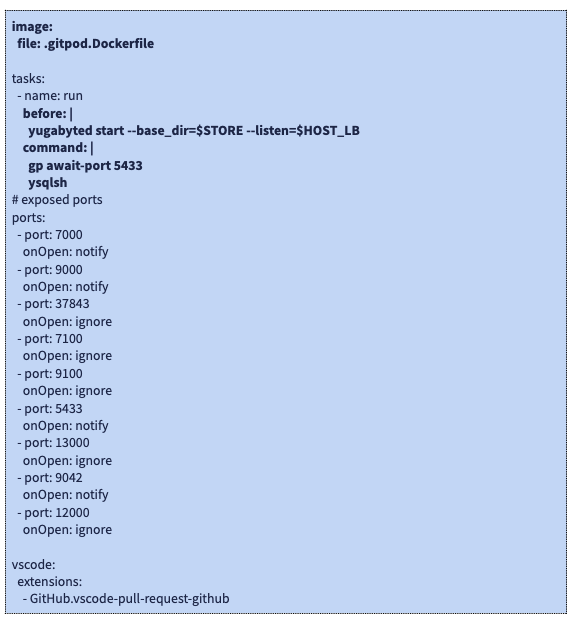
Creating a single-node instance
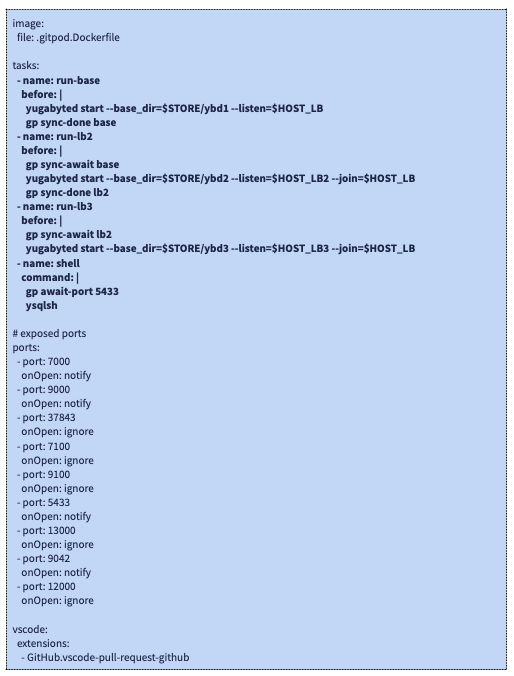
Next, let’s make a new file: .gitpod.yml. The content of this file is as follows:
Next, commit .gitpod.Dockerfile and .gitpod.yml to your GitHub repository. To initialize the Gitpod workspace, launch https://gitpod.io/#[REPO_URL] in a browser window. Replace [REPO_URL] with your repository URL.
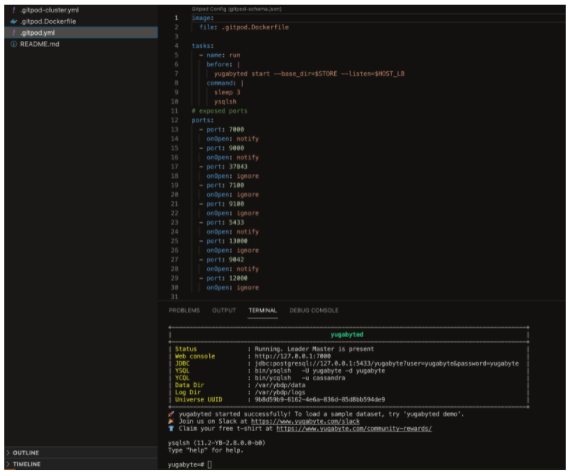
A Gitpod workspace gets created based on the definition of the .gitpod.yml file. The “yugabyted start” statement can be part of the “before” or “command” task. These two tasks get executed during the initial workspace creation and re-initialization phases. YugabyteDB starts during the initialization phase, and upon completion, a terminal launches with the ysql shell prompt.
Gitpod manages the exposed ports in the Dockerfile definition. Specifically, it automatically creates the port-forwarding rules. We will get links to access the Web-UI right from this same interface.
Creating a cluster with multiple nodes
We need to update .gitpod.yml with the following multi-node configuration. The complete multi-node configuration spec is available in the .gitpod-cluster.yml file in the repository.
Finally, commit .gitpod.yml with this updated configuration to your GitHub repository and re-initialize the Gitpod workspace https://gitpod.io/#[REPO_URL].
Specifically, this configuration will initialize a three-node cluster based on the loopback interface configuration. The node initialization is sequenced properly using gp sync-done and gp sync-await calls.
Customizing the cluster configuration
The following config builds on top of the previous cluster configuration, providing GFlags and cluster-configuration customization. However, we have configured the cluster with custom placement info in the below snippet. The complete multi-node custom configuration spec is available in the .gitpod-cluster-config.yml file in the repository.
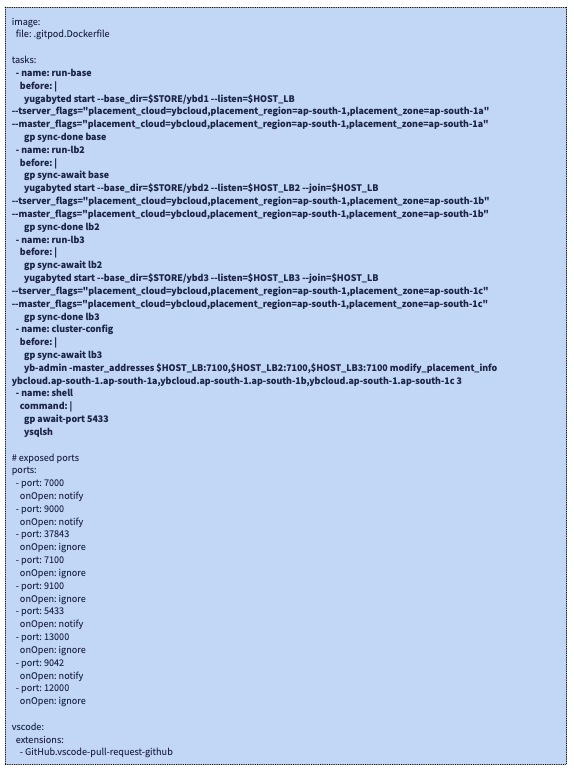
Finally, commit .gitpod.yml with this updated configuration to your GitHub repository and re-initialize the Gitpod workspace https://gitpod.io/#[REPO_URL].
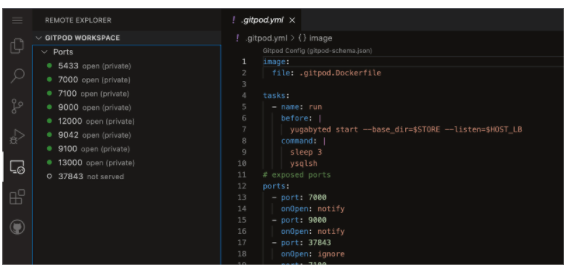
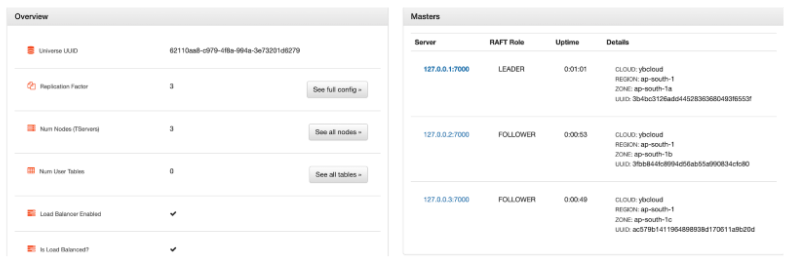
The Web-UI console now reflects the custom configuration changes, as illustrated below:
Conclusion
Additionally, you can check out this article to learn more about integrating microservices with a Gitpod-powered YugabyteDB workspace to improve developer experience. Specifically, we have a pull request submitted for a dedicated YugabyteDB base image for Gitpod.
Finally, if interested, you can follow this pull request to track our progress. Either way, we hope you give this short tutorial a shot.
Any questions? Let us know what you think in the YugabyteDB Community Slack channel.


