Getting Started with IntelliJ IDEA and Distributed SQL
September 29, 2020
IntelliJ IDEA is a popular integrated development environment (IDE) written in Java for developing software. It is developed by JetBrains and is available as an ache 2 licensed community edition and in a proprietary commercial edition. IntelliJ supports a variety of datasources within their IDE. Because YugabyteDB is PostgreSQL compatible, most third-party tools and apps will work “out of the box.” IntelliJ is no exception here.
In this blog post we’ll walk you though the following steps:
- Install a 3 node YugabyteDB cluster on Google Kubernetes Platform
- Install the Northwind sample database
- Configure IntelliJ to work with YugabyteDB
- Test out some basic IntelliJ database features with YugabyteD
Step 1: Install YugabyteDB on a GKE Cluster using Helm 3
In this section we are going to install YugabyteDB on the cluster. The complete steps are documented here. We’ll assume you already have a GKE cluster up and running as a starting point.
The first thing to do is to add the charts repository.
$ helm repo add yugabytedb https://charts.yugabyte.com
Now, fetch the updates.
$ helm repo update
Create a namespace. In this case we’ll call it yb-demo.
$ kubectl create namespace yb-demo
Expected output:
namespace/yb-demo created
We are now ready to install YugabyteDB. In the command below we’ll be specifying values for a resource constrained environment.
$ helm install yb-demo yugabytedb/yugabyte \
--set resource.master.requests.cpu=1,resource.master.requests.memory=1Gi,\
resource.tserver.requests.cpu=1,resource.tserver.requests.memory=1Gi,\
enableLoadBalancer=True --namespace yb-demo --wai
To check the status of the cluster, execute the below command:
$ kubectl get services --namespace yb-demo
![]()
Note the external-IP for yb-tserver-service which we are going to use to establish a connection between YugabyteDB and IntelliJ. From the screenshot above we can see that the IP is 35.224.XX.XX and the YSQL port is 5433.
Step 2: Create the Northwind sample database
The next step is to download a sample schema and data. You can find a variety of sample databases that are compatible with YugabyteDB in our Docs. For the purposes of this tutorial we are going to use the Northwind sample database. The Northwind database contains the sales data for a fictitious company called “Northwind Traders,” which imports and exports specialty foods from around the world. The Northwind database is an excellent tutorial schema for a small-business ERP, with customers, orders, inventory, purchasing, suppliers, shipping, employees, and single-entry accounting.
Connect to the yb-tserver-pod by running the following command:
$ kubectl exec -n yb-demo -it yb-tserver-0 /bin/bash
To download the schema and data files, run the following commands:
$ wget https://raw.githubusercontent.com/yugabyte/yugabyte-db/master/sample/northwind_ddl.sql
$ wget https://raw.githubusercontent.com/yugabyte/yugabyte-db/master/sample/northwind_data.sql
To connect to the YSQL service exit out of the pod shell and run the following command:
$ exit
$ kubectl exec -n yb-demo -it yb-tserver-0 -- ysqlsh -h yb-tserver-0.yb-tservers.yb-demo
Create a database and connect to it using the following commands:
yugabyte=# CREATE DATABASE northwind;
northwind=# \c northwind;
We can now create the database objects and load them with data using the files we downloaded to yb-tserver-pod using the following commands:
northwind=# \i 'northwind_ddl.sql';
northwind=# \i 'northwind_data.sql';
Verify that the tables are created by running the following command:
northwind-# \d

                 List of relations
 Schema |          Name          | Type  |  Owner
--------+------------------------+-------+----------
 public | categories             | table | yugabyte
 public | customer_customer_demo | table | yugabyte
 public | customer_demographics  | table | yugabyte
 public | customers              | table | yugabyte
 public | employee_territories   | table | yugabyte
 public | employees              | table | yugabyte
 public | order_details          | table | yugabyte
 public | orders                 | table | yugabyte
 public | products               | table | yugabyte
 public | region                 | table | yugabyte
 public | shippers               | table | yugabyte
 public | suppliers              | table | yugabyte
 public | territories            | table | yugabyte
 public | us_states              | table | yugabyte
(14 rows)
Verify we have data by issuing a simple SELECT:
northwind=# SELECT count(*) FROM products;
 count
-------
    77
(1 row)
By default, a YugabyteDB installation doesn’t have a password setup for the default yugabyte user. Specifying one is done the same way you’d do it in PostgreSQL.
northwind=# ALTER ROLE yugabyte WITH PASSWORD 'password';
Step 3: Configure IntelliJ to work with YugabyteDB
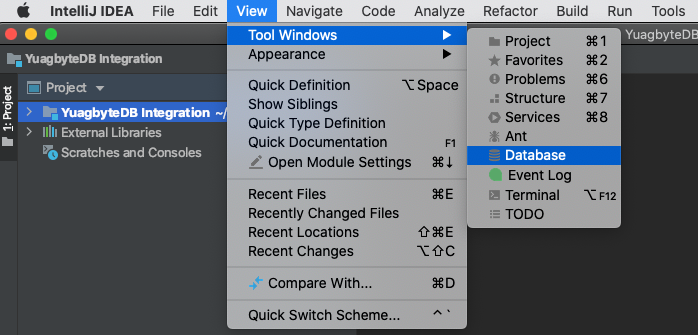
Launch the Database tool window. (View > Tool Windows > Database)
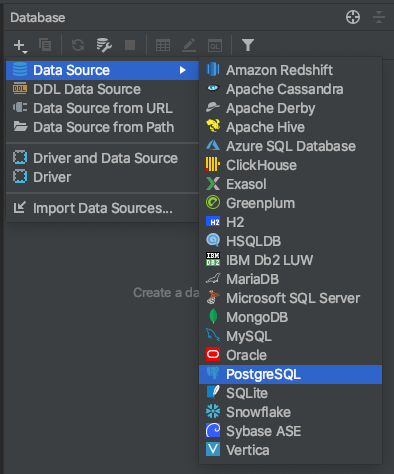
Add a PostgreSQL data source. (New (+) > Data Source > PostgreSQL)
On the General tab, enter your database’s connection string:
- Host: The external IP that GKE assigned to YugabyteDB in the previous step
- Port: YugabyteDB uses port 5433
- Database: For our purposes we’ll be connecting to
northwindsample database we created in the previous step - User: The default YugabyteDB user is
yugabyte - Password: We’ll use the password password, which we assigned to the default user in the previous step
- Driver: Select or install the latest PostgreSQL driver
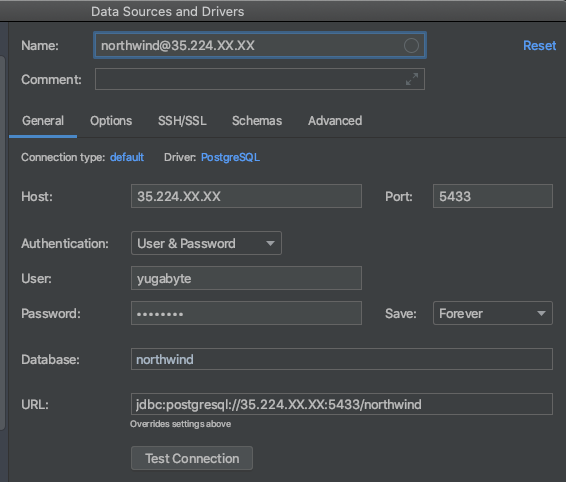
For good measure, make sure to test the connect before clicking “Ok.”
Step 4: Run a sample query
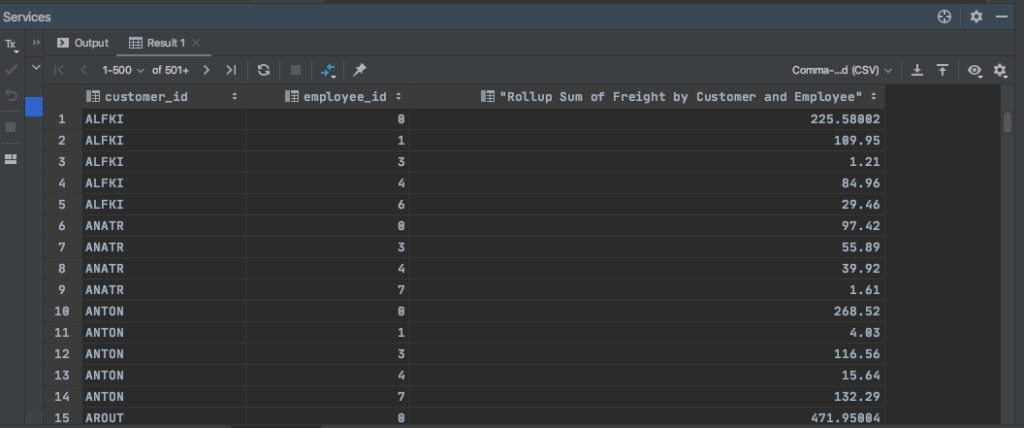
Next, let’s test the integration by executing the following query in IntelliJ.
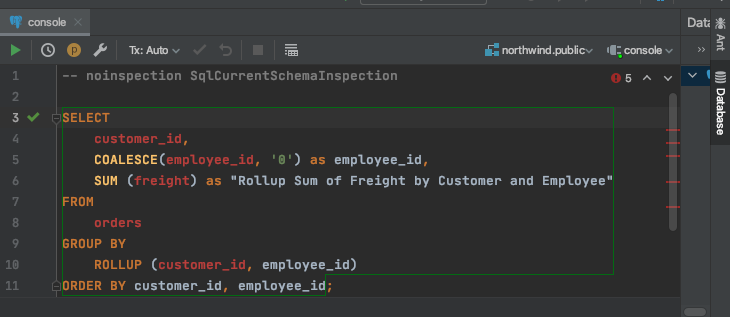
In the output window we should see the following result set.
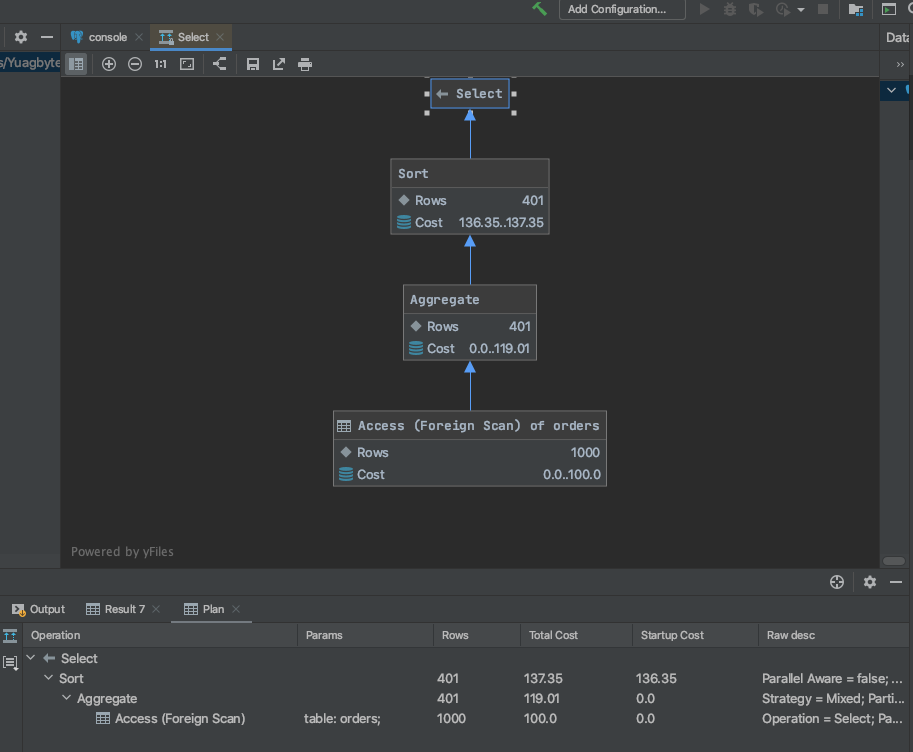
Step 5: Generate an EXPLAIN PLAN
IntelliJ has the built-in ability to generate EXPLAIN visualizations of your queries. For example, we can get the visualization for our last query by selecting Explain Plan > Show Visualization.
Note: Not all of IntelliJ’s database management features are supported with YugabyteDB. If you run into any issues, make sure to drop by our Slack channel and let us know, or you can always open up a GitHub issue.
Conclusion
That’s it! You now have a 3 node YugabyteDB cluster on GKE, with the sample Northwind database that you can develop against in IntelliJ. For more information about how to work with databases in IntelliJ, check out the IntelliJ documentation. For more 3rd party integrations that work with YugabyteDB, check out the YugabyteDB Documentation.


