Build a Retail Agent with MCP Toolbox, YugabyteDB, and Google ADK
October 30, 2025
This blog post outlines how you can integrate YugabyteDB‘s Retail Analytics sample dataset with an MCP server (Google’s MCP Toolbox for Databases).
We demonstrate how to define simple SQL tools using tools.yaml and illustrate how an Agent Development Kit (ADK) agent can discover and utilize these tools. All necessary files and a minimal ADK Python agent are provided, ready for you to copy, paste, and run locally.
Use this hands-on demo to build a smart retail analytics agent that:
- Runs on your laptop using YugabyteDB.
- Uses the MCP Toolbox to expose SQL queries as reusable tools.
- Let’s have a Google ADK agent use those tools to answer natural language queries like:
“How much did Alice spend?”
“Show me reviews for Rustic Paper Wallet.”
What is MCP?
MCP (Model Context Protocol) is an open standard that lets LLM-based agents discover and call external tools and data sources in a standardized, auditable way. Think of it as a USB-C port for AI agents to access files, databases, APIs, and more.
MCP makes tool discovery, streaming responses, and tool-driven workflows consistent across agent frameworks and servers.
MCP Toolbox for Databases (formerly “Gen AI Toolbox for Databases”) is an open-source MCP server focused on databases. It acts as a secure, production-worthy intermediary. It manages connection pooling, auth, observability, and exposes SQL operations as MCP tools that agents can call. Toolbox can run locally (binary or container) or be deployed to Cloud Run.
Why Use MCP Toolbox With ADK?
- Safety and observability: The Toolbox centralizes database access, allowing you to audit and trace agent database calls and avoid giving agents direct database credentials.
- Reusability: Define tools once (in
tools.yaml), and multiple agents and frameworks can reuse them. - Ease of integration: Google ADK can load tools from MCP servers and let your LLM pick when and which tools to call (ADK exposes an
MCPToolsethelper). This makes writing agent logic simpler.
What We Can Build With These Tools?
This developer demo provides details on:
- MCP Toolbox (container or binary) configured with a
tools.yamlfile to expose useful SQL operations such as searching products, getting reviews, listing orders, and placing orders. - A small Google ADK Python agent that connects to the MCP server, retrieves the tool list, and uses these tools to answer queries.
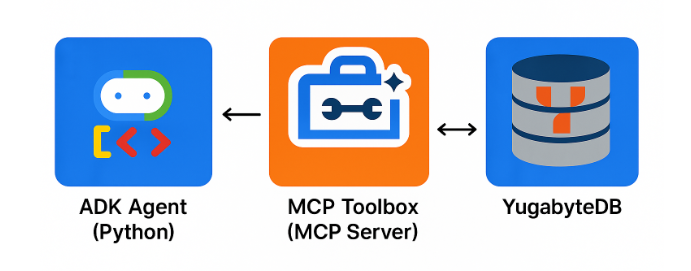
Architecture
ADK Agent (Python) ← MCP Toolbox (MCP server) ←→ YugabyteDB (products/users/orders/reviews)
Prerequisites
Minimum local tools:
- An up-and-running YugabyteDB cluster
- GenAI toolbox installed. See this page for installation options
- Python 3.9+ with
pip. - (Optional)
npx @modelcontextprotocol/inspector— MCP Inspector to browse and debug tools interactively. (Model Context Protocol)
Set up the Database
For this example, we use YugabyteDB’s retail analytics sample dataset. This dataset contains sample data across the following tables:
- Products: Contains product-related information.
- Users: Stores data about customers who have purchased products.
- Orders: Details customer orders.
- Reviews: Holds product review information.
To install the retail analytics dataset, execute the provided commands in your YSQL shell.
The necessary SQL scripts for Retail Analytics are located in the share folder of your YugabyteDB or client shell installation, and can also be found in the sample directory.
CREATE DATABASE analytics;
GRANT ALL ON DATABASE analytics to yugabyte;
\c analytics
\i share/schema.sql;
\i share/products.sql;
\i share/users.sql;
\i share/orders.sql;
\i share/reviews.sql;
Create a tools.yaml File
tools.yaml maps SQL operations to MCP tools. In this file, we mention the source type as yugabytedb and the connection parameters to connect to our database. We introduce two tools of the kind yugabytedb-sql — product insights by title and user purchase history.
sources:
  analytics-yb:
    kind: yugabytedb
    host: 127.0.0.1
    port: 5433
    database: analytics
    user: yugabyte
    password: yugabyte
    loadBalance: true
tools:
  product-insights-by-title:
    kind: yugabytedb-sql
    source: analytics-yb
    description: Given a product title, return its category, recent reviews, number of unique users who bought it,
      and the total revenue earned from it.
    parameters:
      - name: title
        type: string
        description: The product title (or part of it) to search for
    statement: |
      WITH prod AS (
        SELECT id, title, category
        FROM products
        WHERE title ILIKE '%' || $1 || '%'
        LIMIT 1
      ),
      orders_summary AS (
        SELECT
          o.product_id,
          COUNT(DISTINCT o.user_id) AS buyers_count,
          SUM(o.total) AS total_revenue
        FROM orders o
        JOIN prod p ON p.id = o.product_id
        GROUP BY o.product_id
      ),
      reviews_data AS (
        SELECT
          r.product_id,
          json_agg(json_build_object(
            'reviewer', r.reviewer,
            'rating', r.rating,
            'body', r.body,
            'created_at', r.created_at
          ) ORDER BY r.created_at DESC) AS reviews
        FROM reviews r
        JOIN prod p ON p.id = r.product_id
        GROUP BY r.product_id
      )
      SELECT
        p.title,
        p.category,
        COALESCE(o.buyers_count, 0) AS buyers_count,
        COALESCE(o.total_revenue, 0) AS total_revenue,
        COALESCE(r.reviews, '[]') AS reviews
      FROM prod p
      LEFT JOIN orders_summary o ON p.id = o.product_id
      LEFT JOIN reviews_data r ON p.id = r.product_id;
  user-purchase-history:
    kind: yugabytedb-sql
    source: analytics-yb
    description: Given a user name, return the list of products they purchased (title, quantity, spend per product)
      and their overall total spend.
    parameters:
      - name: username
        type: string
        description: The full or partial name of the user
    statement: |
      WITH usr AS (
        SELECT id, name
        FROM users
        WHERE name ILIKE '%' || $1 || '%'
        LIMIT 1
      ),
      purchases AS (
        SELECT
          p.title,
          SUM(o.quantity) AS total_quantity,
          SUM(o.total) AS total_spent
        FROM orders o
        JOIN products p ON o.product_id = p.id
        JOIN usr u ON u.id = o.user_id
        GROUP BY p.title
      )
      SELECT
        u.name,
        json_agg(json_build_object(
          'product', p.title,
          'quantity', p.total_quantity,
          'spent', p.total_spent
        )) AS products,
        SUM(p.total_spent) AS overall_spent
      FROM usr u
      LEFT JOIN purchases p ON true
      GROUP BY u.name;
toolsets:
  analytics-tools:
    - product-insights-by-title
    - user-purchase-history
Start the MCP server with this command:
./toolbox --tools-file "tools.yaml"
You will see the following output:
2025-09-25T15:52:14.777257+05:30 INFO "Initialized 1 sources."
2025-09-25T15:52:14.777327+05:30 INFO "Initialized 0 authServices."
2025-09-25T15:52:14.777355+05:30 INFO "Initialized 2 tools."
2025-09-25T15:52:14.777377+05:30 INFO "Initialized 2 toolsets."
2025-09-25T15:52:14.777868+05:30 INFO "Server ready to serve!"
At this point, you can run the MCP Inspector to interact with and validate your tools. Follow the steps listed here to use MCP Inspector.
Connecting Your Agent to the Tools
Below is a minimal ADK agent that fetches tools from the MCP server and uses them.
Install the Agent Development Kit (ADK)
Open a new terminal tab and create a folder named my-agents as follows. Navigate to the my-agents folder.
mkdir my-agents
cd my-agents
Create and activate a virtual Python environment using venv as follows:
python -m venv .venv
source .venv/bin/activate
Install the ADK and the MCP Toolbox for Databases packages along with the LangChain dependency as follows:
pip install google-adk toolbox-core
You will now be able to invoke the ADK utility as follows.
Creating our first Agent Application
We will now use ADK to create a scaffolding for our Retail Agent Application using the ADK create command, with the app name ‘retail-agent-app’, as shown below. You need an existing Google Cloud account and project – check out this link for details
adk create retail-agent-app
You need to make the following selections:
- A model for the root agent – Select Gemini.
- A backend – Select Vertex AI.
- The Google Project ID and region – Select the default.
Choose a model for the root agent:
1. gemini-2.5-flash
2. Other models (fill later)

Choose model (1, 2): 1
1. Google AI
2. Vertex AI
Choose a backend (1, 2): 2

You need an existing Google Cloud account and project, check out this link for details:
https://google.github.io/adk-docs/get-started/quickstart/#gemini---google-cloud-vertex-ai

Enter Google Cloud project ID [YOUR_PROJECT_ID]:
Enter Google Cloud region [us-central1]:

Agent created in <YOUR_HOME_FOLDER>/my-agents/retail-agent-app:
- .env
- __init__.py
- agent.py
This will also create the __init__.py file, which marks the folder as a module and contains a single statement that imports the agent from the agent.py file.
from . import agent
Now replace the contents of agent.py. Here, we initialize an LLM agent and load the MCP toolset defined in the tools.yaml file. The tools will be used by the LLM agent to answer user questions:
from google.adk.agents.llm_agent import Agent

root_agent = Agent(
    model='gemini-2.5-flash-lite',
    name='root_agent',
    description='A helpful assistant for user questions.',
    instruction='Answer user questions to the best of your knowledge',
)

from google.adk.agents import Agent
from toolbox_core import ToolboxSyncClient

toolbox = ToolboxSyncClient("http://127.0.0.1:5000")

# Load all the tools
tools = toolbox.load_toolset('analytics-tools')

root_agent = Agent(
    name="retail_agent",
    model="gemini-2.5-flash-lite",
    description=(
        "Agent to answer questions about products or users by name."
    ),
    instruction=(
        '''You are an AI assistant connected to a YugabyteDB database via the MCP Toolbox.
You have access to two SQL tools defined in tools.yaml.
Always use these tools to answer user questions, never invent SQL on your own.

Available tools:
1. product-insights-by-title
   - Input: product title (or part of it).
   - Output: product category, list of reviews, number of unique buyers, and total revenue.

2. user-purchase-history
   - Input: user name (or part of it).
   - Output: list of purchased products (with quantity and spend per product) and the user’s overall spend.

Instructions:
- If the user asks about a product (its sales, reviews, buyers, or revenue), call **product-insights-by-title** with the product name.
- If the user asks about a customer (what they bought or how much they spent), call **user-purchase-history** with the user’s name.
- If the question is unclear, ask a clarifying question.
- Always return clean, structured, and concise results to the user, using the tool outputs directly.

Example:
User: "How much did Alice spend and what did she buy?"
Agent: Use `user-purchase-history` with `username = Alice`.

User: "Show me reviews and revenue for iPhone."
Agent: Use `product-insights-by-title` with `title = iPhone`.
'''
    ),
    tools=tools,
)
Run the agent from the parent directory my-agents with the following command:
adk web
You will see the following output on the terminal:
INFO:     Started server process [94773]
INFO:     Waiting for application startup.
+-----------------------------------------------------------------------------+
| ADK Web Server started                                                      |
|                                                                             |
| For local testing, access at http://127.0.0.1:8000.                         |
+-----------------------------------------------------------------------------+
INFO:     Application startup complete.
INFO:     Uvicorn running on http://127.0.0.1:8000 (Press CTRL+C to quit)
Output
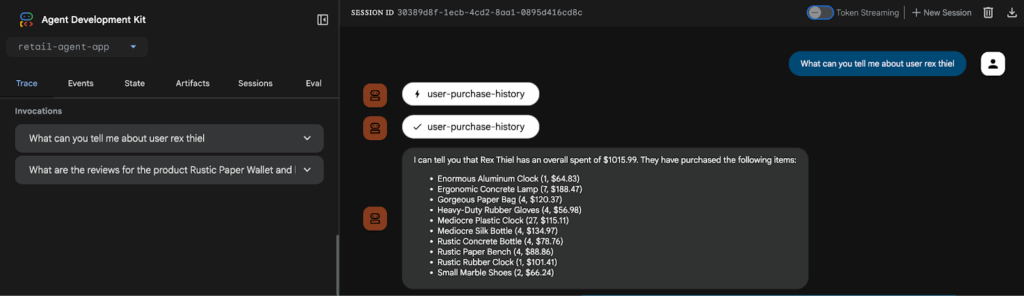
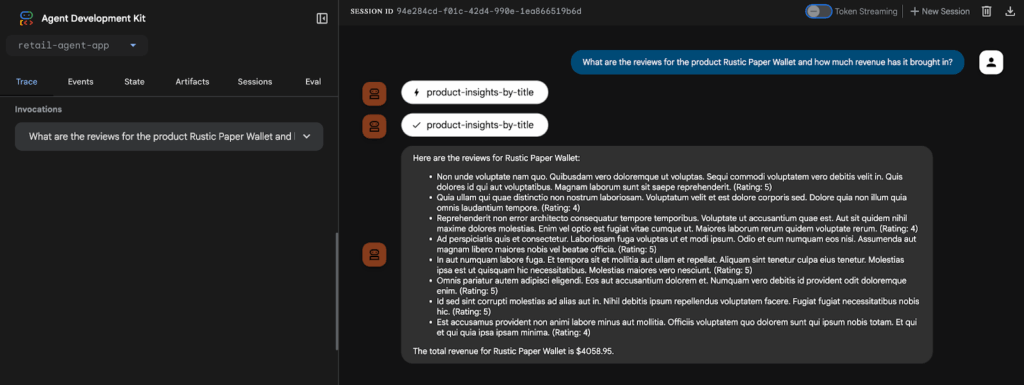
Go to the http://127.0.0.1:8000 endpoint on your browser, and you can interact with your agent.
Prompt 1: What can you tell me about the user Rex Thiel?
Agent output:
Prompt 2: What are the reviews for the product Rustic Paper Wallet, and how much revenue has it brought in?
Agent output:
Conclusion
This blog provides all the components you need to run a practical, small-scale shopping agent:
- A YugabyteDB database pre-populated with your schema and sample data.
- A
tools.yamlfile that exposes SQL endpoints as MCP tools. - A Toolbox running locally.
- An ADK agent that automatically discovers and invokes these tools.
Here are some potential next steps to further enhance your agent:
- Enhance Authentication: Implement robust authentication using Cloud Run, Secret Manager, and service accounts. (Refer to Google APIs for deployment details.)
- Develop More Complex Tools: Explore adding tools with advanced features such as parameter validation, transaction support, or stored procedures.
- Integrate Observability: Enable OpenTelemetry/tracing in Toolbox and collect tool-call logs for audit and monitoring purposes. (Refer to Google APIs for introduction details.)
Want to know more about the YugabyteDB MCP Server? Check out this recent blog, which demonstrates how MCP allows an AI application to access, query, analyze, and interpret data in your YugabyteDB database, using only natural language prompts.


