Build Applications Using Azure App Service and YugabyteDB
October 26, 2023
In this tutorial, we’ll walk you through the steps to build and deploy a scalable web application using YugabyteDB and Azure App Service.
Deploying to Azure App Service allows developers to leverage cloud infrastructure and build more scalable and available applications. Connecting these applications to YugabyteDB extends this scalability and reliability into the data layer!
Keep reading this blog where we’ll:
- Examine YB Shoes, a sample eCommerce dashboard application
- Create a web application on Azure App Service
- Provision a database cluster on YugabyteDB Managed and seed it with data
- Deploy YB Shoes to Azure App Service from a local repository
Let’s start by introducing YB Shoes and its functionality.
Introducing YB Shoes
First, visit GitHub for the web application we will deploy to Azure App Service.
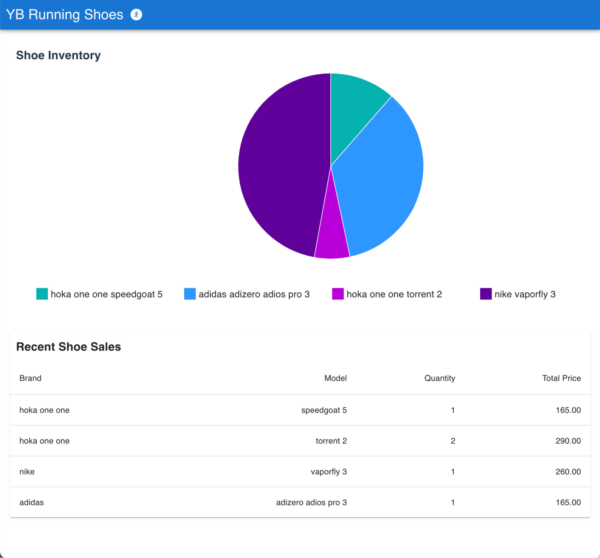
Our application, YB Shoes, presents an eCommerce dashboard displaying current shoe inventory and recent sales. YB Shoes is backed by a Node.js server, which connects to YugabyteDB Managed. The queried inventory and sales data is displayed on a ReactJS frontend.
Here’s the application in action, after deploying to Azure App Service.
How to Get Started on Azure App Service
With Azure App Service, developers can deploy applications in a variety of programming languages and application architectures. For YB Shoes, we will create a web app using Node.js.
From the Azure portal, create a web app with Node.js as the runtime stack. This allows Azure to configure the runtime environment with Node.js and the dependencies required to run our application.
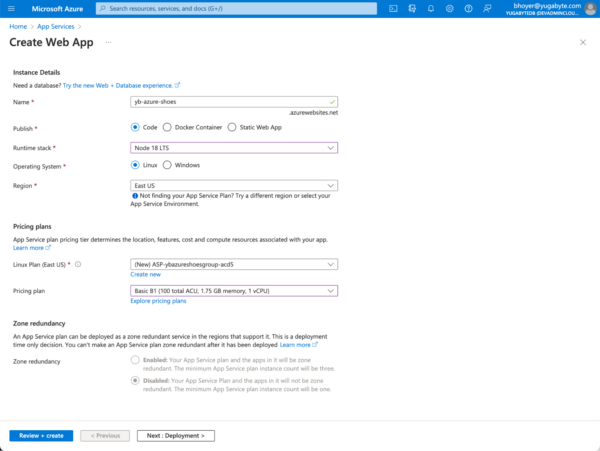
We will deploy our application to Azure from a local repository on our machine so we can forego all settings related to continuous deployment and GitHub Actions. However, for production applications, these integrations significantly improve the development process by deploying applications to Azure automatically when the repository is updated, without manual intervention.
By selecting a free or basic tier of Azure App Service, we will also deploy our application to a single zone by default. Premium pricing plans allow for multi-zone deployments for increased availability.
After creating your application, visit the associated URL to confirm it’s up and running!

Now that we’ve set the foundation on Azure, let’s deploy a database cluster for YB Shoes on YugabyteDB Managed.
Get Started on YugabyteDB Managed
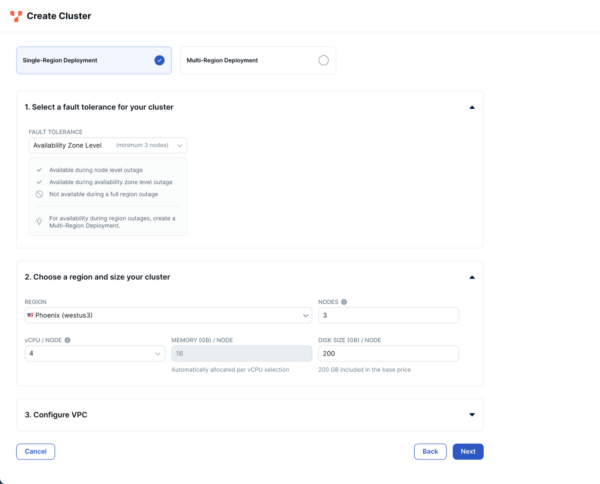
Visit our documentation site to create a YugabyteDB cluster on Azure.
I’ve chosen to deploy a three-node cluster to Azure in the WestUS3 region. This configuration provides fault tolerance across availability zones. However, you can start with an always-free single-node cluster.
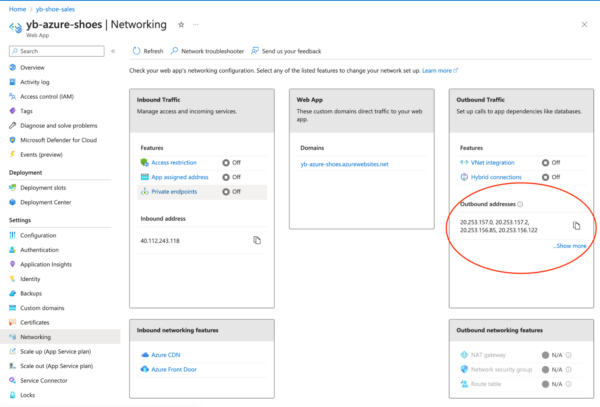
Add the outbound addresses for your web app, which can be found in the networking tab of the Azure portal. This will ensure that a connection can be made between Azure App Service and YugabyteDB.
Now that we have a working cluster in YugabyteDB Managed, let’s add some data.
Add Data to YugabyteDB
Now that our cluster is running in the cloud, we can seed it with data using the provided `schema.sql` and `data.sql` files.
- Use the YugabyteDB Cloud Shell to connect to your cluster.
- Execute the `schema.sql` script against your cluster.
- Execute the `data.sql` script against your cluster.
Now that your cluster is seeded with data, it’s time to deploy and run the application on Azure.
Deploy YB Shoes to Azure App Service
Azure provides multiple deployment methods for your applications.
Since we’ll deploy our application from a local git repository, let’s use the Azure CLI. It’s also worth noting that Azure has a powerful extension for Visual Studio Code, that can execute the same commands.
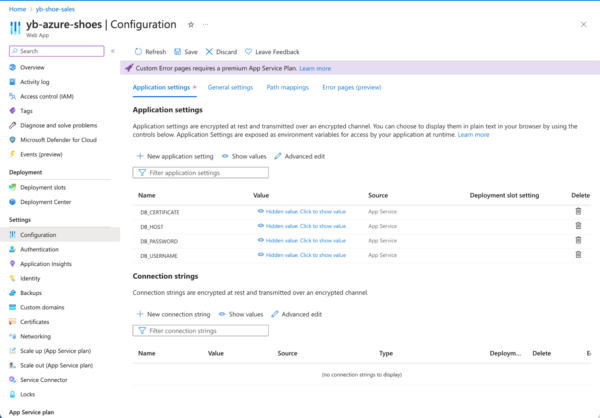
First, we need to configure our application settings in Azure.
# Convert the downloaded CA certificate from YugabyteDB Managed to a single line string, then Base64 encode it
# Azure Configuration Settings forbid special characters, so this ensures the cert can be passed properly to our application
# Tip: Run this command to convert cert file to base64 encoded single line string:
# cat /path/to/cert/file | base64

% az webapp config appsettings set -g GROUP_NAME -n APPLICATION_NAME --setting DB_HOST=[YB_DB_HOST] DB_USERNAME=admin DB_PASSWORD=[YB_DB_PASSWORD] DB_CERTIFICATE=[BASE_64_ENCODED_DB_CERTIFICATE]
Once you execute this command, you can view the configuration settings in the Azure web portal.
Next, we’ll use the Azure CLI to deploy our application code to the cloud.
- Install the Azure CLI.
- In the Azure Deployment Center, configure your Local Git / FTPS Credentials under User Scope
- Configure the project for local git deployment.
% az webapp deployment source config-local-git --name APPLICATION_NAME --resource-group RESOURCE_GROUP # output will contain git URL, i.e. { "url": "https://bhoyer@yb-shoe-sales.scm.azurewebsites.net/yb-shoe-sales.git" } - Set git remote for Azure using the URL from previous output.
% git remote add azure https://bhoyer@yb-shoe-sales.scm.azurewebsites.net/yb-shoe-sales.git
- Push to the Azure remote.
git push azure main:master
After pushing code to the remote repository, Azure will automatically build and publish the application. Once complete, visit your application’s default domain to view YB Shoes, running in the Azure cloud infrastructure!
Wrapping up
As you’ve seen, moving our application to the cloud with Azure App Service and YugabyteDB Managed didn’t require much additional configuration. For further insight into building Node.js applications with YugabyteDB, check out the following blog:


