Data Streaming Using YugabyteDB CDC, Kafka, and SnowflakeSinkConnector
August 16, 2022
YugabyteDB is a high-performance, transactional distributed database for cloud-native applications. Change data capture (CDC) in YugabyteDB ensures that data changes (inserts, updates, and deletions) are identified, captured, and automatically applied to another data repository instance, or made available for consumption by applications and tools.
Snowflake is a cloud-based data warehousing and analytics service.
In this blog, we explore how to stream data from YugabyteDB’s Change Data Capture feature to Snowflake using SnowflakeSinkConnector on Confluent Cloud via Kafka connect.
Environment
- Cloud: AWS
- Snowflake: Standard Edition
- Kafka: 3.2.0
- Docker: 20.10.17
Here we have created a table student with three columns – id, name, and marks. We can use this table to stream into the Snowflake sink using YugabyteDB CDC.
CREATE TABLE STUDENT(id int primary key, name text, marks int);
yugabyte=# \d student
                     Table "public.student"
 Column |  Type   | Collation | Nullable |       Default
--------+---------+-----------+----------+----------------------
 id     | integer |           | not null |
 name   | text    |           |          | 'default_name'::text
 marks  | integer |           |          | 0
Indexes:
    "student_pkey" PRIMARY KEY, lsm (id HASH)
Configuring Kafka Sink on Confluent Cloud
Log in to https://confluent.cloud/login
Go to “Environments”.
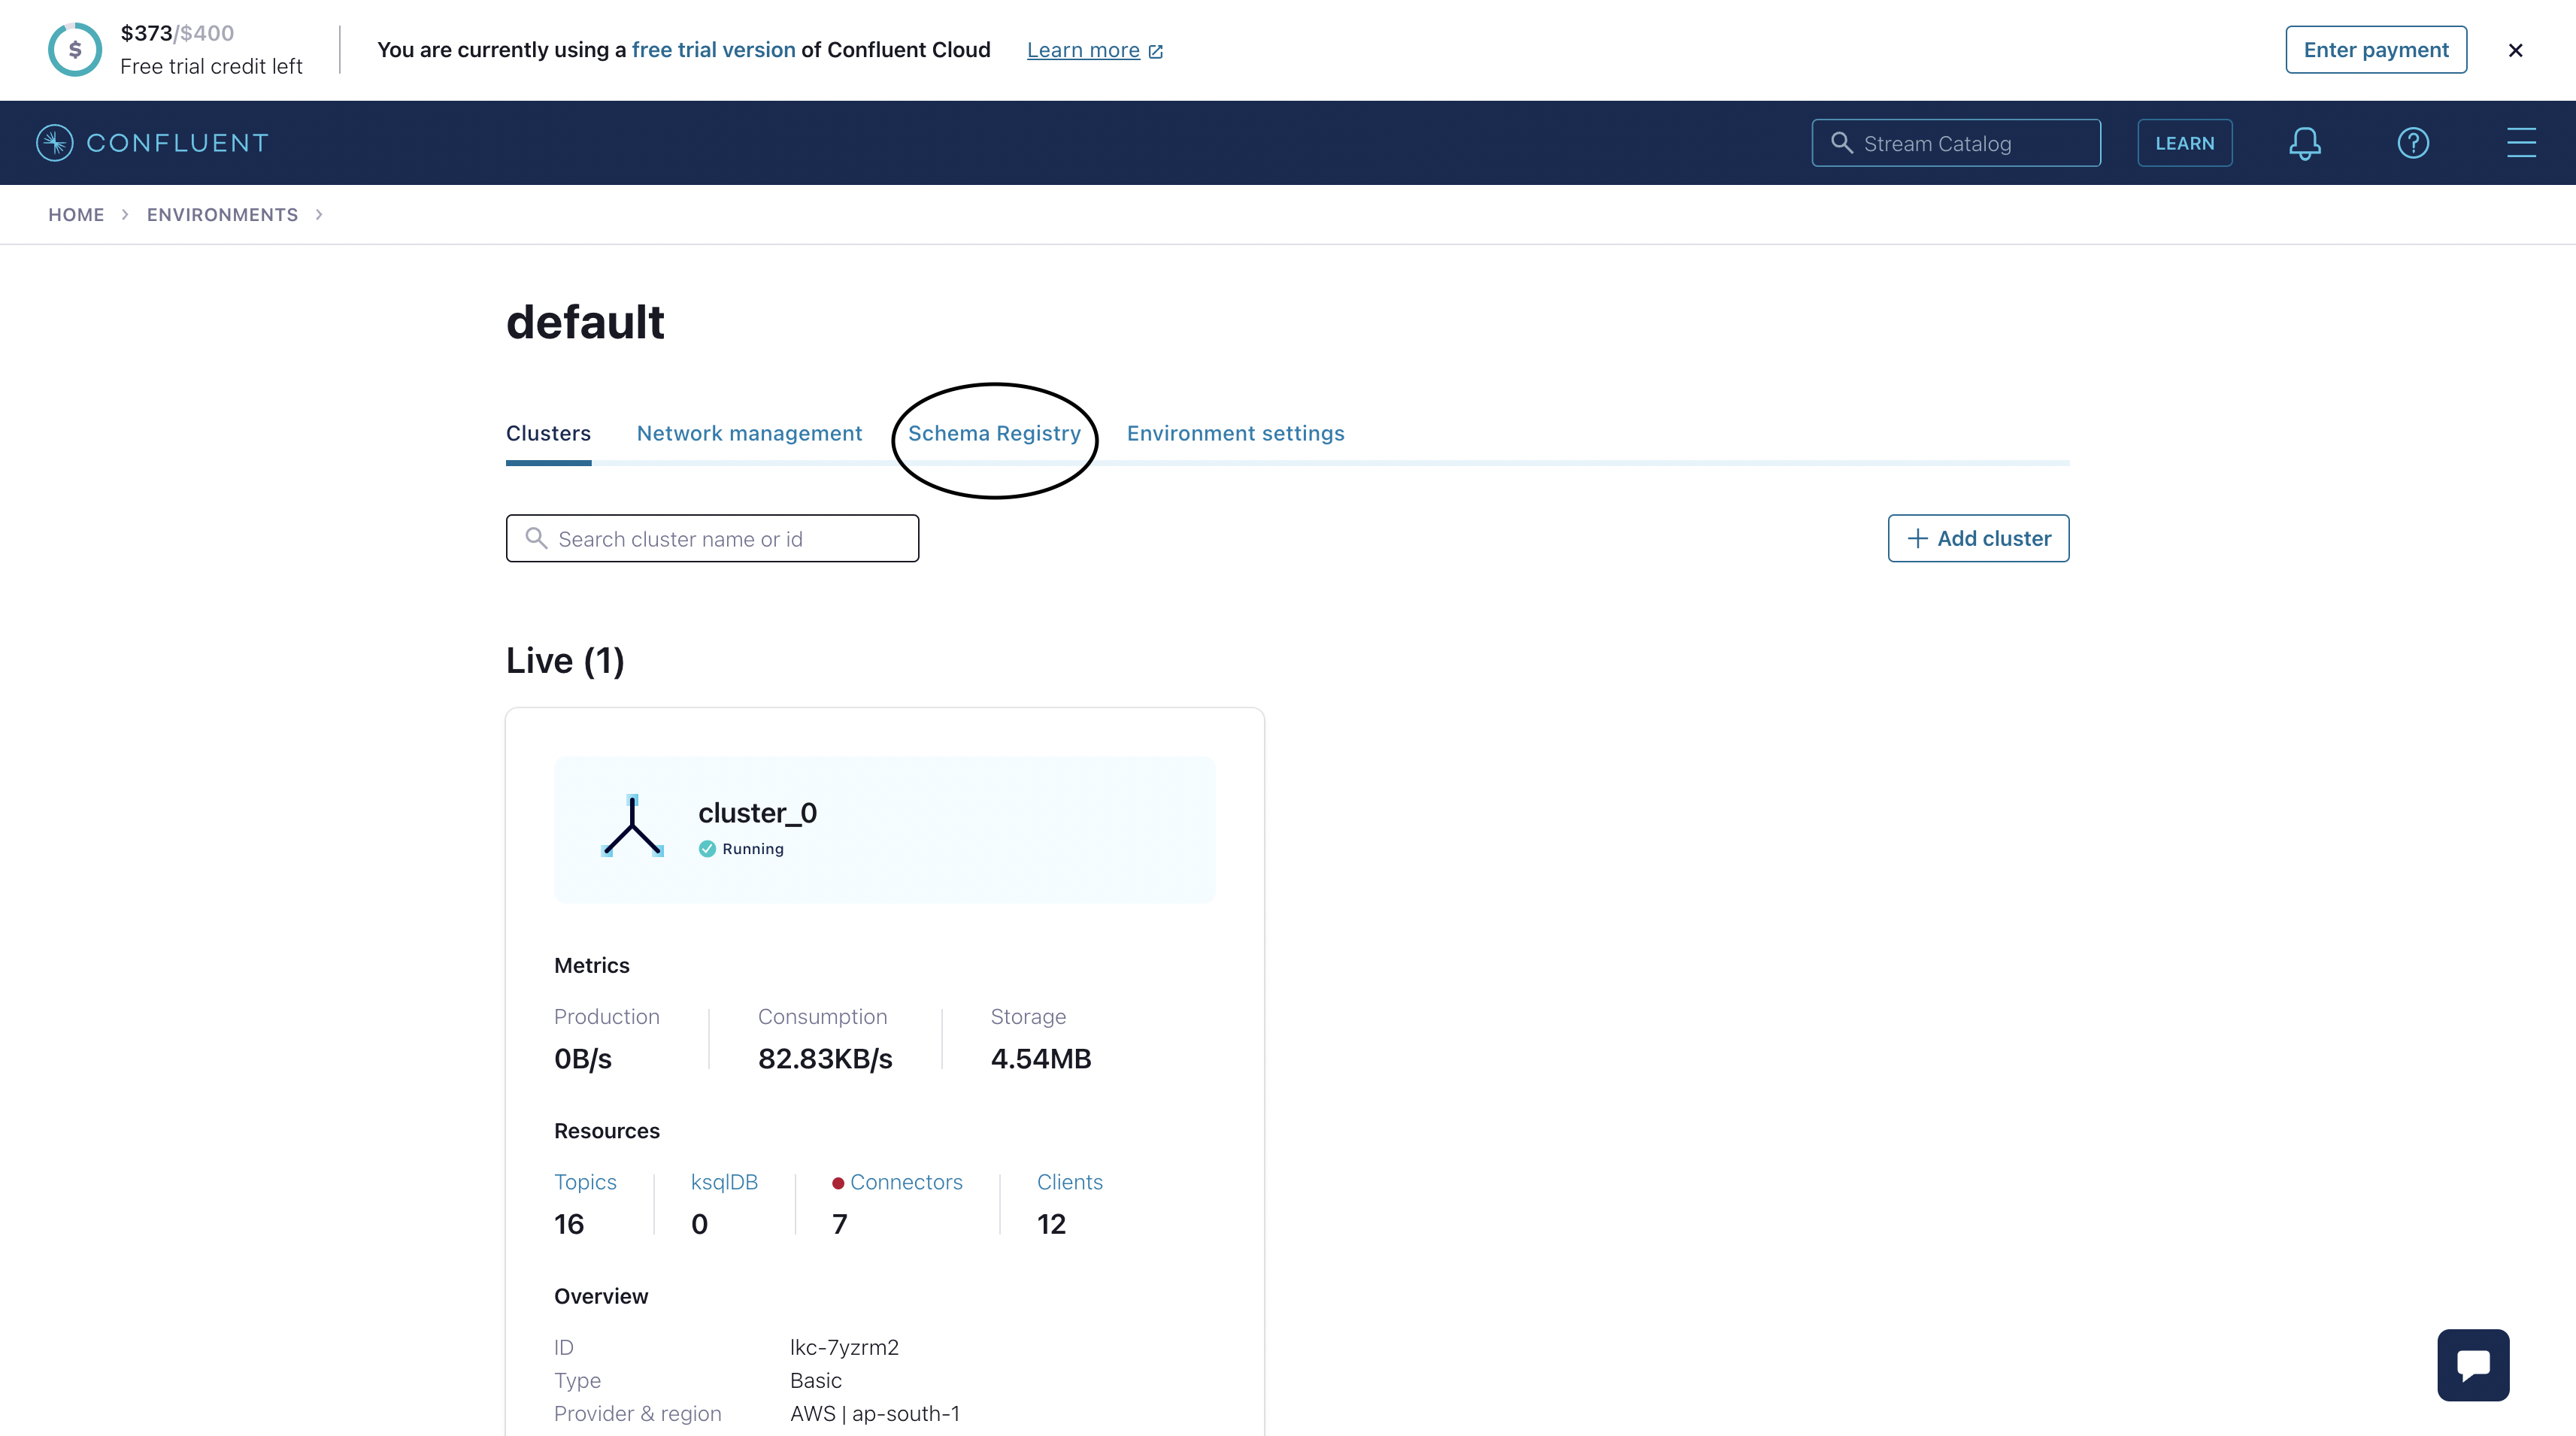
Select your cluster or create a new one.On this page, go to Schema Registry and enable it. This is required for Schema Registry-based formats (for example, Avro, JSON_SR (JSON Schema), or Protobuf). After this go to your cluster.

From this page go to Data Integration-> Clients-> New Client ->Java Client.Here you need to click on Create Kafka Cluster API Key, download and continue.
Use these credentials to configure your Kafka Connect.
Once this is done, from the left panel click on topics. Here you can create a new topic, where your kafka connect will send the messages. The convention for naming the topic is <database.server.name>.<table.include.list> (see section 3.4) I named my topic “topic4.public.student”.
When the topic is created, you can start connecting YugabyteDB.
Connecting YugabyteDB to Kafka Topic on Confluent Cloud
There are two ways to connect YugabyteDB to Kafka Topic on Confluent Cloud.
- Kafka Connect
- CDCSDK server
Here use Kafka connect.
To stream data from YugabyteDB to Snowflake we first need to connect to a Kafka topic on Confluent cloud.
We will use docker for this, so ensure you have docker and docker-compose installed.
Download the YugabyteDB Debezium Connector .jar file
Create a directory. Inside this directory download the YugabyteDB Debezium Connector jar file, using this command:
wget https://github.com/yugabyte/debezium-connector-yugabytedb/releases/download/v1.7.0.8-BETA/debezium-connector-yugabytedb-1.7.0.8-BETA.jar
Creating a Dockerfile
Now, create a Docker file using:
vi Dockerfile
Add these contents to the docker file you just created:
FROM confluentinc/cp-kafka-connect-base:6.0.1

COPY debezium-connector-yugabytedb-1.7.0.8-BETA.jar /usr/share/java/kafka
Creating an Image
Create an image by running this command:
docker build . -t <image-name>
Creating the docker-compose File
Create a file named docker-compose.yaml
vi docker-compose.yaml
Add the lines given below to this file and ensure you add your appropriate <stream-id>, <user-name>, <password>, <bootstrap-server>, and <host-IP>. The <user-name> is your API key and the <password> is your API secret. Both are obtained from Confluent cloud.
version: '3'
services:
 kafka-connect-ccloud:
   image: <image-name>
   container_name: kafka-connect-ccloud
   ports:
     - 8083:8083
   environment:
     CONNECT_LOG4J_APPENDER_STDOUT_LAYOUT_CONVERSIONPATTERN: "[%d] %p %X{connector.context}%m (%c:%L)%n"
     CONNECT_CUB_KAFKA_TIMEOUT: 300
     CONNECT_BOOTSTRAP_SERVERS: "<bootstrap-server>"
     CONNECT_REST_ADVERTISED_HOST_NAME: 'kafka-connect-ccloud'
     CONNECT_REST_PORT: 8083
     CONNECT_GROUP_ID: kafka-connect-group-01-v04
     CONNECT_CONFIG_STORAGE_TOPIC: _kafka-connect-group-01-v04-configs
     CONNECT_OFFSET_STORAGE_TOPIC: _kafka-connect-group-01-v04-offsets
     CONNECT_STATUS_STORAGE_TOPIC: _kafka-connect-group-01-v04-status
     CONNECT_KEY_CONVERTER: org.apache.kafka.connect.json.JsonConverter
     CONNECT_VALUE_CONVERTER: org.apache.kafka.connect.json.JsonConverter
     CONNECT_LOG4J_ROOT_LOGLEVEL: 'INFO'
     CONNECT_LOG4J_LOGGERS: 'org.apache.kafka.connect.runtime.rest=WARN,org.reflections=ERROR'
     CONNECT_CONFIG_STORAGE_REPLICATION_FACTOR: '3'
     CONNECT_OFFSET_STORAGE_REPLICATION_FACTOR: '3'
     CONNECT_STATUS_STORAGE_REPLICATION_FACTOR: '3'
     CONNECT_PLUGIN_PATH: '/usr/share/java,/usr/share/confluent-hub-components/'
     # Confluent Cloud config
     CONNECT_REQUEST_TIMEOUT_MS: "20000"
     CONNECT_RETRY_BACKOFF_MS: "500"
     CONNECT_SSL_ENDPOINT_IDENTIFICATION_ALGORITHM: "https"
     CONNECT_SASL_MECHANISM: "PLAIN"
     CONNECT_SECURITY_PROTOCOL: "SASL_SSL"
     CONNECT_SASL_JAAS_CONFIG: "org.apache.kafka.common.security.plain.PlainLoginModule required username=\"<username>\" password=\"<password>\";"
     #
     CONNECT_CONSUMER_SECURITY_PROTOCOL: "SASL_SSL"
     CONNECT_CONSUMER_SSL_ENDPOINT_IDENTIFICATION_ALGORITHM: "https"
     CONNECT_CONSUMER_SASL_MECHANISM: "PLAIN"
     CONNECT_CONSUMER_SASL_JAAS_CONFIG: "org.apache.kafka.common.security.plain.PlainLoginModule required username=\"<username>\" password=\"<password>\";"
     CONNECT_CONSUMER_REQUEST_TIMEOUT_MS: "20000"
     CONNECT_CONSUMER_RETRY_BACKOFF_MS: "500"
     #
     CONNECT_PRODUCER_SECURITY_PROTOCOL: "SASL_SSL"
     CONNECT_PRODUCER_SSL_ENDPOINT_IDENTIFICATION_ALGORITHM: "https"
     CONNECT_PRODUCER_SASL_MECHANISM: "PLAIN"
     CONNECT_PRODUCER_SASL_JAAS_CONFIG: "org.apache.kafka.common.security.plain.PlainLoginModule required username=\"<username>\" password=\"<password>\";"
     CONNECT_PRODUCER_REQUEST_TIMEOUT_MS: "20000"
     CONNECT_PRODUCER_RETRY_BACKOFF_MS: "500"
   command:
     - bash
     - -c
     - |
       echo "Launching Kafka Connect worker"
       /etc/confluent/docker/run &
       #
       echo "Waiting for Kafka Connect to start listening on localhost:8083 ⏳"
       while : ; do
           curl_status=$(curl -s -o /dev/null -w %{http_code} https://localhost:8083/connectors)
           echo -e $(date) " Kafka Connect listener HTTP state: " $curl_status " (waiting for 200)"
           if [ $curl_status -eq 200 ] ; then
           break
           fi
           sleep 5
       done
       echo -e "\n--\n+> Creating Kafka Connect source connectors"
       curl -s -X PUT -H  "Content-Type:application/json" \
       https://localhost:8083/connectors/ybconnector1/config \
           -d '{
             "tasks.max":"1",
             "connector.class": "io.debezium.connector.yugabytedb.YugabyteDBConnector",
             "database.hostname":"<host-IP>",
             "database.master.addresses":"<host-IP>:7100",
             "database.port":"5433",
             "database.user": "yugabyte",
             "database.password":"yugabyte",
             "database.dbname":"yugabyte",
             "database.server.name": "dbserver",
             "snapshot.mode":"never",
             "table.include.list":"public.test",
             "database.streamid":"<stream-ID>"
           }'
       #
       sleep infinity
Running the docker-compose File
Run the docker-compose.yaml file using the following command:
docker-compose up
Checking if Records are Being Sent to Kafka
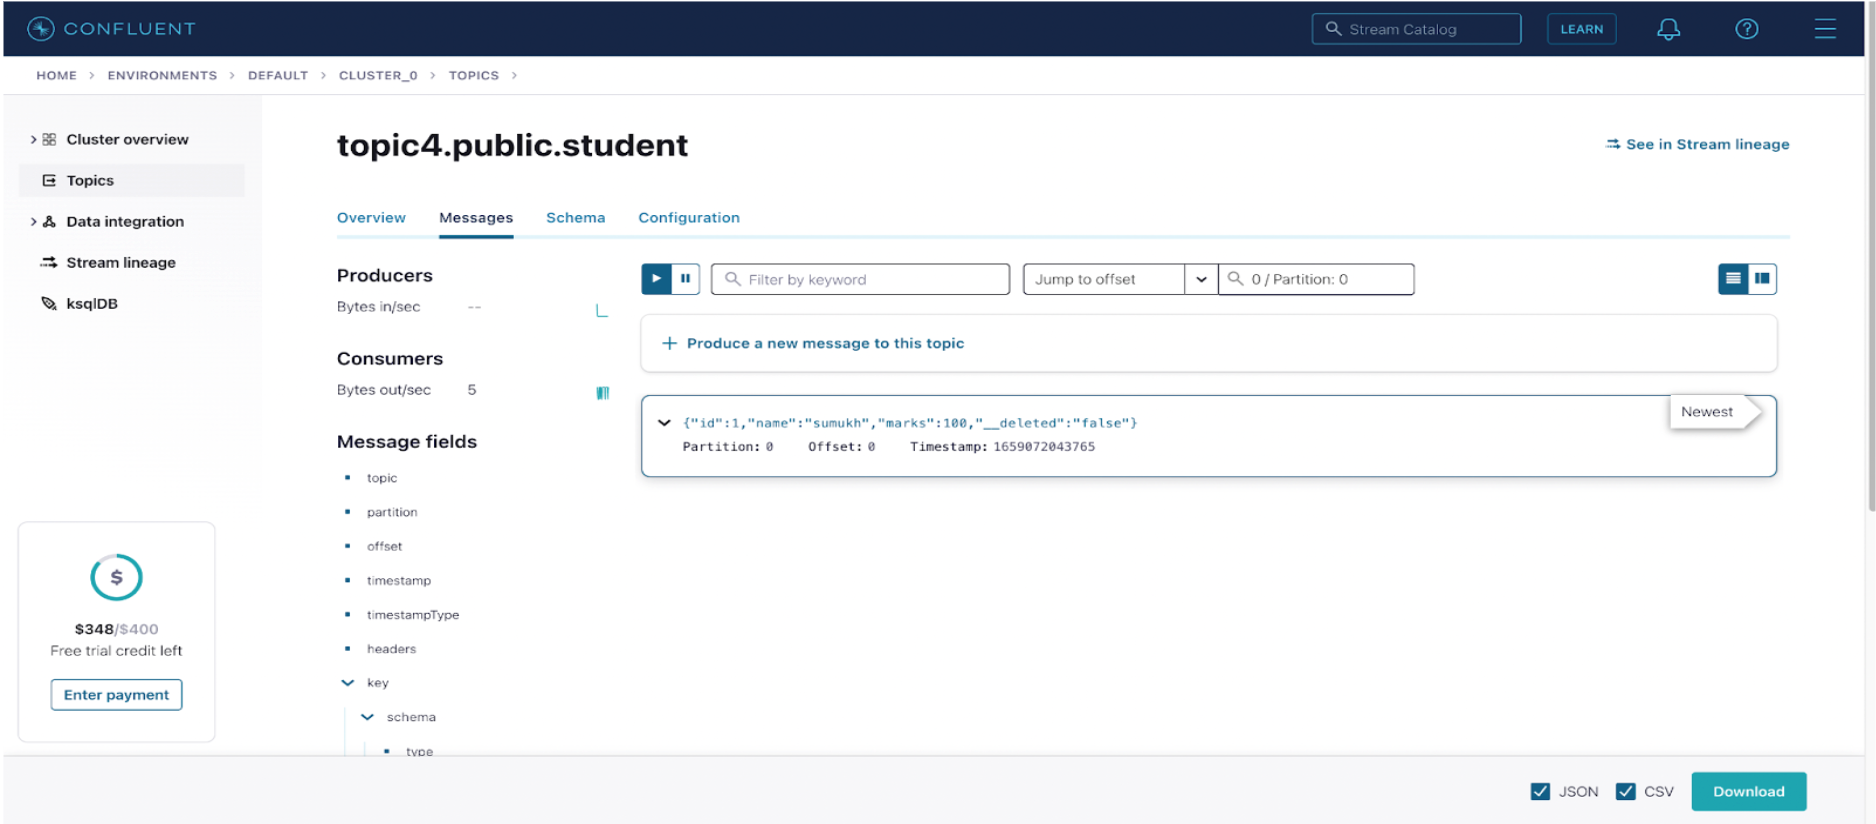
Insert some records in the table you created for streaming data. Now, go to the Confluent cloud page and click on topics. Then, select your topic.
Under the messages section, you should be able to see messages reflecting your latest insert. (You might have to insert offset = 0 to see these messages).
Setting up Snowflake: Generating and Adding keys
Log-in to your Snowflake account, or create a new one if required here.
Before the Kafka SnowflakeSinkConnector can sink data to Snowflake, we need to generate a key pair. The public key will be added to the Snowflake user and the Kafka connector will need the private key for authentication.
To generate a key pair, run the following commands:
openssl genrsa -out snowflake_key.pem 2048
This will generate your private key. To generate a public key you should use:
openssl rsa -in snowflake_key.pem -pubout -out snowflake_key.pub
Two files (snowflake_key.pem and snowflake_key.pub) will be created. Now, copy the public key (snowflake_key.pub). Ensure that you only copy the key, not the header and footer.
Also, make sure the key you copy is on a single line and not split across multiple lines. You can get the necessary key by running the following command:
grep -v "BEGIN PUBLIC" snowflake_key.pub | grep -v "END PUBLIC"|tr -d '\r\n'
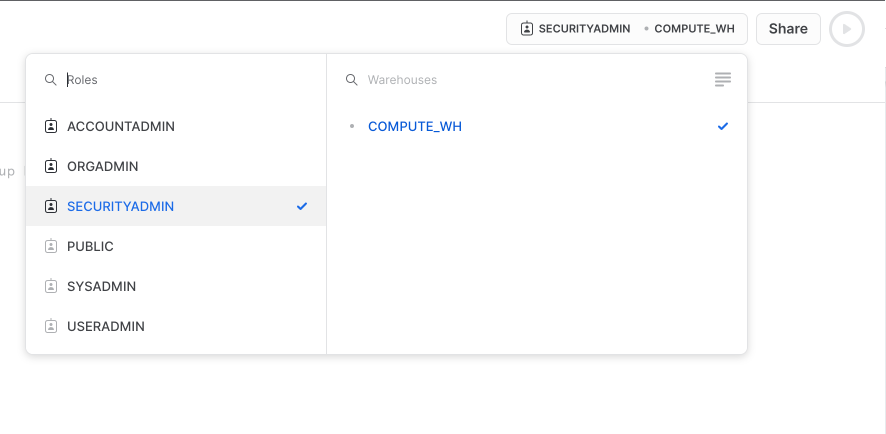
Next, go to Snowflake, click on Worksheets and create a new worksheet. Switch to the SECURITYADMIN role on the top right.
In the worksheet, run the following queries:
CREATE USER <user-name> RSA_PUBLIC_KEY='<public-key>';
Enter the <user-name> of your choice. You will need this user name in the Kafka connector configuration.
You will need to create the database you want Kafka to push the messages to.
CREATE DATABASE <db-name>;
You can also create a schema and the table where you want the Kafka messages to reside. I used the PUBLIC schema, which is created automatically when you create a database.
Now that we have created our user and database, we need to assign the required privileges to this user. The Kafka Snowflake sink connector documentation specifies that only usage, create table, create pipe and create stage privileges are required. However, to prevent “unauthorized access” and “insufficient privileges” errors we grant all database and schema privileges to the user we created.
USE ROLE SECURITYADMIN;
GRANT ALL PRIVILEGES ON DATABASE  TO ROLE securityadmin;
GRANT ALL PRIVILEGES ON SCHEMA <db-name>.PUBLIC TO ROLE securityadmin;

GRANT ROLE securityadmin TO USER <user-name>;
ALTER USER <user-name> SET DEFAULT_ROLE=securityadmin;
You can confirm that your user has been allotted the securityadmin role using:
DESC USER <user-name>and the securityadmin role has been allotted all the privileges using:SHOW GRANTS TO ROLE securityadmin
Setting up Kafka SnowflakeSinkConnector on Confluent Cloud
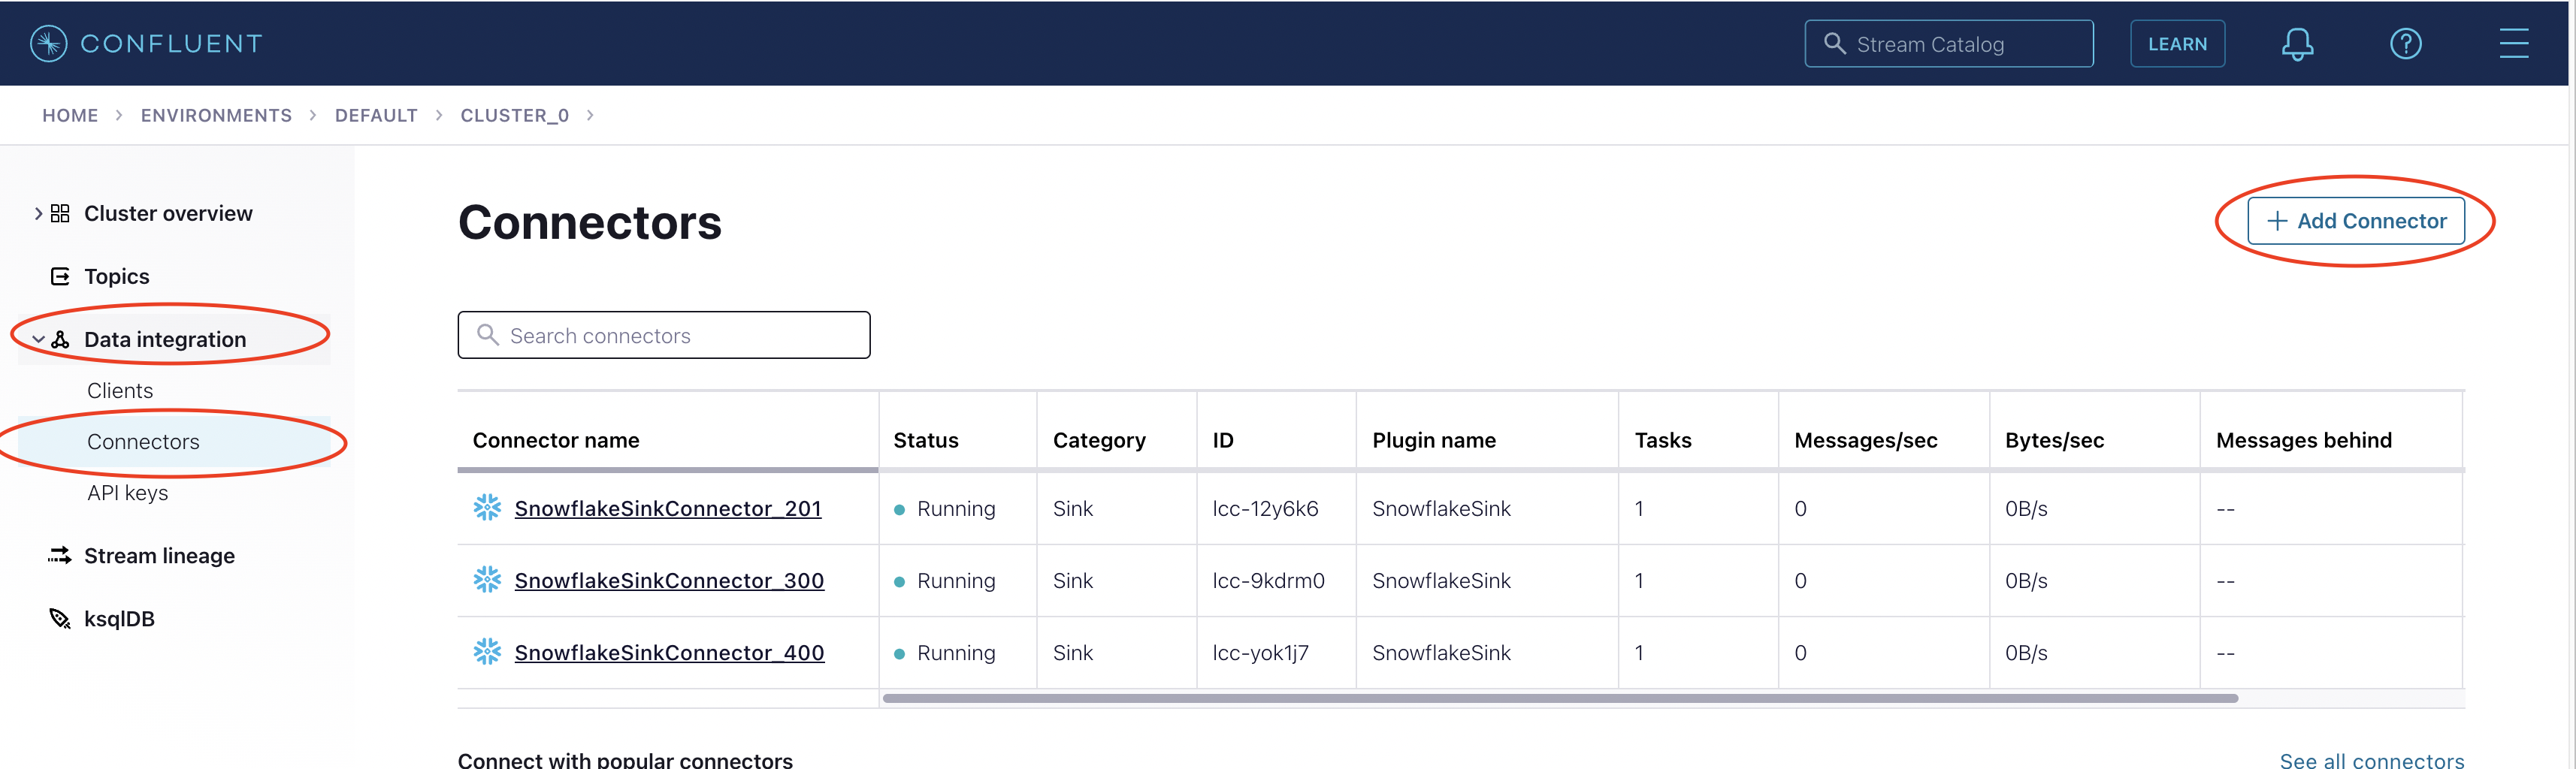
Go to Confluent cloud. In the left panel, go to Data Integration -> Connectors. On the right side click the Add Connector button.
Now, select Snowflake Sink from the list of connectors.
Select the topic you created earlier and continue. Choose suitable access for your connector. Here, I chose Global Access. Next, generate your API key and download. Then, when the key is downloaded click on continue. You will reach this page:
We then need the following items:
- Connection URL:
- The format for connection URL is <account_name>.<region_id>.<cloud>.snowflakecomputing.com
- Caveat: For snowflake <account_name> is not the same as login user name. The required account name is in your snowflake URL
https://app.snowflake.com/<region_id>.<cloud>/<account-name>/...
- Connection user name
- This is the <user-name> we created earlier.
- Private key
- This is the snowflake_key.pem key we generated, but without the header or footer and generated into a single line.
- You can use this command to get the required key
grep -v "BEGIN RSA PRIVATE KEY" snowflake_key.pem | grep -v "END RSA PRIVATE KEY"|tr -d '\r\n'
- Decryption key of private key
- If you are using an encrypted private key you need to specify the decryption key for it. For now, leave this blank.
- Snowflake Database name
- The database name we created earlier.
- Schema name
- If a schema was created you can give the name of that schema. I didn’t create one, instead, I used the default PUBLIC schema.
- Topics to tables mapping
- If you want messages from the Kafka topic to be populated into a specific table, that mapping should be given here. If you leave this field blank, the SnowflakeSinkConnector will create a new table and populate it with the messages.
Once this is all done click continue.
Choose the appropriate Input format. Here I used JSON. Under advanced configurations, you can modify various connection details. This means you can decide on parameters such as the number of records to flush cached data, the size of the connector record buffer, whether or not to include metadata, etc. You can also add transforms here if required. I used the default values.
Once all this is done, you can move to the next page where you should give an appropriate name to the connector and review all of the configurations. Once you click to continue here the SnowflakeSinkConnector will launch.
Refer to the Troubleshooting section if any errors occur.
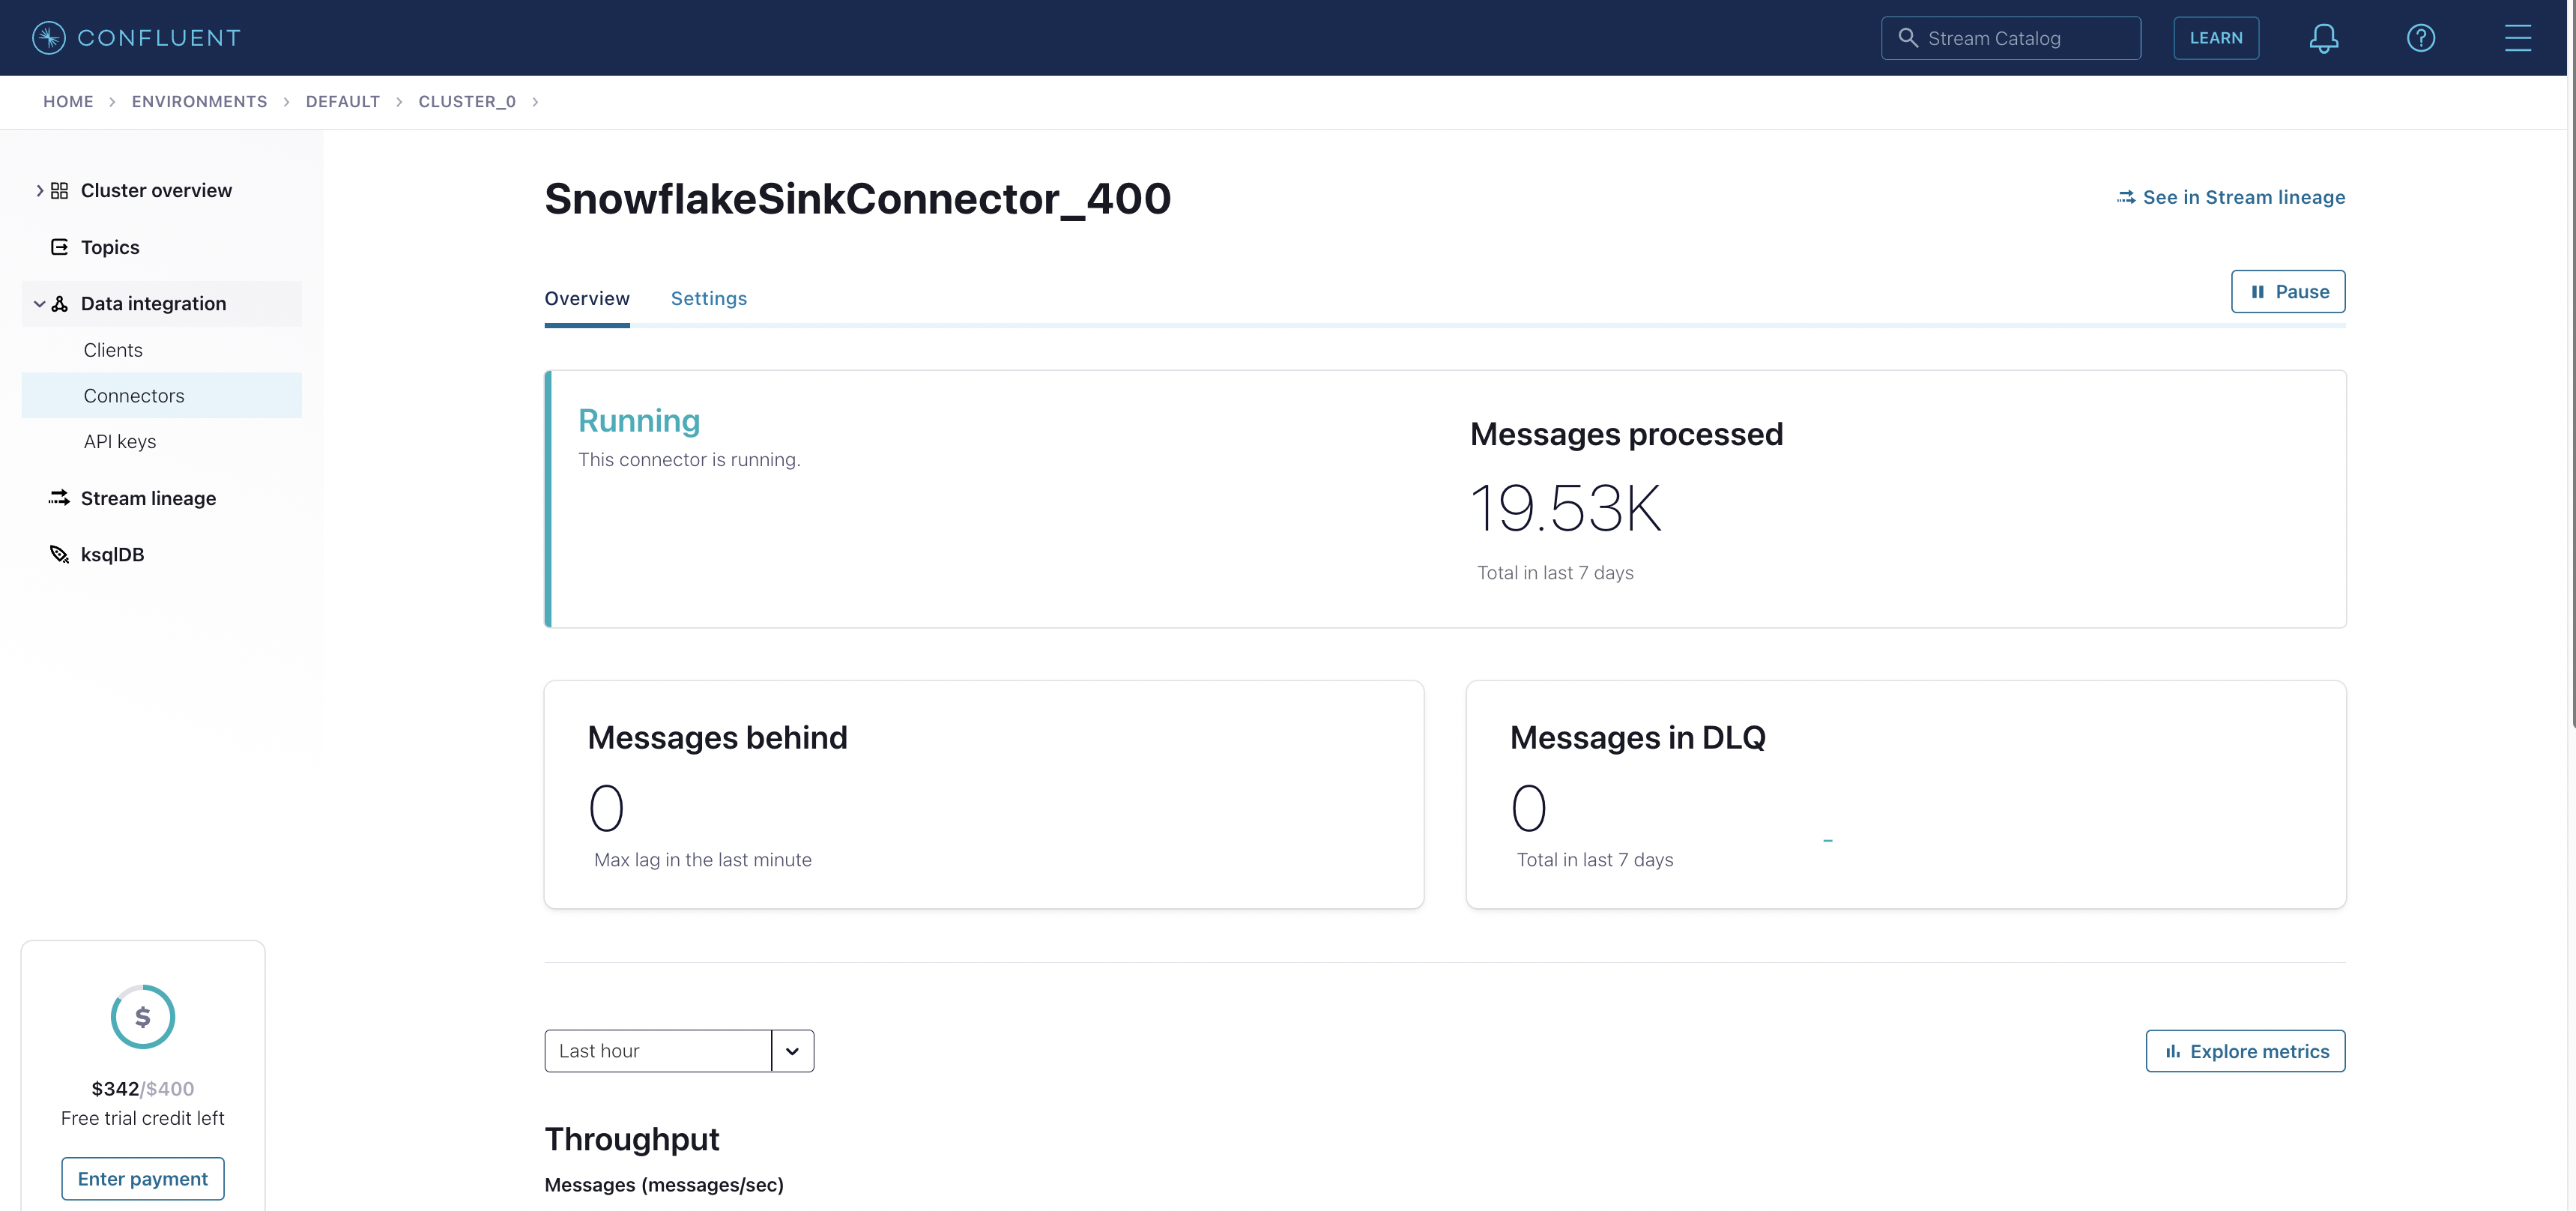
Finally, on Confluent Cloud, you should see a screen similar to this when you click on your connector.
- Connection URL:
Running Queries in Snowflake to Extract Relevant Information (Final Testing)
The Kafka connector sends messages as a single JSON. The table we copied the records from the SnowflakeSinkConnector to has a single JSON per record. A sample JSON record is shown here:
{
  "content": {
    "__deleted": "false",
    "id": 1,
    "marks": 100,
    "name": "sumukh"
  },
  "meta": {
    "CreateTime": 1659072043765,
    "key": {
      "payload": {
        "id": 1
      },
      "schema": {
        "fields": [
          {
            "field": "id",
            "optional": false,
            "type": "int32"
          }
        ],
        "name": "topic4.public.student.Key",
        "optional": false,
        "type": "struct"
      }
    },
    "offset": 0,
    "partition": 0,
    "topic": "topic4.public.student"
  }
}
To extract useful information, we have to use some fancy SQL:
SELECT f.path,f.value FROM <table-name> p, lateral flatten(input => p.message:content, recursive => true) f WHERE f.seq=100;
This gives you the following results:
PATH VALUE id 100 marks 100 name “John” Troubleshooting
Here are some of the issues you might encounter:
- Failed to create a pipe due to insufficient privileges on the table.This issue occurs when SnowflakeSinkConnector creates a new table. By default, your user does not have the privileges required to write to this table. To resolve this, run this query in Snowflake:
SHOW TABLES;
This will show you a list of all the tables. Select the table that was auto-created. Its name will start with the topic name, followed by a number. Copy this <table-name> and run:
GRANT ALL PRIVILEGES ON TABLE <table-name> TO ROLE securityadmin;
- Failed. Please make sure that the stage provided exists and the user has the right permission to operate on the SnowflakeSink stage.
SnowflakeSinkConnector stores records in an internal stage. This stage is auto-created and is not granted the necessary privileges.SHOW STAGES;
This will show you a list of all the stages. Select the stage that was auto-created. Its name will start with the connector name and will have the table name at the end. Copy this <stage-name> and run:
GRANT ALL PRIVILEGES ON STAGE <stage-name> TO ROLE securityadmin;
- Data is not being reflected in Snowflake, but the Kafka SnowflakeSinkConnector is running and processing messages.
- Not enough records: The default value (and also the minimum) of the number of records to flush cached data is 10,000. If you don’t have sufficient records they will not be reflected in Snowflake.
- Enough records, but still no rows populated in Snowflake. This occurs when the table the SnowflakeSinkConnector creates has two columns of type variant (RECORD_CONTENT and RECORD_METADATA), but the message has a single JSON.
As a result, data is present in the stage but not populated in the table. You will need to manually copy the contents from the stage to a table.CREATE TABLE <new-table-name> (message variant);
GRANT ALL PRIVILEGES ON <new-table-name> TO ROLE securityadmin;
COPY into <new-table-name> FROM @<stage-name> file_format = (type = json);
- Failed to create a pipe due to insufficient privileges on the table.This issue occurs when SnowflakeSinkConnector creates a new table. By default, your user does not have the privileges required to write to this table. To resolve this, run this query in Snowflake:
Conclusion
In this blog we walked through the process of setting up a pipeline to stream data from YugabyteDB to Snowflake using Kafka connect. It should now be clear that the CDC message is stored as a single JSON and you should have all the tools required to query it and to extract relevant information.
Feel free to drop any questions below, or join our Community Slack to chat with engineers, experts, and users in real-time.