Integrate YugabyteDB with Amazon Redshift Using AWS Managed Kafka Stream and CDC Connector
August 22, 2023
In this blog, we’ll walk through how to integrate YugabyteDB with the Amazon Redshift database using the Amazon Web Services(AWS) Managed Kafka Stream (MSK) and the YugabyteDB Change Data Capture (CDC) connector.
Introducing YugabyteDB, Amazon Redshift, and AWS MSK
YugabyteDB is an open-source distributed SQL database for transactional (OLTP) applications. YugabyteDB is designed to be a powerful cloud-native database that can run in any cloud – private, public, or hybrid.
Amazon Redshift is a fully managed cloud-based data warehouse service provided by Amazon Web Services (AWS). It is designed to handle petabyte-scale data warehousing and analytics workloads for businesses of all sizes.
Amazon Managed Streaming for Apache Kafka (AWS MSK) is a fully managed, highly available, and secure Apache Kafka service offered by Amazon Web Services (AWS). AWS MSK makes it easy for customers to build and run applications using Apache Kafka without having to manage and operate their own Kafka clusters.
Integration of YugabyteDB (OLTP) with AWS Redshift (Data Warehouse)
YugabyteDB can seamlessly connect to Amazon Redshift using the YugabyteDB CDC connector and AWS MSK. The connection is achieved through the YugabyteDB CDC connector, helping users consume data from a data warehouse and an OLTP (transactional database) without additional processing or batch loads.
Benefits of YugabyteDB Integration with Amazon Redshift:
YugabyteDB and Amazon Redshift provide the following benefits:
- Real-time data synchronization: With YugabyteDB’s Change Data Capture (CDC) feature, data changes automatically sync between YugabyteDB and Redshift in real-time, enabling real-time analytics.
- Better performance and scalability: By using YugabyteDB as your transactional database, you can offload read-heavy analytical workloads to Redshift, which is optimized for analytical processing. This improves the performance and scalability of both systems.
- Multi-cloud and hybrid cloud deployment: YugabyteDB supports multi-cloud and hybrid cloud deployments, which helps users fetch transactional data from different cloud or on-premise environments and data warehouse data from AWS Redshift.
- No additional software: The data streams from YugabyteDB to Amazon Redshift goes through AWS MSK which doesn’t require any additional ETL or data integration tools at AWS.
YugabyteDB to Amazon Redshift Architecture
The diagram below (Figure 1) shows the end-to-end integration architecture of YugabyteDB to Amazon Redshift.
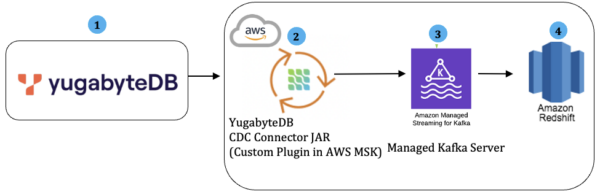
The streamed change data from the YugabyteDB Debezium/Kafka connector is streamed directly to Amazon Redshift using AWS MSK.
| Data Flow Sequence # | Operations/Tasks | Component Involved |
| 1 | YugabyteDB CDC enabled and create the stream ID for specific YSQL database (e.g. your db name) | YugabyteDB |
| 2 | Download the YugabyteDB CDC Connector JAR | YugabyteDB Debezium Connector JAR |
| 3 | Setup the AWS MSK Cluster (refer to the IAM policies and roles) | AWS MSK, AWS IAM Roles & Policies |
| 4 | Setup Amazon Redshift and keep the credentials ready for testing | Amazon Redshift |
Best Use Cases For YugabyteDB Integration with Amazon Redshift
Real-time Pricing Strategy using Customer LifeTime Value (LTV): Customer LTV helps retailers determine the optimal pricing strategy for their products and services. By knowing the expected revenue from each customer, businesses can set prices that maximize revenue while remaining competitive in the market.
YugabyteDB is used widely in the retail industry. It helps store real-time orders and transactions; however, it needs a constant lookup from the customer’s LTV score which (in turn) needs historical data from a data warehouse database, like Amazon Redshift. Thanks to the CDC integration, YugabyteDB can continuously stream the customer’s transactional data changes to Amazon Redshift. That database stores the customer’s data for longer periods, helping to calculate the LTV score using past purchase histories, customer retention rates, and customer acquisition costs. Using the LTV score from Amazon Redshift, the retail order application determines the right pricing strategy and discounts for the customers in real-time.
Credit Risk Evaluation: Credit risk evaluation is a critical business process for lenders or banks to minimize the risk of default and ensure their firm’s long-term viability.. By collecting and analyzing various data points related to a borrower’s creditworthiness, banks or lenders can make informed decisions and provide credit to borrowers who are most likely to repay their obligations.
YugabyteDB is used as an OLTP database in many financial institutions and banks to collect and store loan or credit card application information. It is difficult to know the customer’s current risk rating since it varies based on their transaction history, debt-to-income ratio, blacklisting details, etc. Using CDC, the Yugabyte database continuously pushes transactional data to Amazon Redshift which does all the risk evaluation by collecting various data coming from different sources (e.g. credit bureaus, payment applications, etc.). The OLTP application can look up the credit risk rating from Redshift in real-time and prove or reject loan or credit applications.
How to Set Up Amazon Redshift Sink
Install YugabyteDB
You have multiple options to install or deploy YugabyteDB if you don’t have one already available. Note: If you’re running a Windows Machine then you can leverage Docker on Windows with YugabyteDB.
Install and Setup AWS MSK
Install and setup AWS MSK, using the article, Stream Data From YugabyteDB CDC to AWS MSK Using Debezium. It helps configure IAM Policies and roles required for AWS MSK in AWS. Post creation of IAM Role and setup the MSK cluster using the same article.
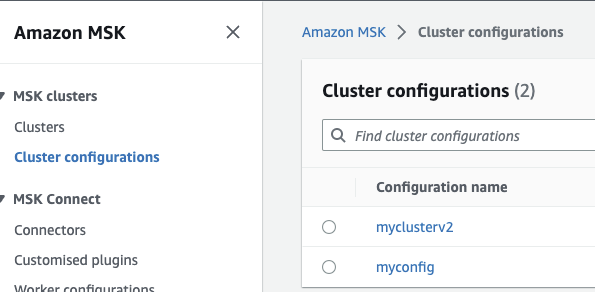
Create Cluster Configuration and Worker configuration in MSK
Cluster Configuration:
In AWS MSK, under MSK Clusters menu (on the left side) will show cluster configuration. Click to create a new configuration and enter the values below on the configuration settings. Then save it.

Figure 2: myclusterV2 auto.create.topics.enable=true default.replication.factor=3 min.insync.replicas=2 num.io.threads=8 num.network.threads=5 num.partitions=3 num.replica.fetchers=2 replica.lag.time.max.ms=30000 socket.receive.buffer.bytes=102400 socket.request.max.bytes=104857600 socket.send.buffer.bytes=102400 unclean.leader.election.enable=true zookeeper.session.timeout.ms=18000
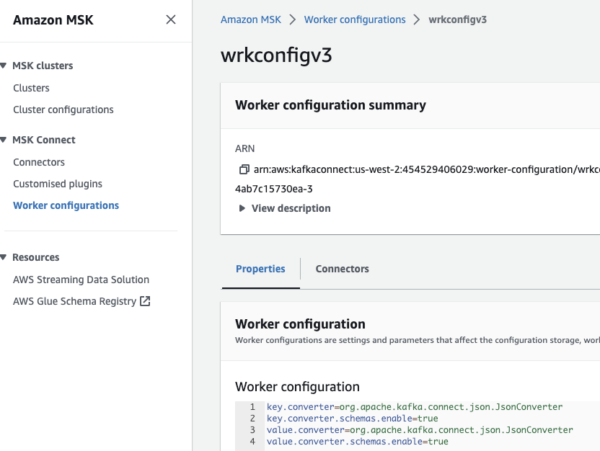
Worker Configuration:
In AWS MSK, under “MSK Connect”, create a worker configuration (like below) and enter the properties if you are going to receive the data in JSON format.
key.converter=org.apache.kafka.connect.json.JsonConverter
key.converter.schemas.enable=true
value.converter=org.apache.kafka.connect.json.JsonConverter
value.converter.schemas.enable=true
NOTE: It is highly recommended to use schema registry with AVRO. In such a case, the above worker configuration is not required.
Figure 3: Worker configuration in Amazon MSK Create MSK Connector for YugabyteDB
Create the Configuration of AWS MSK connector for YugabyteDB as referred in point #6 and choose the worker configuration that you created in Step #3.
Use the values below in the connector configuration and change the yellow highlights with new data according to your specific YugabyteDB configuration.
connector.class=io.debezium.connector.yugabytedb.YugabyteDBConnector
database.streamid=684d878b37e94b279454b0b8d6a2a305
database.user=yugabyte
database.dbname=yugabyte
tasks.max=1
time.precision.mode=connect
transforms=unwrap
database.server.name=dbserver12
database.port=5433
include.schema.changes=true
database.master.addresses=10.9.205.161:7100
key.converter.schemas.enable=true
database.hostname=10.9.205.161
database.password=xxxxx
transforms.unwrap.drop.tombstones=false
value.converter.schemas.enable=true
transforms.unwrap.type=io.debezium.connector.yugabytedb.transforms.YBExtractNewRecordState
table.include.list=public.target_cdctest
snapshot.mode=initial
Install Amazon Redshift
Install Amazon Redshift from your AWS Console and create a cluster and configure.
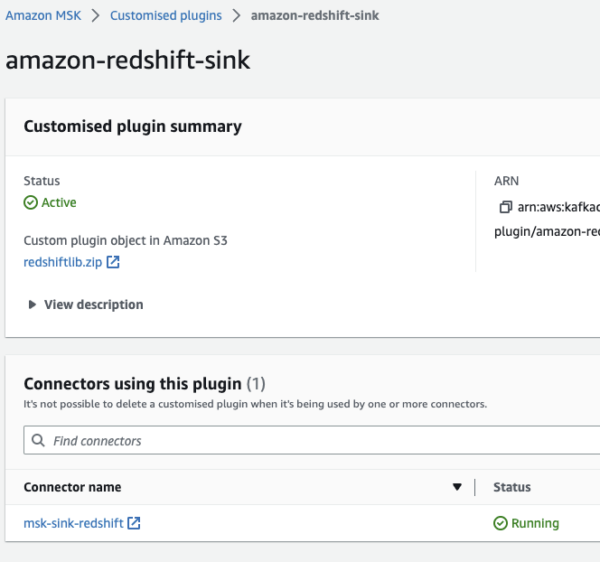
Figure 4: Provisioned clusters dashboard in Amazon Redshift Create Custom Plugin for Amazon Redshift
Download the Amazon Redshift Sink connector and upload this zip file to your AWS MSK Custom Plugin. You can also rename it.
Figure 5: Create a custom plugin for Amazon Redshift Create MSK Sink Connect for Amazon Redshift
Create the Configuration of AWS MSK connector (see point #6). ou will need to keep it with the Amazon Redshift configuration instead of the YugabyteDB configuration like below. (NOTE:Replace the values in yellow per your specific Amazon Redshift details and AWS MSK Kafka Topic name)
connector.class=io.confluent.connect.aws.redshift.RedshiftSinkConnector
aws.redshift.port=5439
table.name.format=public.target_cdctest
confluent.topic.bootstrap.servers=b-4.bseetharamanmsk.acsf.c10.kafka.us-west-2.amazonaws.com:9092
tasks.max=1
topics=dbserver12.public.target_cdctest
aws.redshift.password=xxxxx
aws.redshift.domain=bseetharaman-redshift-demo-cluster.xxgs.us-west-2.redshift.amazonaws.com
aws.redshift.database=dev
delete.enabled=true
auto.evolve=true
confluent.topic.replication.factor=1
aws.redshift.user=awsuser
auto.create=false
insert.mode=insert
pk.mode=record_key
pk.fields=sno
Validate the Data in Amazon Redshift
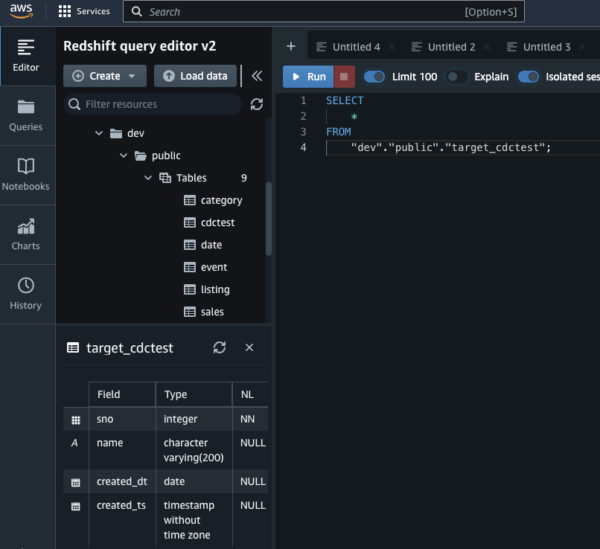
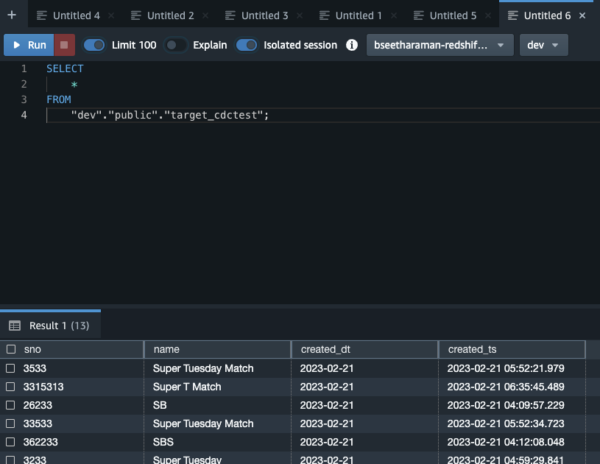
Launch the Amazon Redshift query editor and query the tables that are synced from YugabyteDB.
Figure 6: Amazon Redshift query editor Figure 7: View query details

Conclusion and Summary
In this blog post we walked through step-by-step how to integrate YugabyteDB with Amazon Redshift using YugabyteDB’s CDC connector.
These steps help to integrate the YugabyteDB transactional database with your data warehouse (Amazon Redshift DB) so that it meets the requirements for your application. The metrics collected by YugabyteDB CDC provide an intuitive, visual way to monitor the health, performance, and progress of these CDC operations. For detailed information on CDC metrics, please refer to Monitoring Change Data Capture (CDC) Using YugabyteDB’s Metrics Dashboard.
Integrating YugabyteDB and Amazon Redshift through AWS MSK delivers real time analytics and allows you to store large amounts of data that you’ve collected and store it for business intelligence and analytics in your data warehouse. Both pull significant business value from your data.


