How to Integrate the YugabyteDB MCP Server with Visual Studio Code
December 11, 2025
Introduction
Our recent blog, ‘Introducing the YugabyteDB MCP Server,’ outlined how to use MCP to enable an AI application to access, query, analyze, and interpret data in your YugabyteDB database using natural language prompts.
Since the blog publication, we’ve received inquiries from developers asking whether the MCP Server also works with Visual Studio (VS) Code. This blog addresses that question and provides a guide to using VS Code as the MCP client and connecting it to the YugabyteDB MCP Server. It also details how you can explore the YugabyteDB database via natural-language prompts.
Why Use VS Code with MCP?
VS Code becomes a conversational interface for your database, allowing you to make queries such as “list tables” and “show first 10 rows of table X” directly within the editor.
VS Code with MCP follows the Model Context Protocol (MCP) architecture:
Client (VS Code) → MCP Server (YugabyteDB MCP Server) → Database (YugabyteDB)
Using VS Code with MCP keeps your workflow unified as code editing, database exploration, and AI-assisted queries are all contained in one environment. The MCP configuration can be reused across agents and projects.
VS Code with MCP Architecture Overview
This integration involves four key components:
- Client: VS Code with MCP support
- MCP Server: YugabyteDB MCP Server (running locally or remotely)
- Database: A live YugabyteDB cluster reachable from your machine
- Transport: The most common setup uses STDIO (local process). HTTP/SSE transport is also supported for advanced scenarios
In this tutorial, we’ll configure the server to run locally via STDIO using a workspace-scoped mcp.json file.
Step 1: Prerequisites
Before you start using VS Code with MCP, you must ensure you have:
- A running YugabyteDB cluster (local or remote)
- Python 3.10 (or later) installed (for the MCP server)
- VS Code installed, plus access to an LLM-powered chat extension (such as GitHub Copilot Chat)
- The uv tool installed to manage/run the MCP server environment and for dependency management
For this demo, we have preloaded a three-node YugabyteDB cluster running with the Northwind dataset. This gives us a rich set of sample business data (orders, products, customers, etc.) to query and visualize.
Step 2: Clone and Set Up the YugabyteDB MCP Server
Clone the YugabyteDB MCP Server repository and install dependencies:
In a terminal, run:
git clone https://github.com/yugabyte/yugabytedb-mcp-server.git
cd yugabytedb-mcp-server
curl -LsSf https://astral.sh/uv/install.sh | sh
uv sync
Step 3: Enable MCP Discovery in VS Code
VS Code can automatically discover MCP configurations from other tools (like Claude Desktop, Cursor, etc). You can also explicitly define your own server.
- Open
settings.jsonin VS Code- macOS:
Cmd+Shift+P→ Preferences: Open Settings (JSON) - Windows/Linux:
Ctrl+Shift+P→ Preferences: Open Settings (JSON)

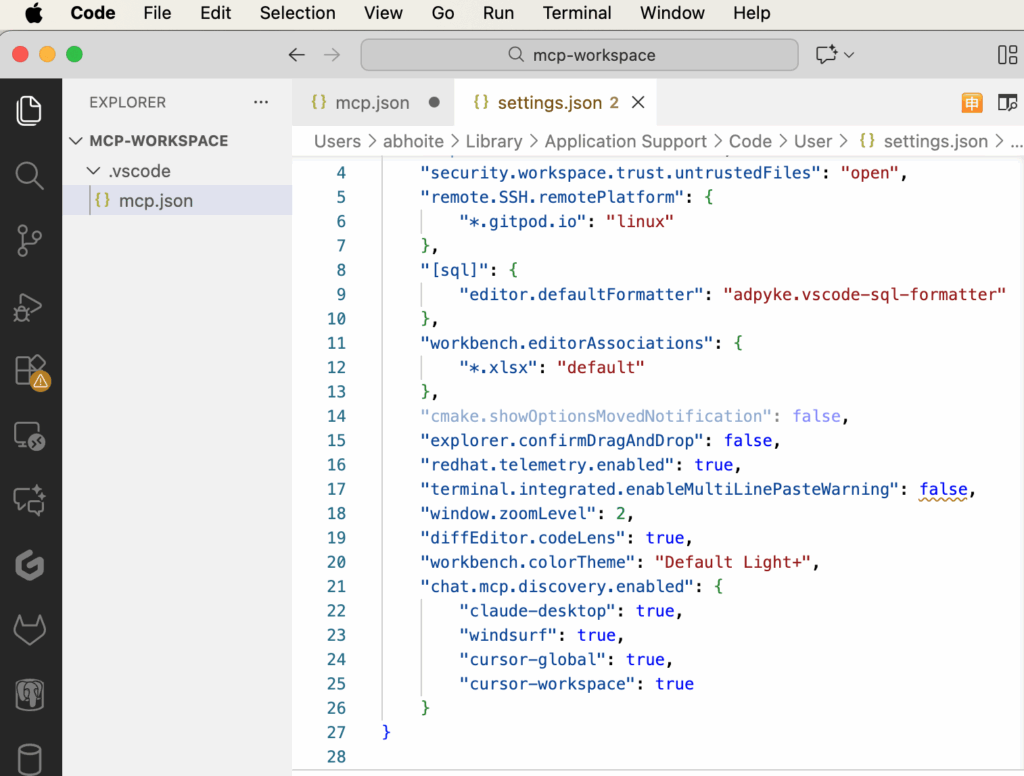
In your
settings.jsonfile, add or update thechat.mcp.discovery setting.enabledsetting as an object mapping of the tool identifiers you want to discover from.For example:
"chat.mcp.discovery.enabled": { "claude-desktop": true, "windsurf": true, "cursor-global": true, "cursor-workspace": true } - macOS:
- Save the file to save the
settings.json - As discovery is enabled (via the object form), VS Code will now look for server configurations (in .vscode/mcp.json, user config, or via other tools) and automatically start your custom server (e.g.,
yugabytedb-mcp) - Save the file and reload VS Code

Step 4: Define mcp.json for YugabyteDB in Your Workspace
Why is mcp.json required?
You create .vscode/mcp.json in your workspace so VS Code knows how to start and connect to your YugabyteDB MCP Server:
- It registers the server name (e.g.,
yugabytedb-mcp) and its launch command - It allows VS Code to discover, start, manage, and load tools from your server. For example, the documentation states that when the file is saved, VS Code displays controls (start/stop) above the server configuration
- It scopes the configuration to this workspace (so the setup can be version-controlled). Without the
mcp.jsonfile, VS Code has no definition of your custom server, so prompts like “the database you are connected to” cannot be routed
Creating .vscode/mcp.json
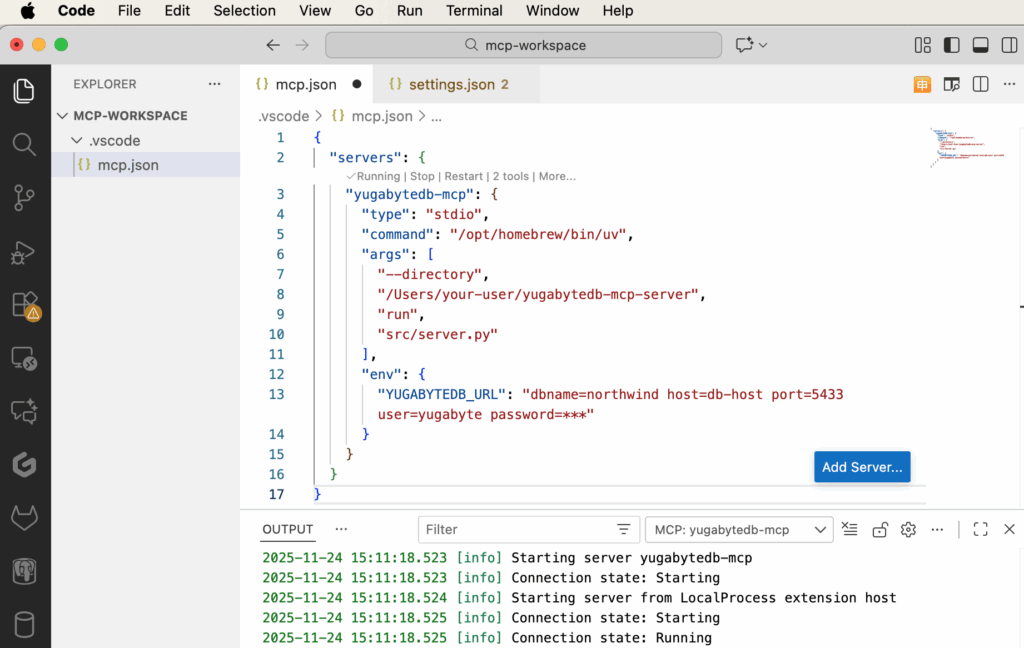
Assuming your workspace is /Users/your-user/mcp-workspace:
- Create and navigate to your workspace directory:
/Users/your-user/mcp-workspace/.vscode/ - Inside, create
mcp.json
Openmcp.jsonin VS Code and enter your configuration, for example:{ "servers": { "yugabytedb-mcp": { "type": "stdio", "command": "/opt/homebrew/bin/uv", "args": [ "--directory", "/Users/your-user/yugabytedb-mcp-server", "run", "src/server.py" ], "env": { "YUGABYTEDB_URL": "dbname=northwind host=db-host port=5433 user=yugabyte password=yugabyte" } } } } - Adjust the values: the
command,the workspace path (/Users/your-user/yugabytedb-mcp-server), and theYUGABYTEDB_URLto match your system. - Save the file
Step 5: Start the YugabyteDB MCP Server from VS Code
In VS Code:
- Open the VS Code Command Palette (
⌘+Shift+Pon macOS orCtrl+Shift+Pon Windows) and run the command “MCP: List Servers.” You should see your server,yugabytedb-mcp, listed - Select
yugabytedb-mcpand choose “Start Server”
You’ll see output similar to:2025-11-23 22:29:33.989 [info] Starting server yugabytedb-mcp 2025-11-23 22:29:33.990 [info] Connection state: Starting 2025-11-23 22:29:33.990 [info] Starting server from LocalProcess extension host 2025-11-23 22:29:33.991 [info] Connection state: Starting 2025-11-23 22:29:33.991 [info] Connection state: Running
This confirms that your server is running and its tools are registered. Once the status is “Running”, the server is ready to handle chat-based tool invocations.
Step 6: Enable and Use GitHub Copilot Chat
- Ensure you have a valid subscription for the GitHub Copilot service and that VS Code is up to date
- Install both the GitHub Copilot Chat extensions from the VS Code Marketplace
- Sign in with your GitHub account and authorize the extensions
- Open the chat view: macOS:
Ctrl + Command + I, windows:Ctrl + Alt + I - Select the mode you prefer (Ask, Edit, Agent)
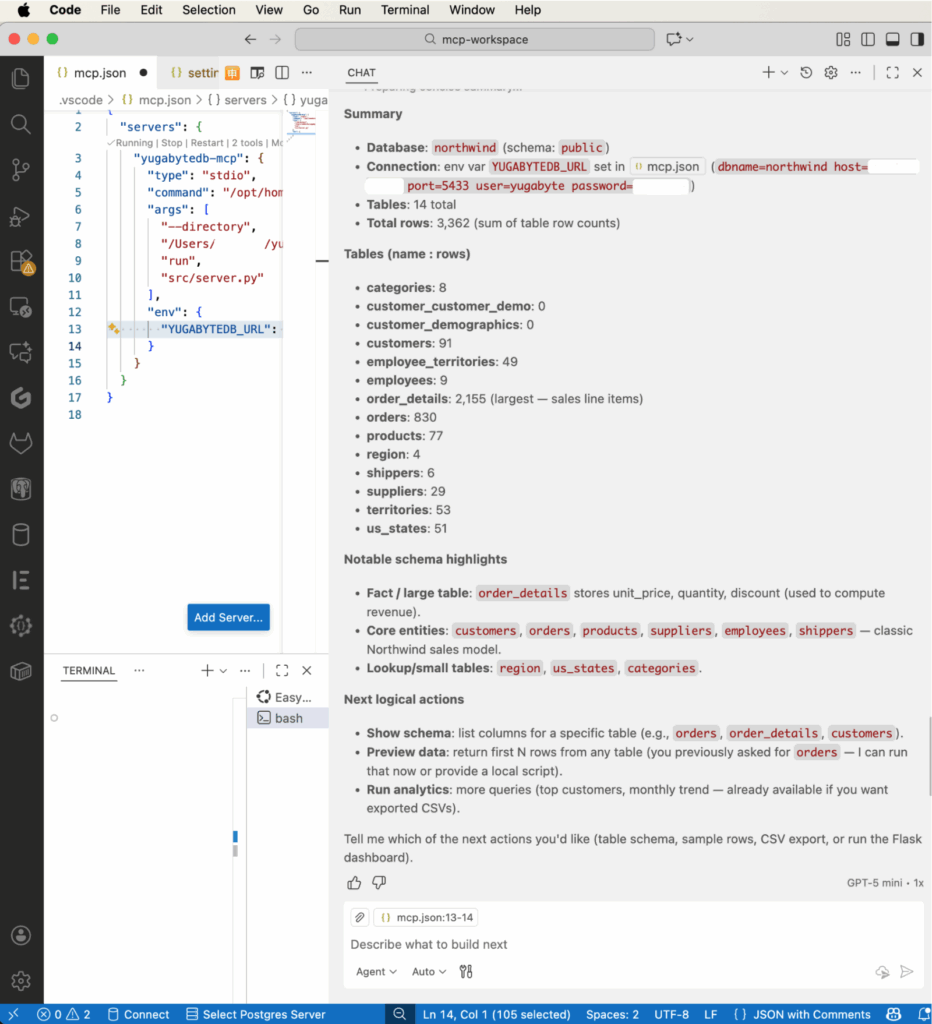
- With your
YugabyteDB-MCPserver running, type a prompt such as:'Summarise the database you are connected to.'The chat assistant (via your MCP server) will invoke thesummarize_databasetool, list tables, schemas, row counts, and return a plain-English summary
The Benefits of a VS Code and YugabyteDB MCP Server Integration
Natural-language database querying inside your IDE
Run tasks like “list tables”, “show first 10 rows of orders”, or “describe table customers” without writing SQL.
All tools in one place
No context-switching: code, data exploration, and AI-powered queries are all live in VS Code.
Faster insights and iteration
Query completion and data exploration are quicker and smoother, enabling you to iterate more efficiently.
Unified, reusable interface for multiple agents/tools
The same MCP server configuration can power different agents (analytics, migration, SRE bots, etc.), simplifying maintenance and sharing.
Better governance, safety, and standardization
With MCP, you centrally control access, credentials, and allow operations, which helps maintain security and consistency across workflows.
Conclusion
Thanks to this new integration, you can turn Visual Studio Code into a full-fledged MCP client for your YugabyteDB database. This allows you to explore schemas, run queries, and interact with your data using natural language, all from within your editor.
Whether you’re prototyping, exploring data, or building AI-augmented workflows, this setup enhances your productivity and streamlines your developer experience. Happy coding and enjoy working with your YugabyteDB data inside VS Code!
Want to know more?
Explore the YugabyteDB Developer Hub to learn more about building cloud-native applications that scale seamlessly across regions and remain resilient during outages.


