Introducing yugabyted, the Simplest Way to Get Started with YugabyteDB
August 13, 2020
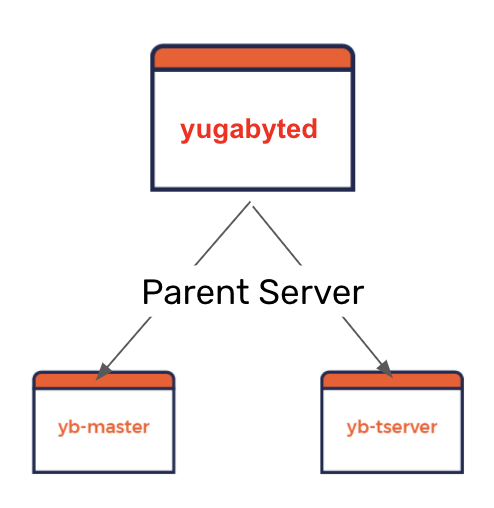
Users familiar with YugabyteDB’s architecture know that it is based on two servers where cluster metadata storage and administrative operations are managed by a YB-Master metadata server that is independent from the YB-TServer database server. The end result is that the YB-Master server can be configured and tuned (in a manner that is completely isolated from YB-TServer) to achieve higher performance and faster resilience than a single-server architecture. However, the need for these two servers to come together in a cluster increases the mental burden on a new user who wants to experience the database’s benefits in the shortest time possible. Utilities such as yb-ctl have gone a long way to address this challenge in the context of a local cluster that runs only on a single host machine. However, the two-server challenge comes to the forefront when multi-node clusters need to be deployed across multiple host machines especially involving manual deployments that do not use a cluster orchestrator like Kubernetes Helm or Terraform.
We are excited to announce the availability of yugabyted, a native server that acts as a parent server across the YB-TServer and YB-Master servers. yugabyted’s immediate goal is to remove the day-1 learning curve that can be daunting for new users. Over the next few releases, we intend to make yugabyted the standard way of interacting with YugabyteDB, even for complex day-2 scenarios. Similar to mysqld, the `d` in yugabyted stands for daemon that acts as a single point of entry into the database cluster and can be easily managed as an always-on service.
Create a single-node cluster
Download and untar yugabytedb tar.gz
wget https://downloads.yugabyte.com/yugabyte-2.2.0.0-darwin.tar.gz
tar xvfz yugabyte-2.2.0.0-darwin.tar.gz && cd yugabyte-2.2.0.0/
You can download yugabytedb for other OS platforms from https://download.yugabyte.com/
Additionally, add a few loopback IP addresses that will allow us to simulate a multi-node YugabyteDB cluster on our laptop.
sudo ifconfig lo0 alias 127.0.0.2
sudo ifconfig lo0 alias 127.0.0.3
sudo ifconfig lo0 alias 127.0.0.4
Start node 1
Starting a single-node cluster is simple. Given that there is only one node, the Replication Factor of the cluster is set to be 1. In other words, every tablet (aka shard) has only one copy stored in the cluster.
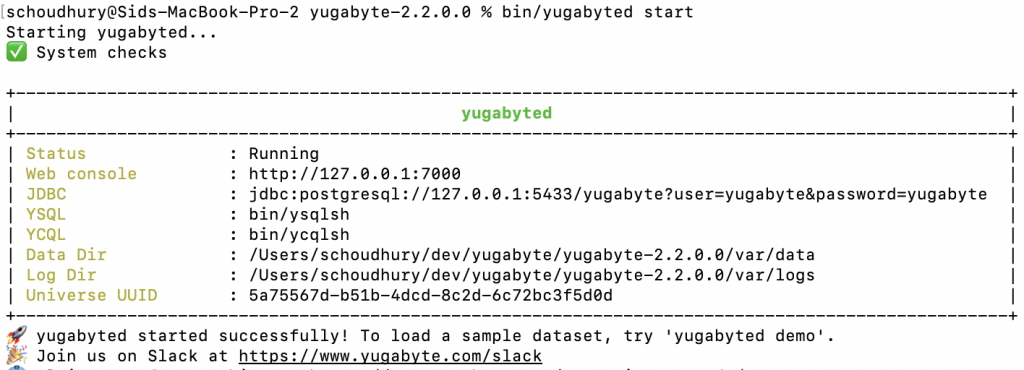
./bin/yugabyted start
The output for a successful run on the above command should look like the following. The cluster has been started with a single node listening at 127.0.0.1. The data directory for this node is located at <current-dir>/var/data and the logs directory is located at <current-dir>/var/logs.
Review cluster status
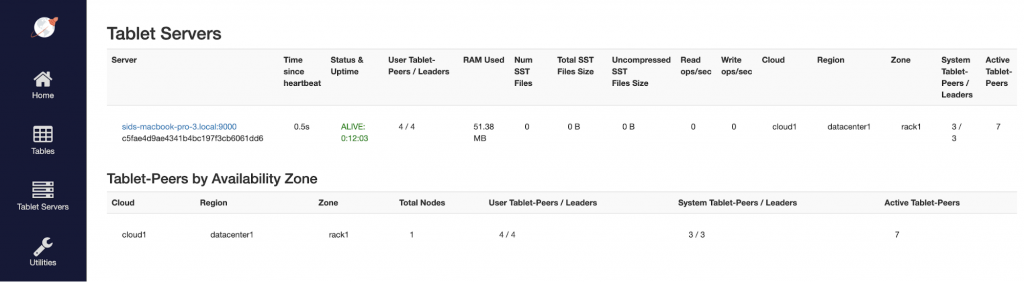
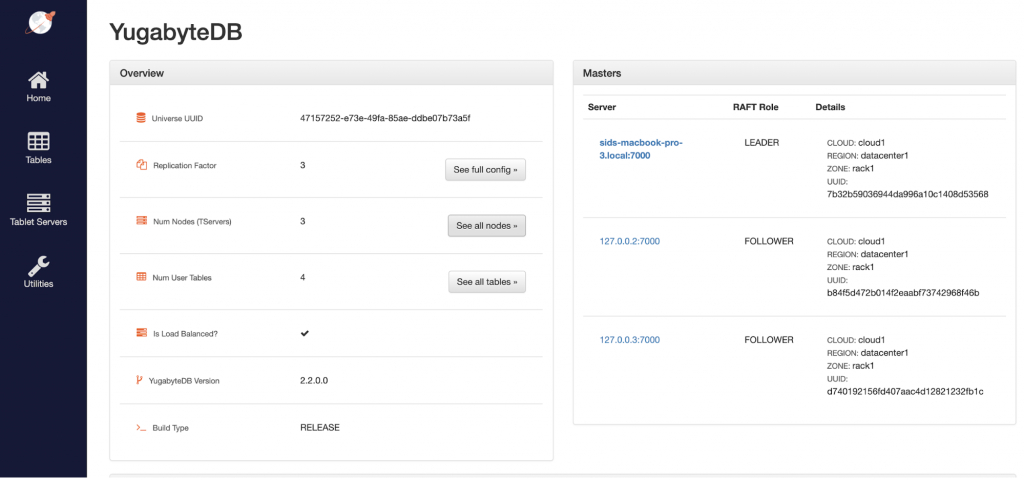
You can review the status of the 1-node RF1 cluster using the YB-Master admin UI at https://127.0.0.1:7000/ and YB-TServer admin UI at https://127.0.0.1:9000/. Sample screenshots are available in YugabyteDB Docs. Following is the list of YB-TServers available as shown on the YB-Master admin UI.
Connect with ysqlsh and load sample data set
Now we can connect to the cluster using ysqlsh and load a sample data set as highlighted in the Explore YSQL docs.
./bin/ysqlsh
CREATE DATABASE yb_demo;
\c yb_demo;
\i share/schema.sql
\i share/products.sql
\i share/users.sql
\i share/orders.sql
\i share/reviews.sql
Run queries
We can run a basic JOIN query to ensure our data was loaded as expected.
SELECT users.id, users.name, users.email, orders.id, orders.total
          FROM orders INNER JOIN users ON orders.user_id=users.id
          LIMIT 10;
At this point, this single-node cluster is a good development environment that you can even run on a Vagrant VM on macOS with the various ports available for access outside the VM.
From single-node to multi-node with the –join option (BETA)
Now that we have created a single-node cluster, we can use yugabyted’s –join option (currently in BETA) to add 2 more nodes into the same cluster and in the process change the Replication Factor of the cluster from 1 to 3. Prior to yugabyted, a single-node cluster RF1 cluster could not be expanded to a 3-node RF3 cluster. So this is an exciting addition to the YugabyteDB feature list.
Start node 2
We start a second node with a listen address of 127.0.0.2 and a directive to join the existing cluster at 127.0.0.1.
bin/yugabyted start --base_dir=/home/yugabyte-2.2.0.0/data2 --listen=127.0.0.2 --join=127.0.0.1
Now we can see that our original 1-node cluster has expanded to a 2-node cluster while remaining at RF1.
Start node 3
We start a third node with a listen address of 127.0.0.3 and a directive to join the existing cluster at 127.0.0.1. Even specifying 127.0.0.2 as the join value will work because that is the listen address of the second node in the cluster.
bin/yugabyted start --base_dir=/home/yugabyte-2.2.0.0/data3 --listen=127.0.0.3 --join=127.0.0.1
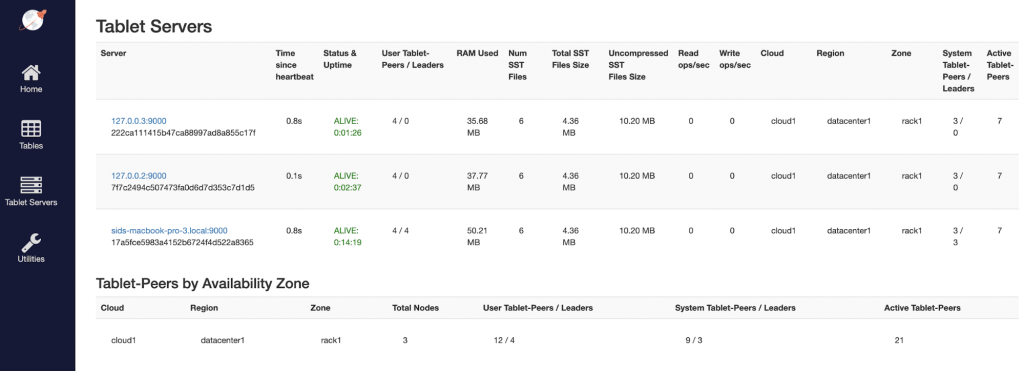
Our 2-node cluster has now become a 3-node cluster and the Replication Factor has increased automatically from 1 to 3.
Connect to node 3 and run queries
We can confirm that this third node is a fully functional member of the cluster by executing some queries for existing data.
./bin/ysqlsh -h 127.0.0.3
\c yb_demo;
Run the same query as previous section
Review cluster status
Native failover/repair in action
In this section, we will see how YugabyteDB handles failovers and repairs natively without using any external replication library.
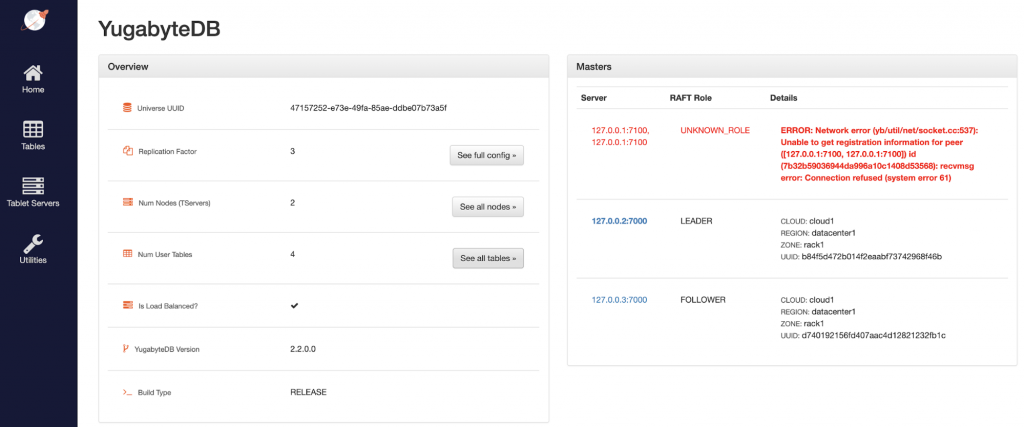
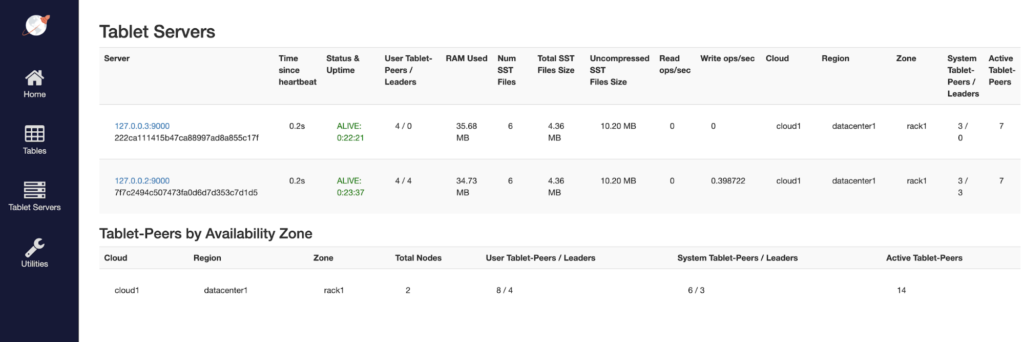
Stop node 1
bin/yugabyted stop
Review cluster status
Connect to node 3 and run queries
./bin/ysqlsh -h 127.0.0.3
\c yb_demo;
Run the same query as previous section
The data is preserved even though it was inserted via a node that is no longer available. This is because of YugabyteDB’s self-healing architecture that elects new shard leaders on available nodes whenever shard leaders are lost because of node failures or network partitions. Even though the cluster is under-replicated for a few shards, writes and reads continue on the cluster for those shards.
Bring back node 1
bin/yugabyted start --join=127.0.0.2

We can see that node 1 has joined back the cluster and the cluster is back to a fully replicated state.
Horizontal write scalability in action
Now we are ready to see horizontal write scalability in action where we add a fourth node and insert new data through that new node.
Start node 4
bin/yugabyted start --base_dir=/home/yugabyte-2.2.0.0/data4 --listen=127.0.0.4 --join=127.0.0.1
Review cluster status
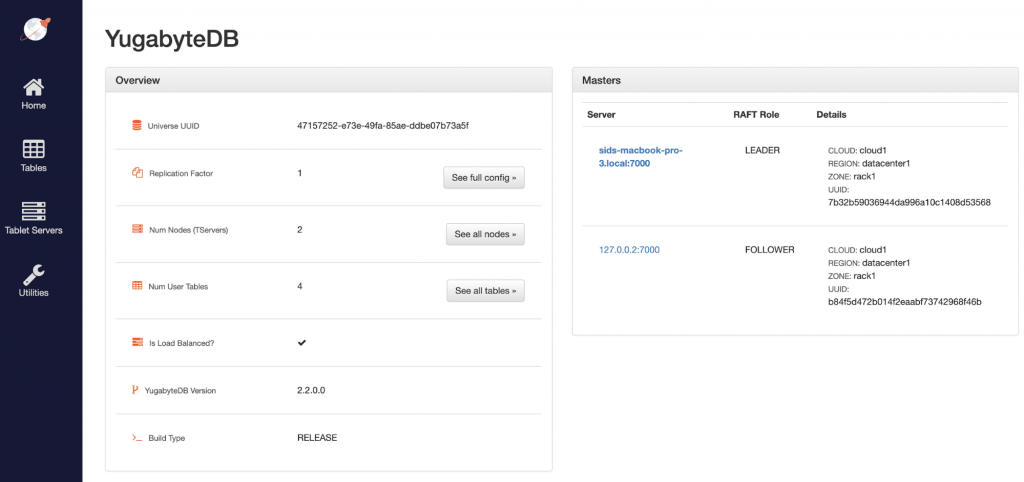
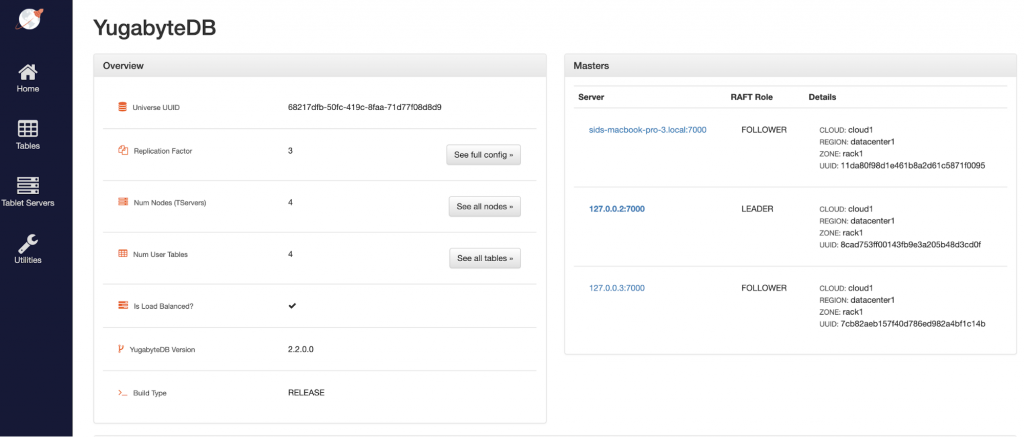
As we can see below, the Num Nodes (TServers) changed to 4 but the YB-Masters count remained at 3. This is because this fourth node does not require a new YB-Master server since the existing 3 YB-Master servers already provide resilience against failures in this RF3 cluster.
Connect to node 4 and execute distributed transactions
./bin/ysqlsh -h 127.0.0.4
\c yb_demo;
Now that you are in the yb_demo database context, run the distributed transaction that simulates a real-world order with ACID properties across the decrement inventory operation and new order creation operation.
BEGIN TRANSACTION;

/* First insert a new order into the orders table. */
INSERT INTO orders
  (id, created_at, user_id, product_id, discount, quantity, subtotal, tax, total)
VALUES (
  (SELECT max(id)+1 FROM orders)                 /* id */,
  now()                                          /* created_at */,
  1                                              /* user_id */,
  2                                              /* product_id */,
  0                                              /* discount */,
  10                                             /* quantity */,
  (10 * (SELECT price FROM products WHERE id=2)) /* subtotal */,
  0                                              /* tax */,
  (10 * (SELECT price FROM products WHERE id=2)) /* total */
) RETURNING id;

/* Next decrement the total quantity from the products table. */
UPDATE products SET quantity = quantity - 10 WHERE id = 2;

COMMIT;
We can verify that the order got inserted by running the following.
SELECT * from orders WHERE id = (SELECT max(id) FROM orders);
We can also verify that the total quantity of product id 2 in the inventory is 4990 (which is 5000 - 10) by running the following query.
SELECT id, category, price, quantity FROM products WHERE id=2;
Destroy node 4
To make our lives a bit challenging, let us completely destroy the node 4 that we used in the previous step. This can simulate a cluster shrink scenario at an online retailer after the rush of Black Friday and Cyber Monday.
bin/yugabyted destroy --base_dir=/home/yugabyte-2.2.0.0/data4
Connect to node 3 and run queries
We can now verify that the transaction we performed on node 4 prior to its loss is still available on the cluster.
./bin/ysqlsh -h 127.0.0.3
\c yb_demo;
SELECT * from orders WHERE id = (SELECT max(id) FROM orders);
SELECT id, category, price, quantity FROM products WHERE id=2;
Summary
We believe yugabyted is a very important first step towards simplifying the new user experience for YugabyteDB. Over the next few releases, we will continue to advance our feature set, including hardening and expanding the capabilities of yugabyted multi-node. We welcome all users to give yugabyted a try today and provide us feedback via GitHub and Slack.


