One LDAP Login for YugabyteDB Anywhere and Your Database

November 3, 2026
Every database team has to answer one simple question: who is allowed to log in, and what are they allowed to do?
In YugabyteDB, this question comes up in two places:
- People log in to the YugabyteDB Anywhere web console to manage clusters.
- People and applications connect to the database itself to read and write data.
In many companies, these two logins are managed separately, with separate users and separate passwords.
That works at first, but it gets harder as the team grows. People have too many passwords to remember. When someone leaves, an admin has to remove them from every system by hand. And nobody can easily answer “who has access to what?”
In this blog post, we show how to fix this issue using LDAP. You keep all your users in one place, such as Active Directory or OpenLDAP, and YugabyteDB checks every login against it for the web console and the database. We explain what LDAP is, how it fits into YugabyteDB, and how to set it up step by step.
Why Choose YugabyteDB?
YugabyteDB is an open-source, distributed SQL database. Instead of keeping all data on one server, it spreads the data across many servers, called nodes. If a node, a zone, or even a whole region goes down, the database keeps running. When you need more capacity, you add more nodes, and YugabyteDB automatically moves data to them.
A big reason teams choose YugabyteDB is that they don’t have to learn a new database language. YugabyteDB provides two APIs, and each is compatible with a popular open-source database:
| API | Compatible with | Tools and drivers | Good for |
|---|---|---|---|
| YSQL | PostgreSQL | ysqlsh, psql, JDBC, PostgreSQL drivers and ORMs | Relational apps, joins, transactions |
| YCQL | Apache Cassandra (CQL) | ycqlsh, cqlsh, Cassandra drivers | High-throughput, wide-column workloads |
Because YSQL reuses the PostgreSQL query layer, most PostgreSQL features work as they are. This includes the way PostgreSQL handles logins, which is what makes LDAP login for YSQL possible. YCQL has its own LDAP support, which we also cover below.
To run YugabyteDB in production, many teams use YugabyteDB Anywhere (YBA). YugabyteDB Anywhere is a self-managed platform with a web console and an API. You use it to create clusters (YugabyteDB Anywhere calls them universes), change their settings, upgrade them, back them up, and monitor them. YugabyteDB Anywhere has its own users and its own login, separate from the database.
What is LDAP?
LDAP stands for Lightweight Directory Access Protocol. It is a standard way to store user accounts and check passwords. You can think of it as a company phone book that also knows each person’s password and which teams they belong to. Microsoft Active Directory, OpenLDAP, and FreeIPA all speak LDAP.
An LDAP directory stores its entries in a tree, a bit like folders on a disk. A few short names come up again and again:
| Term | Meaning | Example |
|---|---|---|
| dc | A part of the domain name, at the top of the tree | dc=example,dc=com |
| ou | A folder that groups entries | ou=People, ou=Groups |
| cn | The name of a person or a group | cn=db-admins |
| uid / mail | The user name or email that a person types to log in | alice, alice@example.com |
| DN | The full address of one entry | uid=alice, ou=People, dc=example, dc=com |
When someone logs in, YugabyteDB checks them in two quick steps, often called Search and Bind.
- First, it connects to LDAP with a service account and searches for the person by the name they typed.
- Then it tries to connect to LDAP again as that person, using the password they typed.
If LDAP accepts it, the password is correct, and the person is let in. YugabyteDB never stores the password as LDAP checks it every time.
Login Methods in YugabyteDB
YSQL handles logins the same way as PostgreSQL. It keeps a list of login rules and reads them from top to bottom. The first rule that matches a connection decides how that user must prove who they are. These are the main methods:
| Method | How it checks the user | When to use it |
|---|---|---|
| trust | No check at all | Only for local testing |
| password / md5 | Password stored in the database | Older setups |
| scram-sha-256 | Password stored in the database, sent safely | Default for local users |
| cert | Client TLS certificate | Apps and services |
| ldap | Password checked by an LDAP server | Central user management (the topic of this blog) |
| jwt | Token from an OIDC provider, used as the password | Okta, Azure AD, Keycloak |
With most of these methods, the database keeps the password itself. With LDAP, the database asks an outside system to check the login instead. That is the key idea behind central login management.
YCQL follows the Cassandra model. It uses password-based login when use_cassandra_authentication is enabled, and it can check those passwords against LDAP via a set of ycql_ldap_* settings.
How it All Fits Together
The image below shows the full setup: the people and apps that connect, the two ways in (the YBA console and the database), and the one LDAP server that checks both.
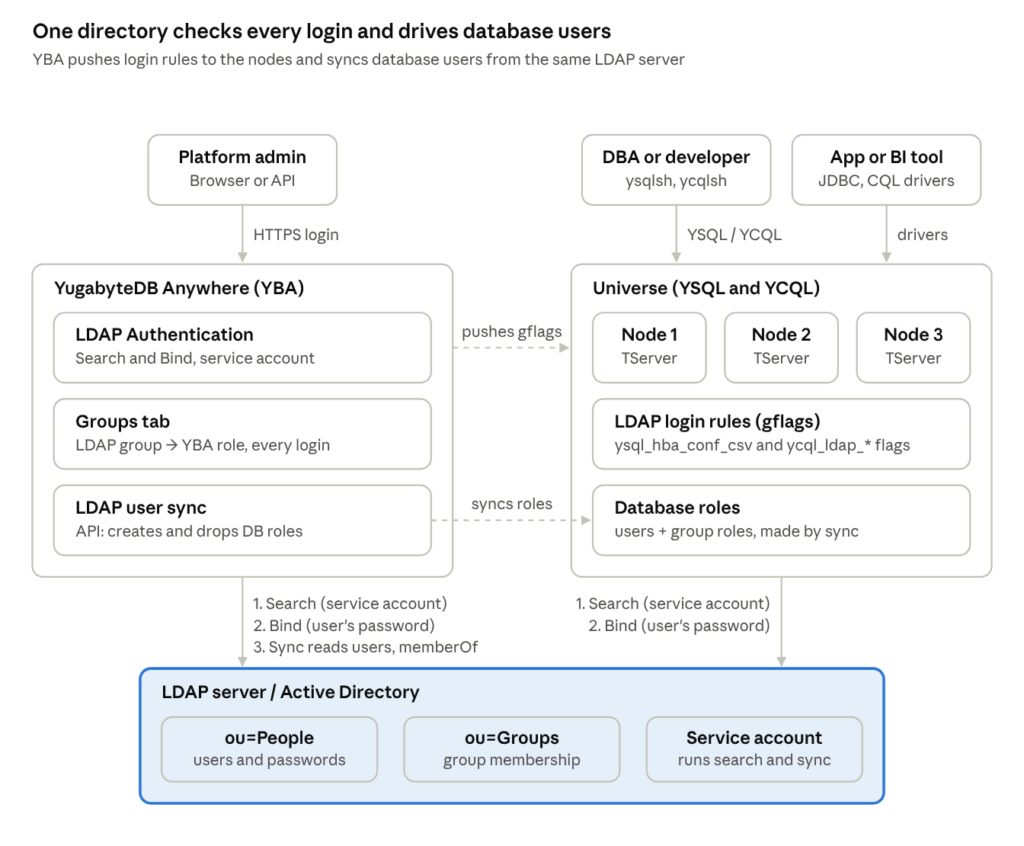
A platform admin logs in to YugabyteDB Anywhere from a browser, and YugabyteDB Anywhere checks that login with LDAP. A DBA or an application connects directly to the database using YSQL or YCQL, and each database node checks login with LDAP on its own.
YugabyteDB Anywhere also sends the login settings to every node in the universe, so all nodes follow the same rules. Both sides use the same Search and Bind steps.
YugabyteDB Anywhere can also read users and groups from LDAP and create or drop the matching database roles. This is the LDAP user sync, covered later.
The platform and the database are set up separately. Turning on LDAP for the YugabyteDB Anywhere console does not enable it for the database, and vice versa. The next sections cover each one.
Setting up LDAP for the YugabyteDB Anywhere Platform
Before you start, ask your LDAP or Active Directory team for four things:
- The server address and port (for example ldap.example.com:389)
- The base DN where users live (for example dc=example,dc=com)
- A service account with its password
- The field people type when they log in (usually uid, mail, or sAMAccountName)
Then log in to YugabyteDB Anywhere as a Super Admin and open Admin → Access Management → User Authentication → LDAP Configuration. Turn on LDAP Enabled, and fill in the fields like this:
| Field | What to enter | Why |
|---|---|---|
| LDAP URL | ldap.example.com:389 | Where YugabyteDB Anywhere finds the LDAP server |
| Security Protocol | Secure LDAP (LDAPS), LDAP with StartTLS, or None | Use LDAPS or StartTLS in production to encrypt traffic |
| LDAP Base DN | dc=example,dc=com | Where to start looking for users |
| LDAP DN Prefix (Optional) | CN= (the default) | Put in front of the user name when YugabyteDB Anywhere builds a DN; used with Simple Bind |
| LDAP Customer UUID (Optional) | leave empty | Only needed when one YugabyteDB Anywhere serves several customers |
| Binding Mechanism | Search and Bind | Finds the user first, then checks the password |
| Search Attribute | mail or uid (sAMAccountName on AD) | What the user types in the login box |
| Search Filter | leave empty | In YugabyteDB Anywhere 2026.1.1.1 it replaces the user search instead of narrowing it |
| Bind DN / Password (Add Service Account Details) | cn=svc-yba,dc=example,dc=com and its password | Service account, used only to search; YugabyteDB Anywhere stores the password hidden |
Click Save when you are done. It is a good habit to reload the page afterward and check that your values are still there. The top of the page looks like this:
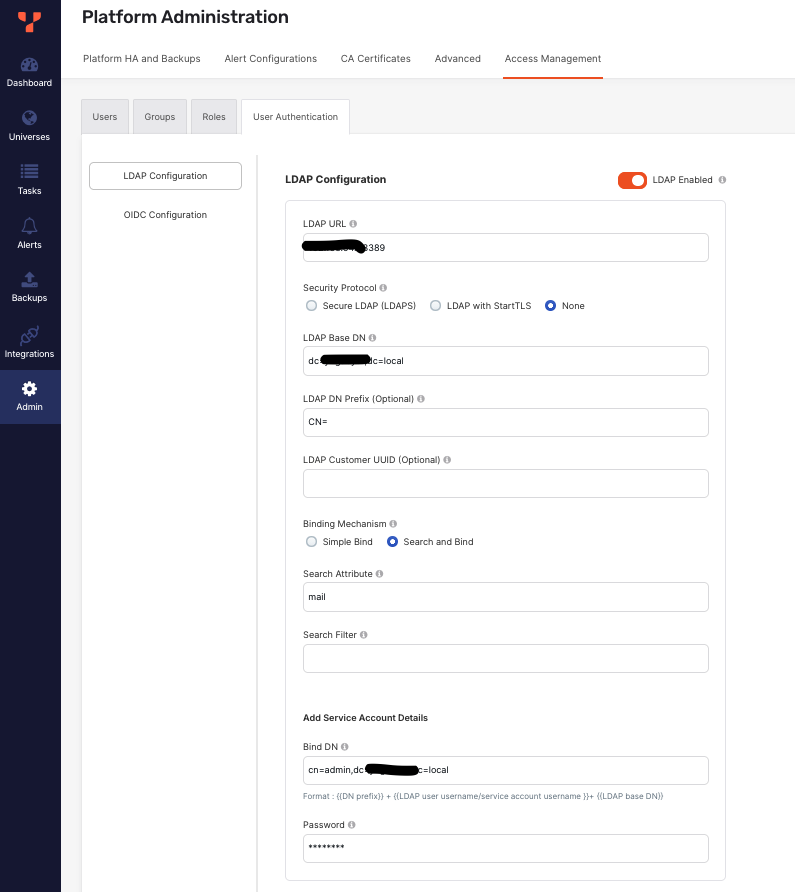
Further down the same page, Role Settings decides which YugabyteDB Anywhere role LDAP users get:
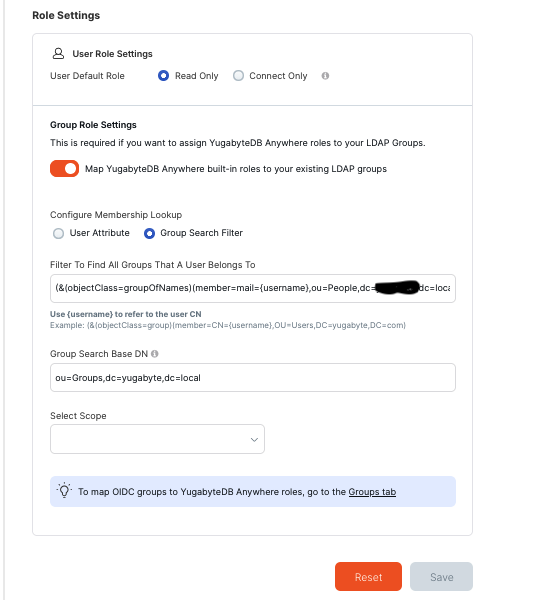
| Setting | What to enter | Why |
|---|---|---|
| User Default Role | Read Only, or Connect Only | Role for users who are in no mapped group. Connect Only lets them sign in but see nothing |
| Map YugabyteDB Anywhere built-in roles to your existing LDAP groups | On | Needed for the group mapping in the next section |
| Configure Membership Lookup | Group Search Filter (or User Attribute, if users carry memberOf) | How YugabyteDB Anywhere finds the groups a user belongs to |
| Filter To Find All Groups That A User Belongs To | (&(objectClass=groupOfNames)(member=mail={username},ou=People,dc=example,dc=com)) | {username} is replaced by what the user typed |
| Group Search Base DN | ou=Groups,dc=example,dc=com | Where the groups are |
| Select Scope | Subtree | Search the whole tree below the Group Search Base DN; check it is set before you save |
Now try logging in to the YugabyteDB Anywhere console using an LDAP username and password. If the login fails, the web page often shows only a short message. You can see the real error by calling the login API directly:
curl -k -X POST https://<yba-host>/api/v1/login \
  -H "Content-Type: application/json" \
  -d '{"email":"alice@example.com","password":"<ldap-password>"}'
If the login works, the response contains an authToken. The first time a person logs in, YugabyteDB Anywhere also creates a local user record for them, so they appear under Admin → Access Management → Users.
Mapping LDAP Groups to YugabyteDB Anywhere Roles
Logging in is only half of the story. You also need to decide what each person can do inside YugabyteDB Anywhere, and LDAP groups make this easy. Put your users into groups in LDAP. For example, cn=yba-admins for admins and cn=yba-readonly for people who only need to look. Then, in YugabyteDB Anywhere, open Admin → Access Management → Groups, click Add Group, and connect each LDAP group to a YugabyteDB Anywhere role:
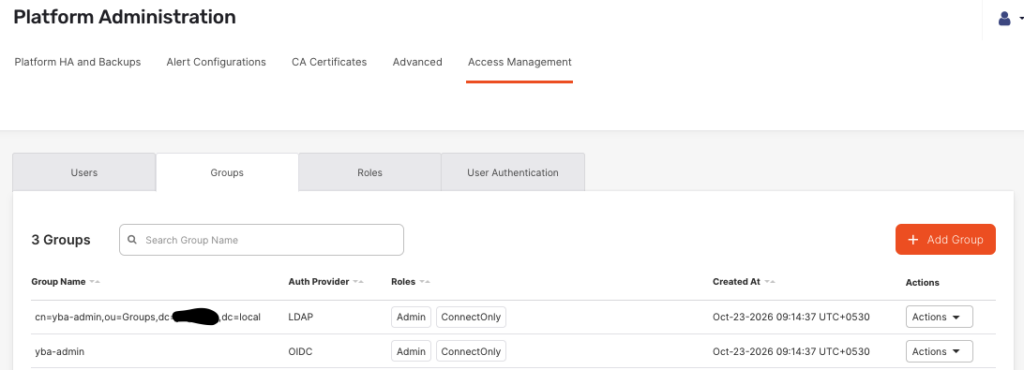
Enter the group’s full DN, exactly as it appears in LDAP, and check that only the role you want is selected before you save.
Group roles are checked every time someone logs in. If you move a person from one group to another, their YugabyteDB Anywhere role changes the next time they log in, but YugabyteDB Anywhere remains unchanged. People who are not in any mapped group get the User Default Role from Role Settings, such as Read Only or Connect Only, if they should not see anything in YugabyteDB Anywhere.
Keep in mind that these groups control roles in YugabyteDB Anywhere only. Permissions inside the database are still managed with GRANT.
Two more points are worth knowing:
- From YugabyteDB Anywhere v2026.1.2.0, you can also map an LDAP group to the SuperAdmin role, after turning on the global setting
yb.security.allow_superadmin_user_group_mapping. - Whatever you map, always keep at least one local Super Admin in YugabyteDB Anywhere as a break-glass login. If every admin comes from LDAP and the LDAP server is down, nobody can get in.
Setting up LDAP for YSQL
The database side is set up separately from the platform. These settings control who can connect to YSQL using tools such as ysqlsh, psql, JDBC, or a BI tool.
Start by creating the user in the database. LDAP only checks the password, so the user (in PostgreSQL terms, the role) must already exist. Don’t give it a password; LDAP takes care of that:
CREATE ROLE alice LOGIN;
If you would rather not create every user by hand, YugabyteDB Anywhere can create them for you from LDAP. We cover this in Creating database users automatically, below.
Next, write the login rule. An LDAP rule for YSQL looks like this:
hostssl all all all ldap ldapserver=ldap.example.com ldapport=389 ldapbasedn="dc=example,dc=com" ldapbinddn="cn=svc-ysql,dc=example,dc=com" ldapbindpasswd=<password> ldapsearchattribute=uid
Each part has a simple job. hostssl all all all means the rule applies to any user, any database, and any address, and only over an encrypted (TLS) connection:
ldaptells YSQL to check the password with LDAPldapserverand ldapport point to the LDAP serverldapbasednsays where to searchldapbinddnandldapbindpasswdare the service account, andldapsearchattributeis the LDAP field that must match the database user name
You don’t edit ysql_hba.conf on the nodes yourself. Instead, you set the rules as a database flag in the console, and YugabyteDB Anywhere writes them to every node.
Open your universe and choose Actions → Edit Flags (in the new UI, Settings → Database → Advanced Config Flags). Click Add Flags → Add to T-Server, pick the flag ysql_hba_conf_csv, and enter a value like this:
hostssl all yugabyte all md5,hostssl all postgres all md5,"hostssl all all all ldap ldapserver=ldap.example.com ldapport=389 ldapbasedn=""dc=example,dc=com"" ldapbinddn=""cn=svc-ysql,dc=example,dc=com"" ldapbindpasswd=<password> ldapsearchattribute=uid"
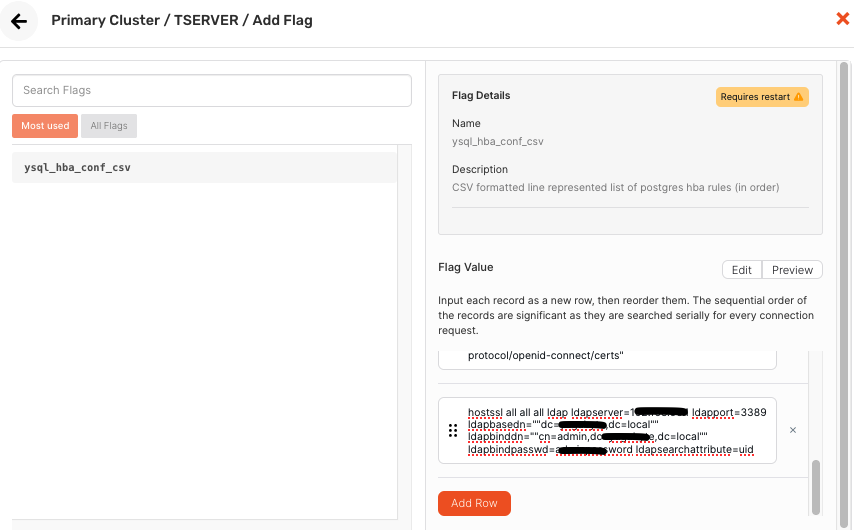
This value has three rules, read from left to right. The first two keep the built-in yugabyte and postgres admin users on normal passwords, so you can still log in even if the LDAP server is down. The third is the LDAP rule for everyone else.
Because the flag is a comma-separated list and the DN values contain commas, the LDAP rule is wrapped in double quotes, and each quote inside it is written twice (“”).
Our universe has client-to-node TLS turned on, so every rule starts with hostssl, which accepts only encrypted connections. If your universe does not use TLS, write host instead.
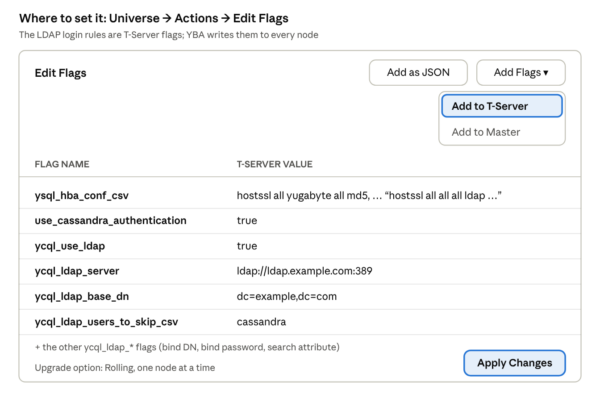
The YCQL flags in the next section appear on the same screen, so you can add the YSQL and YCQL flags together and apply them with a single rolling restart.
When you click Apply Changes, YugabyteDB Anywhere restarts the nodes one at a time so the database stays online. It sends the same rule to every node. Then test the login:
ysqlsh -h <db-host> -p 5433 -U alice -d yugabyte
Enter Alice’s LDAP password. If you see the yugabyte=> prompt, LDAP login for YSQL is working.
You don’t need to log in to a database node to test this. Install the YugabyteDB client tools on your laptop and connect over the network. If the universe uses TLS, first download its root certificate in YugabyteDB Anywhere under
Integrations → Security → Encryption in Transit → Actions → Download Root CA Cert, and pass it to the client:
PGSSLMODE=verify-ca PGSSLROOTCERT=~/yb-certs/root.crt ysqlsh -h -p 5433 -U alice -d yugabyte
Setting up LDAP for YCQL
YCQL uses a different set of settings, but the idea is the same. First, turn on YCQL authentication for the universe under Actions → More → Edit YCQL Configuration. This sets use_cassandra_authentication to true.
Then create the user in YCQL — for example, with ycqlsh as the cassandra admin:
CREATE ROLE alice WITH LOGIN = true;
Next, open Actions → Edit Flags again and add these T-Server flags. You can add them one by one with Add Flags → Add to T-Server, or paste them all at once with Add as JSON:
use_cassandra_authentication=true
ycql_use_ldap=true
ycql_ldap_server=ldap://ldap.example.com:389
ycql_ldap_base_dn=dc=example,dc=com
ycql_ldap_bind_dn=cn=svc-ycql,dc=example,dc=com
ycql_ldap_bind_passwd=<password>
ycql_ldap_search_attribute=uid
ycql_ldap_users_to_skip_csv=cassandra
These flags use the same Search and Bind steps as YSQL. The first flag is listed on purpose even though YCQL authentication is already on: the LDAP user sync, covered below, checks for it as a T-Server flag.
The last flag matters: it keeps the cassandra admin user on its normal password, so you can always log in, even if LDAP has a problem. After the rolling restart, test the login:
ycqlsh <db-host> -u alice -p <ldap-password>
With TLS on, add the certificate:
SSL_CERTFILE=~/yb-certs/root.crt ycqlsh <db-host> 9042 --ssl -u alice -p <ldap-password>
Creating Database Users Automatically
So far, every database user had to be created by hand with CREATE ROLE before LDAP could check their password, and removed by hand when they left.
YugabyteDB Anywhere can do both for you.
Its LDAP universe sync reads users and groups from LDAP and creates the matching roles in YSQL or YCQL. Each LDAP group becomes a role that can’t log in, each LDAP user becomes a role that can log in, and each user is granted the roles of their groups. Every time the sync runs, it also removes the roles of people who are no longer in LDAP.
The sync is an API (a preview feature, available from YugabyteDB Anywhere 2.20.1.0), and it works on universes that YugabyteDB Anywhere manages. Before the first run, four things need to be in place:
| Where | Setting | Why |
|---|---|---|
| YugabyteDB Anywhere runtime configuration (global) | yb.security.ldap | Turns the sync API on. Set it in Admin → Advanced → Global Configuration |
| LDAP directory | Users carry a memberOf attribute (Active Directory does this already; OpenLDAP needs its memberof overlay) | The sync reads each user’s groups from it |
| Universe T-Server flags, for YSQL | ysql_hba_conf_csv with an ldap rule | The sync only runs when LDAP login is on |
| Universe T-Server flags, for YCQL | use_cassandra_authentication=true set as an explicit T-Server flag, plus the ycql_ldap_* flags | The sync checks this flag, not the universe’s YCQL login switch |
YBA Console
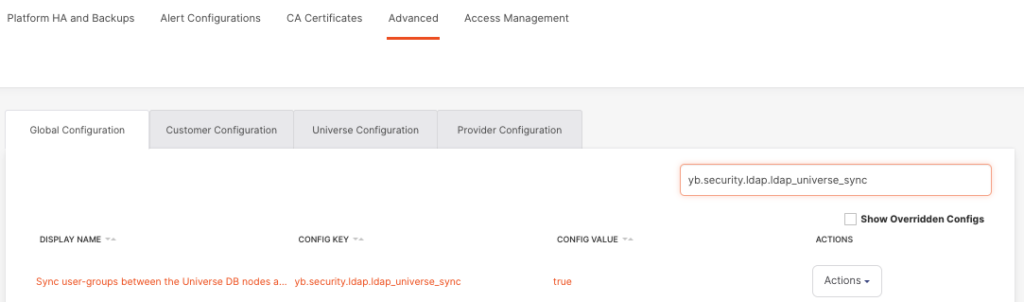
The first setting needs an explanation. yb.security.ldap.ldap_universe_sync is off by default, and while it is off, YugabyteDB Anywhere refuses the sync call.
That is deliberate: the sync is a preview feature that creates and drops database roles, so YugabyteDB Anywhere leaves it disabled until an admin decides to enable it. Turning it on changes nothing by itself as no users are created or removed. It only allows the sync to run when someone calls it.
Then you call the API with the LDAP and database details. This is the request we used for YSQL:
{
  "targetApi": "ysql",
  "dbUser": "yugabyte",
  "dbuserPassword": "<yugabyte password>",
  "ldapServer": "ldap.example.com",
  "ldapPort": 389,
  "ldapBindDn": "cn=svc-sync,dc=example,dc=com",
  "ldapBindPassword": "<password>",
  "ldapSearchFilter": "(objectClass=inetOrgPerson)",
  "ldapBasedn": "ou=People,dc=example,dc=com",
  "ldapGroupMemberOfAttribute": "memberOf",
  "ldapUserfield": "uid",
  "ldapGroupfield": "cn",
  "useLdapTls": false,
  "useLdapSsl": false,
  "createGroups": true,
  "excludeUsers": ["yugabyte", "postgres"]
}
curl -k -X POST https://<yba-host>/api/v1/customers/<customer-uuid>/universes/<universe-uuid>/ldap_roles_sync \ -H "X-AUTH-TOKEN: <token>" -H "Content-Type: application/json" --data @sync-ysql.json
ldapUserfield is the LDAP field that becomes the database user name (uid, or sAMAccountName on Active Directory). ldapGroupfield is the part of each group’s DN that becomes the group role name. excludeUsers lists roles the sync must never touch. For YCQL, send the same request with "targetApi": "ycql" and the cassandra admin.
We tested this on a lab universe running YugabyteDB Anywhere 2026.1.1.1.
After the first sync, the LDAP users asmith, bwayne and jdoe appeared as login roles in both YSQL and YCQL, each one a member of its LDAP group role. asmith could log in to both APIs with the LDAP password, and a wrong password was rejected.
We then added a new person to LDAP and ran the sync again: their role appeared, and they could log in right away. Nobody ran CREATE ROLE. When we deleted that person from LDAP, they could no longer log in, and the next sync automatically dropped their role.
Use Case Tested
We also changed that person’s password in LDAP while they were still active. The old password stopped working immediately, and the new one worked in YugabyteDB Anywhere, YSQL, and YCQL straight away, with no sync and no change to the database.
When we removed them from LDAP, their YugabyteDB Anywhere console logins were blocked at the same time as their database logins. Each sync run also appears in the universe’s Tasks tab in YugabyteDB Anywhere, so you can see when it ran and whether it succeeded.
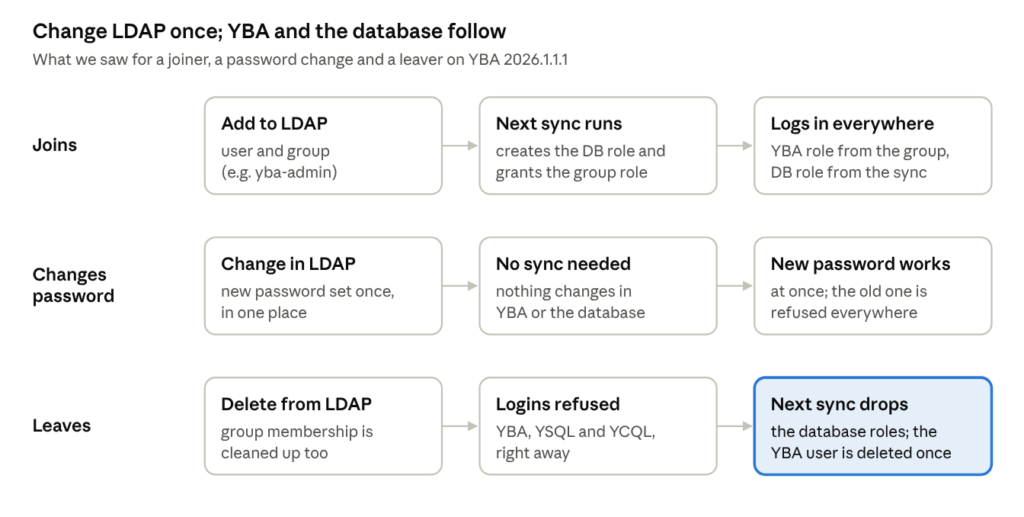
Logins follow LDAP at once. The sync handles the database roles, and the YugabyteDB Anywhere user record is the only thing you remove by hand.
Two additional things to note:
- First, the sync removes every role that isn’t a superuser and isn’t in LDAP, so list any local application users in
excludeUsersbefore the first run. - Second, the synced group roles start with no table permissions. Grant them once (for example,
GRANT SELECT ON ALL TABLES IN SCHEMA public TO "yba-readonly") and every member inherits it.
Running the Sync: What You Need to Do
Adding someone to LDAP does not create their database user by itself, and the setting above does not run anything on its own. Each sync is a single API call that runs once and then stops. These are the steps:
- Turn on the sync (once). In Admin → Advanced → Global Configuration, set
yb.security.ldap.ldap_universe_synctotrue. - Check the prerequisites (once). Users carry
memberOfin LDAP, and the YSQL and YCQL LDAP flags are set, as in the table above. - Write the sync requests (once). Save the YSQL request shown above as a file, for example
sync-ysql.json, and a YCQL copy assync-ycql.json. They list no people (only where to look in LDAP and how to connect) so you never edit them when people join or leave. They do hold the database admin and LDAP bind passwords, so make them readable only by the account that runs the sync. - Run the sync. Call the API with each file, as in the curl command above. The run shows in the universe’s Tasks tab, with its result.
- Schedule it. YBA has no built-in schedule and no console button for the sync, so use cron or your job scheduler to make the same call, for example, every 15 minutes:
*/15 * * * * /usr/local/bin/yb-ldap-sync.sh >> /var/log/yb-ldap-sync.log 2>&1
Here
yb-ldap-sync.shlogs in to YugabyteDB Anywhere and sends both request files. Without the request files, or the same settings inside the script, YugabyteDB Anywhere refuses every run.
What happens between syncs?
When you add someone to LDAP, they can log in to the YugabyteDB Anywhere console immediately, but the database returns “role does not exist” until the next sync creates their user. When you remove someone, every login (YugabyteDB Anywhere, YSQL, and YCQL) is denied at once, and the next sync drops their database user. A password change needs no sync at all: the new password works everywhere straight away.
Use Cases and Advantages
The most common reason to use LDAP is to allow DBAs and developers to connect to the database using their normal company login. There is no extra database password to create, share, or reset.
The same goes for applications and BI tools: their service accounts can live in the same directory as every other company account, instead of being one-off database users that nobody remembers creating.
LDAP also helps a lot when people join, change teams, or leave. You make the change once, in LDAP, and both YugabyteDB Anywhere and the database follow. For audits and compliance, there is one place to answer the question “who has access to what right now?”
Put simply, you get one login for both the console and the database. Offboarding is easy, because disabling a user in LDAP blocks them everywhere. YugabyteDB never stores the passwords, and your company’s password rules (strength, expiry, lockout, etc) apply automatically. It also works with the directory you already have, whether that is Active Directory, OpenLDAP, or FreeIPA.
Limits
LDAP checks a person only when they log in. That leads to a few limits worth knowing before you go to production:
- First, removing a user from LDAP does not delete their YugabyteDB Anywhere user record. Their database roles also remain in place unless you use LDAP user sync, which removes them on its next run. Without sync, run
DROP ROLE(orALTER ROLE ... NOLOGIN) in the database yourself. For YugabyteDB Anywhere, delete the user once under Admin → Access Management → Users. - Second, people who are already logged in stay logged in. Blocking a user in LDAP stops their next login, not their current session. If you need to cut someone off right away, end their database session, for example with
pg_terminate_backend(). - Third, if your only LDAP server goes down, nobody can log in with LDAP. In production, put a load balancer in front of two or more LDAP servers, and keep the
yugabyteandcassandraadmin users on local passwords as a backup.
Conclusion
This blog shared how a single LDAP directory can manage logins for both YugabyteDB Anywhere and the database, including:
- How to connect the YugabyteDB Anywhere console to LDAP and map LDAP groups to its roles
- How to turn on LDAP login for YSQL and YCQL with a few T-Server flags and a rolling restart
- How LDAP universe sync can create and remove database roles for you
The result is a single set of credentials per person, onboarding and offboarding handled in one place, your company’s password rules applied everywhere, and a clear answer to “who has access to what?”
All this without YugabyteDB storing a single password.
To learn more, check out: