Secure Spring Boot Applications Using YugabyteDB and Secret Manager Services
July 19, 2023
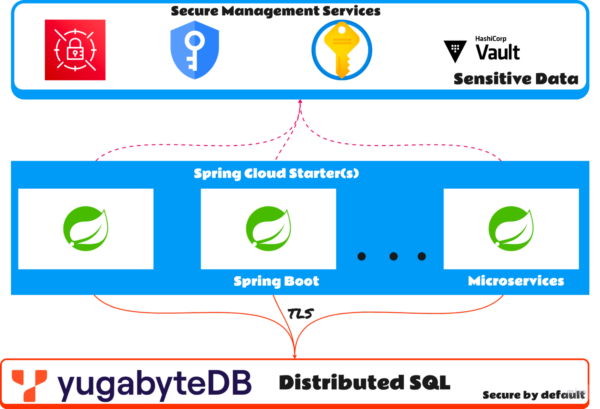
Security plays an important role in software development. Managing sensitive data such as API keys, database credentials, and certificates requires careful attention. To safeguard against unauthorized access and potential breaches, it’s important you securely store and access these sensitive data within your application. Additionally, businesses prioritize application security because data breaches are becoming more common. The good news is that YugabyteDB offers advanced security features such as Transport Layer Security (TLS) encryption, ensuring the protection of your Spring Boot applications. Additionally, you can strengthen the security of your application by utilizing native cloud secret management services such as AWS Secrets Manager, GCP Secret Manager, Azure Key Vault, or Hashicorp Vault. These services enable secure storage and management of sensitive data, with access restricted to authorized users.
In this blog post, we will guide you on securing your Spring Boot application with YugabyteDB over TLS using the native cloud secret management services.
YugabyteDB’s Security Features for Spring Boot Applications
Before we get started, make sure you have the following:
- Maven 3.9+*
- JDK 17+*
- Stable or Preview YugabyteDB release (> 2.18.1.0, 2.19.0.0)
- Access to AWS Secrets Manager, GCP Secret Manager, Azure Key Vault, or Hashicorp Vault
*Note: You can use SDKMAN to install Maven and JDK dependencies.
The source code repository includes a Gitpod launcher file, allowing you to test the integration via a browser interface in the cloud without installing these prerequisites.
A note on what will be covered:
- Enabling encryption in transit for node-to-node communication
- Enabling one-way TLS for client-to-database communication
- Enabling mutual TLS for client-to-database communication
- Integrating Spring Boot applications with secret manager (SM) services such as AWS secrets manager, GCP secret manager, Azure key vault, and Hashicorp vault to access sensitive data such as database credentials, certificates, and private keys in a secure manner
This blog focuses on database integration and security. Provisioning and securing the secret manager’s services are not covered. Refer to the provider’s documentation for installation, configuration, and secure operating procedures.
Some of the assumptions involved are:
The following assumptions, which should be adjusted depending on your environment, have been made in order to simplify and clarify the process we will go through.
- /home/cody/ as the working home directory
- Spring-boot application source code is cloned to /home/cody/ybdb-sealed-secrets
- YugabyetDB binary is placed under /app/yugabytedb/
- YugabyteDB client binaries are under /app/yugabytedb/bin/
- Refer to the provider’s documentation for installation, configuration, and secure operating procedures for configuring Hashicorp vault, AWS secrets manager, GCP secret manager, and Azure key vault.
How to Start Securing Your Spring Boot Application
You can find the code snippet we will use in this GitHub repository. Clone this repository on a local workstation to the directory /home/cody/ybdb-sealed-secrets and launch your preferred IDE to quickly navigate and explore the application code.
git clone https://github.com/srinivasa-vasu/ybdb-sealed-secrets
Get started quickly and easily with YugabyteDB using the yugabyted* executable file. This native server acts as a parent server, connecting the YB-TServer and YB-Master servers. Managing yugabyted as an always-on service is straightforward, and it serves as the single point of entry into the database cluster.
*A known minor bug in Yugabyted’s TLS support will be fixed in versions higher than 2.18.1.0 and 2.19.0.0.
Generate the server key and certificates:
With yugabyted, generate the TLS keys required for node-to-node communication. For the sake of simplicity, we’ll create a cluster on a single machine using loopback addresses. The IP addresses for the three instances are 127.0.0.2, 127.0.0.3, and 127.0.0.4. If you have three separate machines, adjust the IP addresses accordingly.
cd /home/cody
mkdir ybdb1 ybdb2 ybdb3 certs
Use yugabyted to generate the TLS certs for all 3 instances:
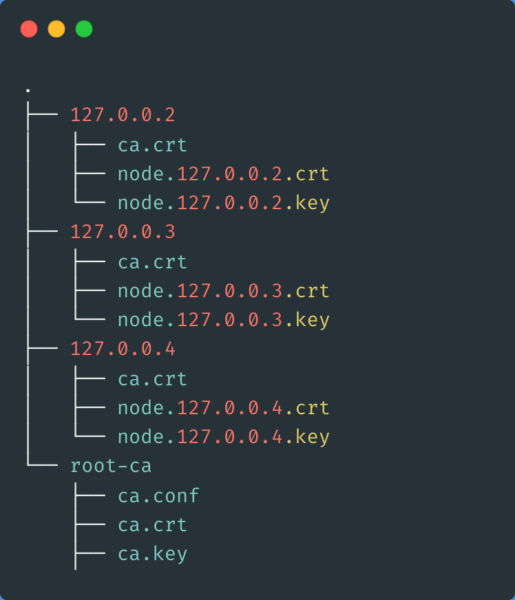
yugabyted cert generate_server_certs --hostname 127.0.0.2,127.0.0.3,127.0.0.4 –base_dir=/home/cody/certs/
This will generate the keys and certificates for all three instances.
Start the YugabyteDB instance(s):
Use yugabyted to build an RF=3 cluster with encryption in transit and authentication enabled. To create a cluster with multiple instances, create the first instance and then add additional instances using the –join flag to the cluster.
Use the following command to bring up the first instance:
yugabyted start --base_dir=/home/cody/ybdb1 --advertise_address=127.0.0.2 --tserver_flags=ysql_hba_conf_csv='{hostssl all all all md5}' --secure --certs_dir=/home/cody/certs/generated_certs/127.0.0.2/Start the second and third instances:
yugabyted start --base_dir=/home/cody/ybdb2 --advertise_address=127.0.0.3 --join=127.0.0.2 --tserver_flags=ysql_hba_conf_csv='{hostssl all all all md5}' --secure --certs_dir=/home/cody/certs/generated_certs/127.0.0.3/

yugabyted start --base_dir=/home/cody/ybdb3 --advertise_address=127.0.0.4 --join=127.0.0.2 --tserver_flags=ysql_hba_conf_csv='{hostssl all all all md5}' --secure --certs_dir=/home/cody/certs/generated_certs/127.0.0.4/
The replication factor of the cluster defaults to 3 automatically. Once the commands above are run, you should see the following,
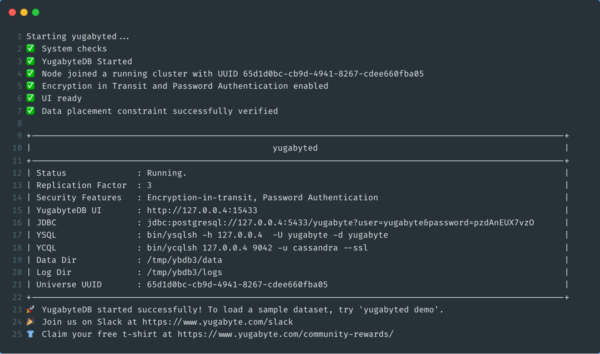
We can change the default user and password by setting the environment variables appropriately. Refer to the yugabyted documentation for instructions on modifying the default configuration.
–secure flag enables encryption in transit and authentication ysql_hba_conf_csv='{hostssl all all all md5}’- This record matches connection attempts made using TCP/IP, but only when the connection is made with SSL encryption
Secure the spring-boot app with TLS
Navigate to the cloned spring-boot application directory, located at /home/cody/ybdb-sealed-secrets. It contains four distinct Maven and Spring profiles for AWS, Azure, GCP, and Vault secret-manager services for the secure connection and consumption of sensitive data.
The Spring Cloud module simplifies integration with hosted native cloud services. It provides a convenient way to interact with self or managed services using well-known Spring idioms and APIs. From an application perspective, the username, password, and root certificate will be stored in the secret manager services.
The datasource is defined in src/main/resources/application.yml and remains consistent across the different integration profiles mentioned in the next sections.
spring:
  application:
    name: ybdb-vault
  datasource:
    url: jdbc:yugabytedb://127.0.0.2:5433/yugabyte?ssl=true&sslmode=verify-ca
AWS Secrets Manager
Spring Cloud for Amazon Web Services simplifies the integration with hosted Amazon Web Services. The Maven starter dependency to activate this convention is as follows:
<dependency>
  <groupId>io.awspring.cloud</groupId>
  <artifactId>spring-cloud-aws-starter-secrets-manager</artifactId>
</dependency>
Refer to the <id>sm-aws</id> section in the Maven build file pom.xml for the complete definition. The dependency mentioned above simplifies the secrets-manager integration by automatically configuring the relevant beans. This helps you avoid alot of boilerplate code.
The Spring profile configuration is available in the application-aws.yml file under src/main/resources/
spring:
  config:
    import: aws-secretsmanager:ybdb-vault
  cloud:
    aws:
      credentials:
        profile:
          name: ${AWS_PROFILE}
      secretsmanager:
        region: ap-south-1
      region:
        profile:
          name: ${AWS_PROFILE}
  datasource:
    username: ${ybdb-username}
    password: ${ybdb-password}
ybdb:
  rootCert: ${ybdb-root-cert}
Create the following in the secrets-manager service:
- Create a secret-id named ybdb-vault
- Under ybdb-vault, create the following key/value pairs
- key: ybdb-username, value: <value>
- key: ybdb-password, value: <value>
- key: ybdb-root-cert, value: <value> in base64 encoded format.
During boot time, the AWSs starter dependency will import the keys from the secret-id ybdb-vault and populate the relevant property placeholders mentioned in the configuration file above.
Build the app:
To enable the aws-secrets-manager build profile, set the environment variable env.scp=aws.
mvn -Denv.scp=aws clean package
Run the app:
To activate the aws-specific binding profile, specify the spring profile VM argument.
java -jar -Dspring.profiles.active=aws ./target/sealedsecret-1.0.jar
GCP Secret Manager
Spring Cloud for GCP simplifies the integration with managed GCP Services. The Maven starter dependency to bootstrap “convention over configuration” is as follows:
<dependency>
  <groupId>com.google.cloud</groupId>
  <artifactId>spring-cloud-gcp-starter-secretmanager</artifactId>
</dependency>
Refer to the <id>sm-gcp</id> section in the Maven build file pom.xml for the complete definition. The dependency mentioned above simplifies the secret manager integration by automatically configuring the relevant beans, avoiding a lot of boilerplate code.
The Spring profile configuration is available in the application-gcp.yml file under src/main/resources/
spring:
  config:
    import: sm://
  cloud:
    gcp:
      project-id: ${GOOGLE_CLOUD_PROJECT}
      credentials:
        location: ${GOOGLE_APPLICATION_CREDENTIALS}
      secretmanager:
        enabled: true
  datasource:
    username: ${sm://ybdb-username}
    password: ${sm://ybdb-password}
ybdb:
  rootCert: ${sm://ybdb-root-cert}
Create the following in the secret manager service:
- Create the following key/value pairs
- key: ybdb-username, value: <value>
- key: ybdb-password, value: <value>
- key: ybdb-root-cert, value: <value> in base64 encoded format.
During boot time, the GCPstarter dependency will import the keys and populate the relevant property placeholders mentioned in the configuration file above.
Build the app:
To enable the gcp-secretmanager build profile, set the environment variable env.scp=gcp.
mvn -Denv.scp=gcp clean package
Run the app:
To activate the gcp-specific binding profile, specify the spring profile VM argument.
java -jar -Dspring.profiles.active=gcp ./target/sealedsecret-1.0.jar
Azure Key Vault
Spring Cloud for Azure simplifies integration with hosted Azure Services. The Maven starter dependency to activate this convention is as follows:
<dependency>
  <groupId>com.azure.spring</groupId>
  <artifactId>spring-cloud-azure-starter-keyvault</artifactId>
</dependency>
Refer to the <id>sm-azure</id> section in the Maven build file pom.xml for the complete definition. The dependency mentioned above simplifies the keyvault integration by automatically configuring the relevant beans, avoiding a lot of boilerplate code.
The Spring profile configuration is available in the application-azure.yml file under src/main/resources/
spring:
  cloud:
    azure:
      key-vault:
        secret:
          property-sources[0]:
            name: ${AZURE_KEY_VAULT_NAME}
            endpoint: ${AZURE_KEY_VAULT_ENDPOINT}
            secret-keys: # pull only these keys
              - ybdb-username
              - ybdb-password
              - ybdb-root-cert
              - ybdb-client-key
              - ybdb-client-cert
  datasource:
    username: ${ybdb-username}
    password: ${ybdb-password}
ybdb:
  rootCert: ${ybdb-root-cert}
Create the following in the keyvault service:
- Create the following key/value pairs
- key: ybdb-username, value: <value>
- key: ybdb-password, value: <value>
- key: ybdb-root-cert, value: <value> in base64 encoded format.
During boot time, the Azure starter dependency will import the keys from the keyvault endpoint service and populate the relevant property placeholders mentioned in the configuration file above.
Build the app:
To enable the azure-keyvault build profile, set the environment variable env.scp=azure.
mvn -Denv.scp=azure clean package
Run the app:
To activate the azure-specific binding profile, specify the spring profile VM argument.
java -jar -Dspring.profiles.active=azure ./target/sealedsecret-1.0.jar
Hashicorp Vault
Spring Cloud Vault simplifies integration with the hosted/managed Vault service. The Maven starter dependency to activate this convention is as follows:
<dependency>
  <groupId>org.springframework.cloud</groupId>
  <artifactId>spring-cloud-starter-vault-config</artifactId>
</dependency>
Refer to the <id>sm-vault</id> section in the Maven build file pom.xml for the complete definition. The dependency mentioned above simplifies the vault integration by automatically configuring the relevant beans, avoiding a lot of boilerplate code.
The Spring profile configuration is available in the application-vault.yml file under src/main/resources/
spring:
  config:
    import: vault://
  cloud:
    vault:
      token: #{systemProperties['VAULT_TOKEN']}
      kv:
        enabled: true
      scheme: http
  datasource:
    username: ${ybdb-username}
    password: ${ybdb-password}
ybdb:
  rootCert: ${ybdb-root-cert}
Create the following in the vault service:
- Create a secret path for the app named ybdb-vault (this matches the spring.application.name property)
- Under ybdb-vault, create the following key/value pairs
- key: ybdb-username, value: <value>
- key: ybdb-password, value: <value>
- key: ybdb-root-cert, value: <value> in base64 encoded format.
During boot time, the vault config starter dependency will import the keys from the secret-path ybdb-vault and populate the relevant property placeholders mentioned in the configuration file above.
Build the app:
To enable the vault build profile, set the environment variable env.scp=vault.
mvn -Denv.scp=vault clean package
Run the app:
To activate the vault-specific binding profile, specify the spring profile VM argument.
java -jar -Dspring.profiles.active=vault ./target/sealedsecret-1.0.jar
Securing the Spring Boot App with Mutual TLS
To enforce mutual TLS instead of one-way TLS in the YugabyteDB YSQL layer, modify the ysql_hba_conf_csv option to create hostssl records with the clientcert=1 option for all relevant client connections. This ensures that clients must present a certificate when connecting to the server. The modified script is as follows:
yugabyted start --base_dir=/home/cody/ybdb1 --advertise_address=127.0.0.2 --tserver_flags=ysql_hba_conf_csv='{hostssl all all all md5 clientcert=1}' --secure --certs_dir=/home/cody/certs/generated_certs/127.0.0.2/

yugabyted start --base_dir=/home/cody/ybdb2 --advertise_address=127.0.0.3 --join=127.0.0.2 --tserver_flags=ysql_hba_conf_csv='{hostssl all all all md5 clientcert=1}' --secure --certs_dir=/home/cody/certs/generated_certs/127.0.0.3/

yugabyted start --base_dir=/home/cody/ybdb3 --advertise_address=127.0.0.4 --join=127.0.0.2 --tserver_flags=ysql_hba_conf_csv='{hostssl all all all md5 clientcert=1}' --secure --certs_dir=/home/cody/certs/generated_certs/127.0.0.4/
Generate the Client Key and Certificates
It’s possible to create client keys and certificates in various ways. The following steps are useful for learning, testing, and development. To use in production, make sure to generate it through a well-known, trusted certificate authority.
- Generate the Private Key and CSR:
openssl req -newkey rsa:2048 -keyout ybdb-client.key -out ybdb-client.csr -config ybdb.ext
Sample ybdb.ext config:
# the fully qualified server (or service) name
FQDN = ybdb.local
# the name of your organization
ORGNAME = ybdb
# subjectAltName entries: to add DNS aliases to the CSR
# ALTNAMES = DNS:$FQDN
[ req ]
default_bits = 2048
default_md = sha256
prompt = no
encrypt_key = no
distinguished_name = dn
req_extensions = req_ext
[ dn ]
C = CH
O = $ORGNAME
CN = $FQDN
[ req_ext ]
subjectAltName = @alt_names
[alt_names]
DNS.1 = ybdb.local
DNS.2 = 127.0.0.1
DNS.3 = localhost
DNS.4 = 127.0.0.2
- CSR Signing:
Sign the CSR using the same root CA that was used for the server side.openssl x509 -req -CA [rootCA_cert] -CAkey [rootCA_key] -in ybdb-client.csr -out ybdb-client.crt -CAcreateserial -extfile ybdb-csr.ext
Sample ybdb-csr.ext config:
authorityKeyIdentifier=keyid,issuer
basicConstraints=CA:FALSE
subjectAltName = @alt_names
[alt_names]
DNS.1 = ybdb.local
DNS.2 = 127.0.0.1
DNS.3 = localhost
DNS.4 = 127.0.0.2
- Convert Client Private Key from PEM to DER:
This is a Java requirement; it expects the private key in Distinguished Encoding Rules (DER) encoding format.openssl pkcs8 -topk8 -inform PEM -outform DER -in ybdb-client.key -out ybdb-client.der -nocrypt
Update Provider-Specific Secret Manager Services
Update the provider-specific secret manager services to add the below additional key/value pairs:
- key: ybdb-client-cert, value: <value>
- key: ybdb-client-key, value: <value> in base64 encoded format of the DER key.
Set ybdb.mutualTLS property to true in src/main/resources/application.yml
ybdb:
  mutualTLS: true
You can find the additional binding pairs in src/main/resources/application-<profile>.yml
ybdb:
  clientKey: ${ybdb-client-key}
  clientCert: ${ybdb-client-cert}
You can also find the complete source code used to populate the aforementioned sensitive data in the Java context in src/main/java/io/dsql/sealed/secret/SecretManagerProperties.java.
Finally, customize the Hikari datasource by setting the root CA, client key, and client certificate properties in the datasource configuration. For the complete implementation, see the source file at src/main/java/io/dsql/sealed/secret/SealedSecretApplication.java.
@Bean
public DataSource yugabteDBDatasource(DataSourceProperties properties,
    SecretManagerProperties secretManagerProperties) {
  Function<Type, String> secretConfig = secretManagerProperties.getSecretConfig();
  PGSimpleDataSource wrappedDataSource = properties.initializeDataSourceBuilder().type(PGSimpleDataSource.class)
      .build();
  wrappedDataSource.setSslRootCert(secretConfig.apply(Type.ROOT_CERT));
  wrappedDataSource.setSslKey(secretConfig.apply(Type.CLIENT_KEY));
  wrappedDataSource.setSslCert(secretConfig.apply(Type.CLIENT_CERT));
  HikariConfig config = config();
  config.setDataSource(wrappedDataSource);
  return new HikariDataSource(config);
}
Run the application again while using various profiles to confirm mTLS integration.
Try it Yourself
The gitpod configuration data is contained in .gitpod.yml file in the source repository. Try this example by visiting https://gitpod.io/#source_repo_path in your browser to verify the vault service integration.
Conclusion
Leveraging YugabyteDB and secret manager services from different providers offers a strong and secure solution to manage sensitive information and secure access to Spring Boot applications. This integration provides advanced data protection, centralized key management, and seamless integration with existing infrastructure. By prioritizing secure access management, developers can reduce the risk of data breaches and ensure user data safety.
The implementation outlined in this blog offers a runtime-independent approach to leveraging these services. However, specific implementations may vary based on the application’s runtime environment, such as Kubernetes, Openshift, Heroku, or Cloud Foundry, if native integration is desired.
If you have any questions or comments, join our engaging YugabyteDB Community Slack to chat with the expanding, distributed SQL community.


