Using Linkerd with YugabyteDB
December 10, 2020
This blog post is written by guest author Bhavin Gandhi, Software Engineer at InfraCloud Technologies, Inc., in collaboration with the teams at Buoyant, the creator of Linkerd, and Yugabyte.
As more organizations turn to microservices architectures for their applications, Kubernetes naturally emerges as a perfect complement to those applications. But for application developers, building on Kubernetes can introduce complex problems to solve at the application layer. This is where service meshes like Linkerd come to the rescue and provide essential features like reliability, security, and observability. Doing this at the infrastructure layer in the service mesh means developers no longer need to implement these features in the application. This frees up developers to do what they do best—build new features. And operations teams can do what they do best—deliver the application with performance, security, and scale.
Adding a distributed SQL database like YugabyteDB fits exceedingly well in this scenario, too. As infrastructure and the applications themselves evolve, so too must the data tier. Stateful applications like a SQL database are very complex workloads to run in Kubernetes. The ephemeral nature of Kubernetes pods and the ever-present need to reschedule them onto a new host requires a database tier that is agile. Otherwise, outages, slowdowns, data loss, and incorrect results occur. However, a distributed SQL database like YugabyteDB can solve these challenges. With YugabyteDB constantly monitoring and re-balancing the data shards across the available nodes in a Kubernetes cluster, applications can avoid outages, slowdowns, or data loss scenarios. Now that we’ve introduced why services meshes and distributed SQL are natural fits in a Kubernetes environment, let’s explore how to secure communication between services with YugabyteDB and Linkerd.
In a previous blog post about Istio, we shared how to secure the communication between YugabyteDB services using mTLS. Similar to Istio, Linkerd’s mutual TLS feature takes care of creating the certificates, rotating them, and more. In this blog post, we will take a look at installing Linkerd, verify if traffic between YugabyteDB pods is secured with mTLS.
We will be focusing on the version 2 of Linkerd. Linkerd is the lightweight service mesh solution built specially for Kubernetes. It uses an ultralight micro-proxy (linkerd2-proxy), which is written in Rust and built to be used as a sidecar. Linkerd is designed with three core principles in mind, ‘keep it simple’, ‘minimize resource requirements’, and ‘just work’. The recently released version 2.9.0 of Linkerd added support for mTLS with TCP services. This change enables us to use Linkerd to get mTLS between the YugabyteDB services. Ok, let’s get started.
Summary of sections in this post
- Before we begin
- Installing Linkerd on the cluster
- Installing YugabyteDB using Helm
- Running a sample application
- Verifying the mTLS
- Linkerd dashboard
- (Optional) Cleaning up the resources
- Conclusion
Before we begin
Before we get started with the setup, make sure you have the following:
- Kubernetes 1.16+ cluster with kubectl pointing to it. (You can create a GKE cluster or an equivalent in other cloud providers or use Minikube to create a local cluster.)
- In case of GKE or equivalent, 12 CPU cores and 45 GB RAM should be allocatable to the YugabyteDB pods.
- We will be using Helm 3 to install the charts, make sure you have in it installed on your machine as well.
Installing Linkerd on the cluster
To install the linkerd CLI on your machine, run the following command:
$ curl -sL https://run.linkerd.io/install | sh
$ export PATH=$PATH:$HOME/.linkerd2/bin
This will download the CLI and add its path to the PATH environment variable. You can check out the Getting Started documentation page for alternative ways of installing the CLI.
Linkerd CLI provides a way to validate the cluster.
$ linkerd check --pre

…
linkerd-version
---------------
√ can determine the latest version
√ cli is up-to-date

Status check results are √
To install Linkerd on to your cluster, execute the install command:
$ linkerd install | kubectl apply -f -
This command generates YAML manifests for Kubernetes and applies them on to the cluster. This may take a while to finish depending on the cluster.
To check if everything has been installed correctly and running, run the check command:
$ linkerd check

…
kubernetes-api
--------------
√ can initialize the client
√ can query the Kubernetes API

linkerd-api
-----------
√ control plane pods are ready
√ control plane self-check
√ [kubernetes] control plane can talk to Kubernetes
√ [prometheus] control plane can talk to Prometheus
√ tap api service is running

linkerd-version
---------------
√ can determine the latest version
√ cli is up-to-date

…
Status check results are √
The check command will wait for the Linkerd components to start if they are not running already.
$ kubectl -n linkerd get deploy

NAME                     READY   UP-TO-DATE   AVAILABLE   AGE
linkerd-controller       1/1     1            1           3m30s
linkerd-destination      1/1     1            1           3m29s
linkerd-grafana          1/1     1            1           3m27s
linkerd-identity         1/1     1            1           3m30s
linkerd-prometheus       1/1     1            1           3m26s
linkerd-proxy-injector   1/1     1            1           3m28s
linkerd-sp-validator     1/1     1            1           3m28s
linkerd-tap              1/1     1            1           3m27s
linkerd-web              1/1     1            1           3m29s
Installing YugabyteDB using Helm
With Linkerd running successfully, let’s install the YugabyteDB Helm chart. To add the Helm chart’s repository, run the following commands:
$ helm repo add yugabytedb https://charts.yugabyte.com
"yugabytedb" has been added to your repositories

$ helm repo update
Hang tight while we grab the latest from your chart repositories...
...Successfully got an update from the "yugabytedb" chart repository
Update Complete. ⎈ Happy Helming!⎈
Create a namespace for our installation and enable the sidecar injection:
$ kubectl create namespace yb-demo

# Enable the automatic linkerd2-proxy sidecar injection
$ kubectl annotate namespaces yb-demo linkerd.io/inject=enabled
When sidecar injection is enabled, Linkerd will add its linkerd2-proxy container to every pod from that namespace.
To provision a YugabyteDB cluster in the yb-demo namespace, run the following commands:
$ helm search repo yugabytedb/yugabyte
NAME                    CHART VERSION   APP VERSION     DESCRIPTION
yugabytedb/yugabyte     2.3.3           2.3.3.0-b106    YugabyteDB

$ helm install cluster-1 yugabytedb/yugabyte \
    --namespace yb-demo \
    --set istioCompatibility.enabled=true
If you are using Minikube, refer to this documentation section and add the resource requirements accordingly.
To check the status of all the pods from the yb-demo namespace, execute the following command. Wait till all the pods have a Running status.
$ kubectl get pods --namespace yb-demo
NAME           READY   STATUS    RESTARTS   AGE
yb-master-0    3/3     Running   0          7m15s
yb-master-1    3/3     Running   0          7m15s
yb-master-2    3/3     Running   0          7m15s
yb-tserver-0   3/3     Running   0          7m15s
yb-tserver-1   3/3     Running   0          7m15s
yb-tserver-2   3/3     Running   0          7m15s
Running a sample application
As we have the cluster running, now we will run a sample application on it. We will be using the YugabyteDB workload generator container image to do so.
$ kubectl run yb-sample-apps \
    -it --rm \
    --image yugabytedb/yb-sample-apps \
    --namespace yb-demo \
    --command -- sh

$ java -jar yb-sample-apps.jar java-client-sql \
    --workload SqlInserts \
    --nodes yb-tserver-service.yb-demo.svc.cluster.local:5433 \
    --num_threads_write 4 \
    --num_threads_read 6

…
83979 [Thread-1] INFO com.yugabyte.sample.common.metrics.MetricsTracker  - Read: 0.00 ops/sec (0.00 ms/op), 0 total ops  |  Write: 496.48 ops/sec (4.02 ms/op), 21199 total ops  |  Uptime: 45028 ms |
Verifying the mTLS
We have a sample application running against our YugabyteDB cluster. Linkerd enables mTLS out of the box, so let’s verify if it is enabled for our services.
To check if the traffic is secured with mTLS, run the edges command in a new terminal window:
# The edges between YugabyteDB statefulsets
$ linkerd edges statefulsets --namespace yb-demo
SRC          DST          SRC_NS    DST_NS    SECURED
yb-master    yb-master    yb-demo   yb-demo   √
yb-master    yb-tserver   yb-demo   yb-demo   √
yb-tserver   yb-master    yb-demo   yb-demo   √
yb-tserver   yb-tserver   yb-demo   yb-demo   √

# The edges between yb-sample-apps pod
$ linkerd edges pod --namespace yb-demo | grep -E '^SRC|yb-sample-apps'
SRC                    DST              SRC_NS    DST_NS    SECURED
linkerd-prometheus-…   yb-sample-apps   linkerd   yb-demo   √
yb-sample-apps         yb-tserver-0     yb-demo   yb-demo   √
yb-sample-apps         yb-tserver-1     yb-demo   yb-demo   √
yb-sample-apps         yb-tserver-2     yb-demo   yb-demo   √
From the above commands, we can see that the traffic between the yb-master and, yb-tserver Statefulset pods is secured with mTLS. In the case of yb-sample-apps, it connects only with the yb-tserver pods, and that is secured as well.
Take a look at the Securing Your Service page from Linkerd documentation for other ways to validate mTLS.
Linkerd dashboard
Linkerd comes with its own dashboard along with Grafana. Open the dashboard and browse the yb-demo namespace.
$ linkerd dashboard

Linkerd dashboard available at:
https://localhost:50750
Grafana dashboard available at:
https://localhost:50750/grafana
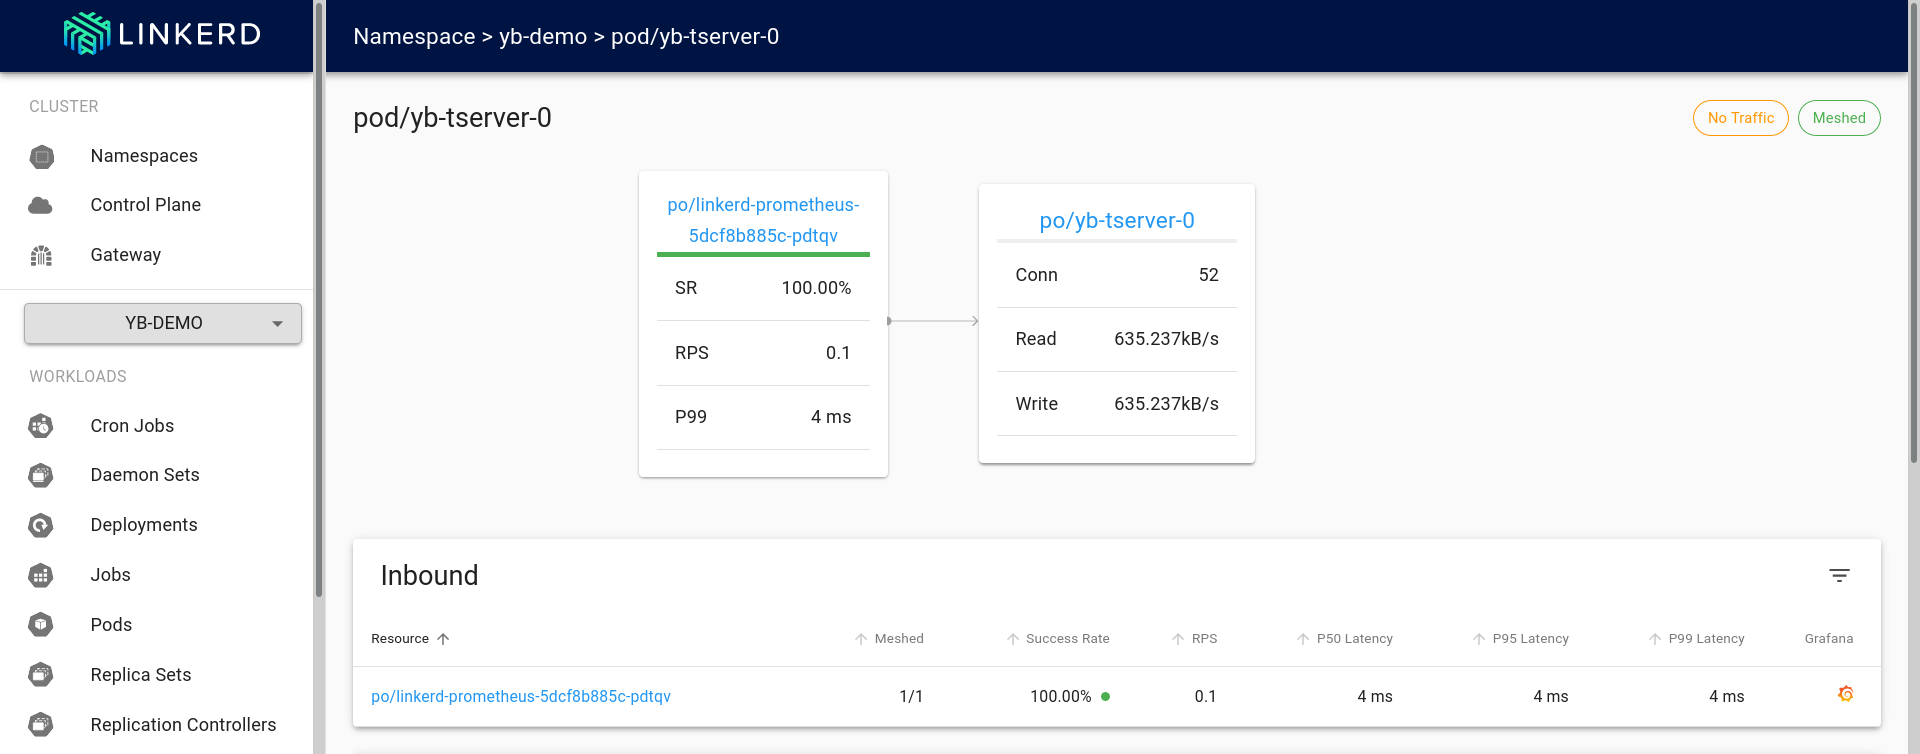

The first graph from above dashboard shows the pictorial view of the edges (as of now it only shows this for HTTP connections #5206).
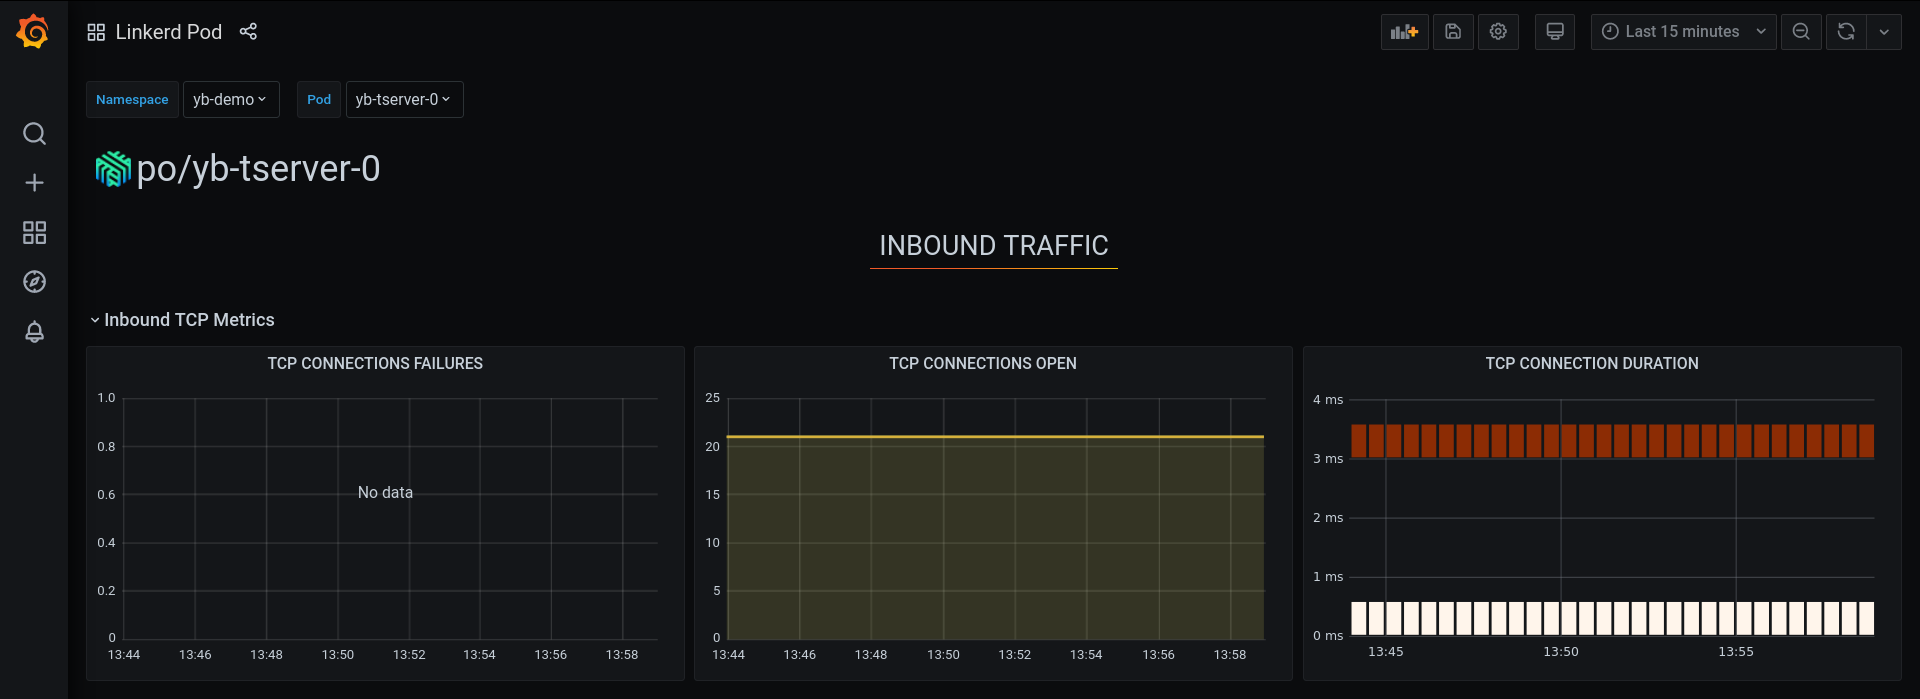
On the same page it also shows TCP statistics and details about the edges. Clicking on the Grafana logo near the TCP section will open up the Grafana user interface.
Some of the HTTP related graphs are removed from the following screenshots for brevity.

(Optional) Cleaning up the resources
To delete all the resources that we created as part of this post, run the following commands. The resources to be cleaned up include Helm releases of YugabyteDB, the volumes created by the yugabyte chart, and everything installed by Linkerd.
$ helm delete cluster-1 --namespace yb-demo
release "cluster-1" uninstalled

$ kubectl delete pvc --namespace yb-demo --selector chart=yugabyte,release=cluster-1
…
persistentvolumeclaim "datadir0-yb-master-2" deleted
persistentvolumeclaim "datadir0-yb-tserver-2" deleted

$ linkerd uninstall | kubectl delete -f -
…
namespace "linkerd" deleted
Conclusion
In this blog post, we showed you how you can use Linkerd to enable mTLS with YugabyteDB. We walked you through the steps of installing YugabyteDB and Linkerd along with viewing the dashboards as well as verifying mTLS. The process of getting Linkerd configured is fairly simple and mTLS works out of the box.

")
