Using Sequelize with YugabyteDB
August 13, 2021
Sequelize is a promise-based Node.js ORM tool that allows us to interact with databases using javascript instead of SQL. In simple terms, Object Relational Mapping is a process for accessing a relational database using object-oriented languages like javascript. For more information on the features in Sequelize, you can check out their documentation site.
Sequelize Node.js package already has support for databases like Postgres, MySQL, MariaDB, SQLite, and Microsoft SQL Server. We have added support for YugabyteDB by making a few changes in that package and publishing our own Node.js package sequelize-yugabtedb.
In this blog, we will discuss how you can:
1. Start a YugabyteDB cluster on your local machine
2. Create a Node.js project and Install Sequelize ORM
3. Use Sequelize ORM through the javascript code
4. Verify the results in the database
What is YugabyteDB?
YugabyteDB is a distributed SQL database for transactional (OLTP) applications. It is 100% open source, available under the Apache 2.0 license. YugabyteDB is feature compatible with Postgres, and combines enterprise-grade relational database capabilities with the horizontal scalability and resilience of cloud native architectures. Built using a unique combination of high performance document store, per-shard distributed consensus replication and multi-shard ACID transactions (inspired by Google Spanner), YugabyteDB serves both scale-out OLTP workloads with low query latency, extreme resilience against failures and global data distribution. As a cloud-native database, it can be deployed across public and private clouds as well as in Kubernetes environments with ease.
You can download and install YugabyteDB in any environment of your choice. Alternately, you can use Yugabyte Cloud, a fully managed database-as-a-service (DBaaS) for YugabyteDB. You get a resilient, scalable, PostgreSQL-compatible database for your applications in just a few minutes. We take care of infrastructure and database operations, letting you focus on building applications.
In this blog post, we will cover deploying a YugabyteDB cluster on your local machine.
Starting a YugabyteDB cluster on your local machine
Before starting a YugabyteDB cluster, you need to have YugabyteDB installed on your machine. To install YugabyteDB, please follow the steps mentioned on this page.
- Change your current working directory to where the YugabyteDB is installed on your machine. For example:
$ cd home/yugabyte-db - To create a single-node local cluster with a replication factor (RF) of 1, run the following command:
$ ./bin/yugabyted start - Check the cluster status by running the following command:
$ ./bin/yugabyted status
Creating a Node.js project and installing Sequelize ORM
Before proceeding with the next steps, you need to have Node.js installed on your machine. To install it, please refer to this link.
Now, let’s setup a simple Node.js project and then install the sequelize-yugabytedb package in our project.
- Create a new directory:
mkdir nodejs-demo-project && cd nodejs-demo-project - Create a package.json file:
echo {} > package.json - Install sequelize-yugabytedb package:
npm install sequelize-yugabytedb - Create a empty demo.js file:
touch demo.js
Using Sequelize ORM through the javascript code
Add the below code in the demo.js file you have created. In the code, sequelize.define() will create a model with the name ‘user’, but the actual table in the database is created when we call the User.sync() function. User.create() will basically fire an INSERT statement for a single row in the table:
const { Sequelize, DataTypes } = require('sequelize-yugabytedb')

const sequelize = new Sequelize('yugabyte', 'yugabyte', 'yugabyte', {
   host: 'localhost',
   port: '5433',
   dialect: 'postgres'
})

//Defining a model 'user'
const User = sequelize.define('user', {
       user_id : {
           type: DataTypes.INTEGER,
           primaryKey: true
       },
       username: {
           type: DataTypes.STRING
       },
       country: {
           type: DataTypes.STRING
       }
   }
)

async function createTableAndInsert() {
   //creating a table "users"
   await User.sync({force: true})

   //Insert 3 rows into the users table
   await User.create({user_id: 1, username: 'sam', country: 'India'})
   await User.create({user_id: 2, username: 'bob', country: 'USA'})
   await User.create({user_id: 3, username: 'jake', country: 'Canada'})
}

async function fetchAllRows() {
   //fetching all the rows
   const users = await User.findAll({raw: true})
   console.log(users)

   process.exit(0)
}

createTableAndInsert()
.then(function() {
   fetchAllRows()
})
Now, you can run the app using this command: node demo.js
Verify the results in the database
Once the code is executed, we can verify the results by looking for the changes inside the database. Follow the steps below for that:
- Go to your YugabyteDB installation directory. For example:
cd /path-to-yugabytedb - Run the ysqlsh client:
./bin/ysqlsh - List the tables to check if it is created or not:
\dt - Then check if rows are inserted into the table:
Select * from customers;
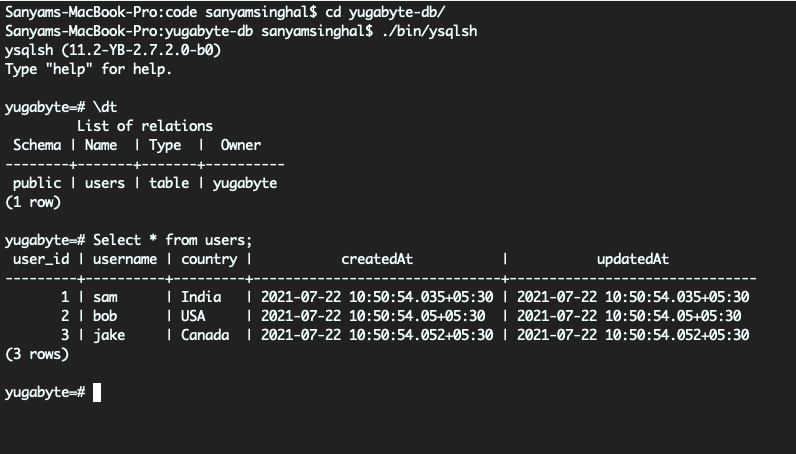
- These ‘createdAt’ and ‘updatedAt’ timestamp columns are added by default by the sequelize. You can avoid it by adding
timestamps: falsewhile defining the model in this way:
const User = sequelize.define('user', {
       user_id : {
           type: DataTypes.INTEGER,
           primaryKey: true
       },
       username: {
           type: DataTypes.STRING
       },
       country: {
           type: DataTypes.STRING
       }
   },
   {
       timestamps: false
   }
)
What’s Next?
- You can read more about using Sequelize ORM from their documentation site.
- You can also check out our orm-examples repository, which has a more realistic use (a simple online e-commerce store) of Sequelize ORM with YugabyteDB.
- Give Yugabyte Cloud a try by signing up for a free tier account in a couple of minutes.
Got questions? Feel free to ask them in our YugabyteDB community Slack channel.


