YugabyteDB 2.17: Increased BCDR Protection with Enhanced xCluster Replication
December 9, 2022
YugabyteDB is purpose-built for high availability. It’s a distributed database typically deployed across multiple nodes with multiple replicas for every data row. Therefore, as long as the majority of nodes are up and running, the database remains available.
But what happens if an entire cloud region becomes unavailable taking the whole cluster down? This scenario is relatively rare, but it does happen and can be catastrophic. Most organizations require a full business continuity strategy to handle these situations.
YugabyteDB 2.17 delivers a number of new xCluster replication enhancements to address this problem and make it easier to embrace a business continuity/disaster recovery (BCDR) data strategy. In this blog, we examine what’s new in YugabyteDB 2.17, and how you can use these enhancements to build a comprehensive BCDR strategy.
Be Prepared: The Motto for an Unpredictable Cloud World
The cloud has fundamentally changed the IT landscape and brought flexibility and simplicity to application development. In reality, however, the underlying infrastructure and solutions remain as complex as ever, with numerous points of potential failure and disruption.
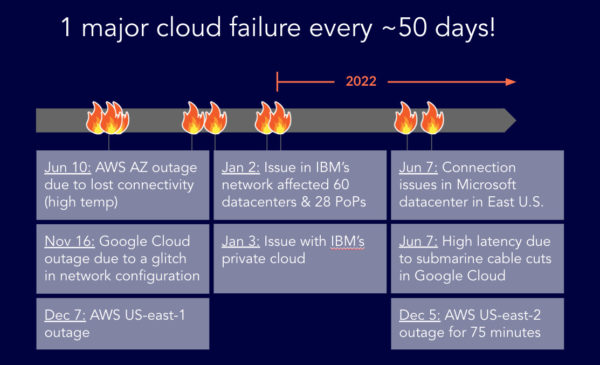
Over the past few years there’s been a major cloud failure about every 50 days. In fact, as we write this blog there’s news of another major cloud outage with the AWS US East 2 region coming offline for 75 minutes, impacting holiday shopping and services.
No business wants to face this, but with cloud outages becoming a regular event, a robust BCDR strategy is crucial.
As application and database owners, it’s our job to be prepared. The optimal way to mitigate region outages is to extend your data across multiple regions. Traditional solutions (and even many cloud database offerings) makes this extremely complex. However, the core distributed architecture of YugabyteDB makes it simple.
YugabyteDB can stretch a cluster across three or more regions with synchronous replication allowing you to configure data placement so that data replicas reside in different regions. This setup guarantees that you can seamlessly handle a full region outage. If you lose one region, the other two will maintain consensus for all of the distributed tablets, ensuring the entire database remains available.
This stretched cluster approach is great if you want to maintain zero RPO in disaster scenarios; however, it comes with the price tag of increased latency. Replication within the cluster is synchronous, therefore applications have to wait for each and every update to be propagated to other regions via a slower cross-region network (with speed of light limitations). This reduces application performance during normal operations.
In many cases, better performance is preferred over zero RPO. If you are in that camp, you should consider using asynchronous replication between two (not three) regions. YugabyteDB is unique in that it offers both different synchronous (i.e. stretched) replication configurations, as well as a powerful asynchronous replication option, called xCluster replication. This provides the most diverse set of deployment options available for a distributed SQL database.
The xCluster Replication solution, one of the new features released in YugabyteDB 2.17, is a powerful tool for those looking to improve their BCDR strategy. We’ll dig deep into the xCluster replication enhancements in 2.17 further in this blog, but first, let’s quickly recap the xCluster basics.
xCluster Basic Configuration
xCluster is the perfect fit for applications where higher performance and a reasonably high level of protection are crucial, but not where zero RPO and synchronous replication are required.
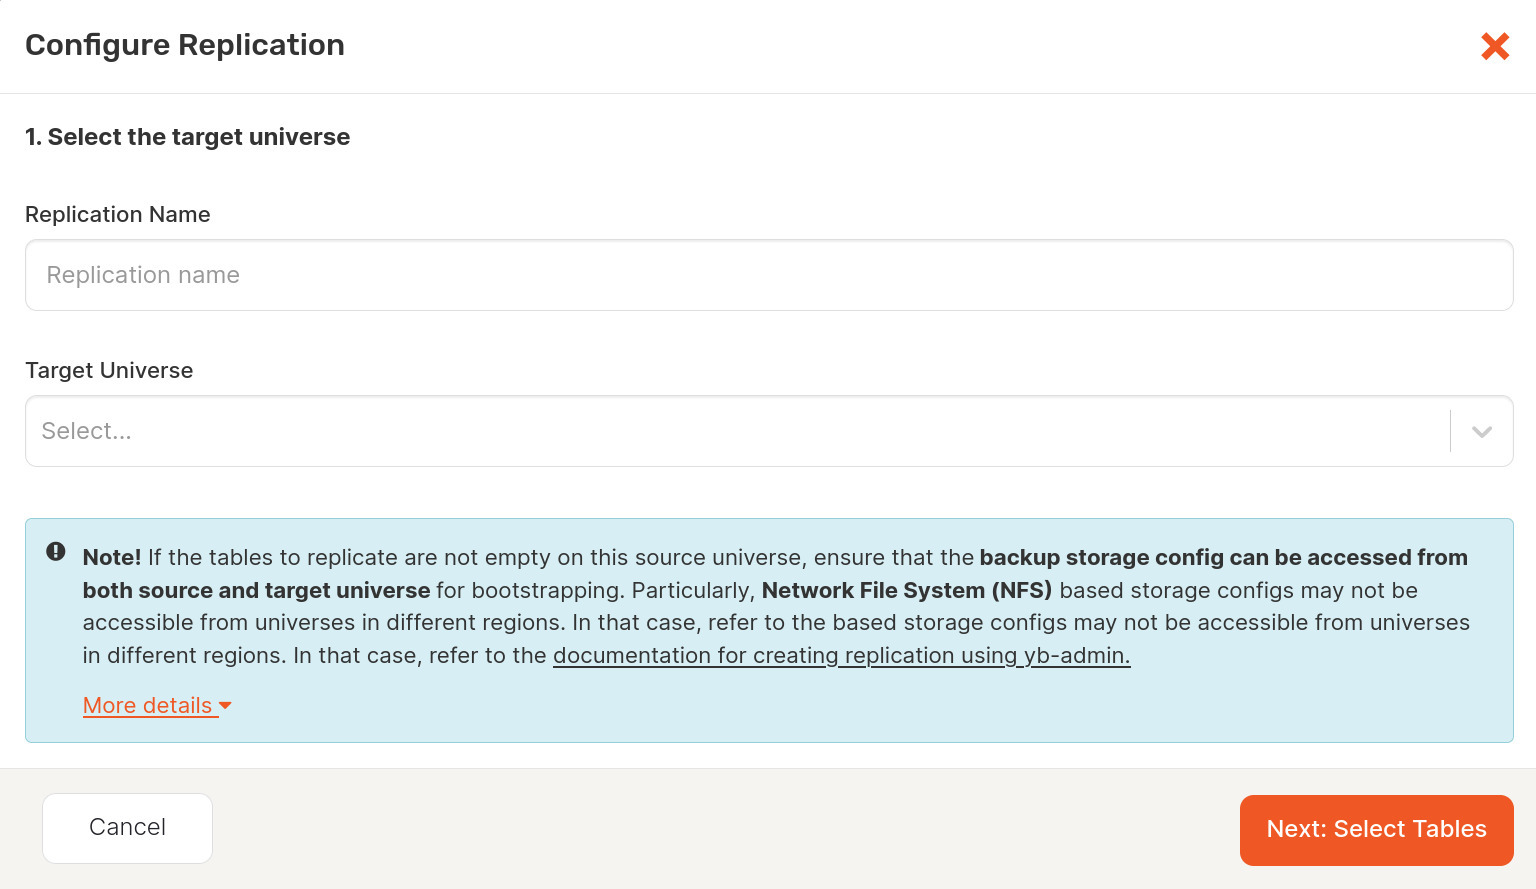
The easiest way to set up xCluster replication is through YugabyteDB Anywhere, which provides UI and API support to manage asynchronous replication between independent YugabyteDB clusters. You can configure unidirectional or bidirectional xCluster replication.
Within the concept of replication, universes (the Yugabyte term for clusters) are divided into the following categories:
- A source universe, which contains the original data subject to replication.
- A target universe, which is the recipient of the replicated data. One source universe can replicate to one or more target universes.
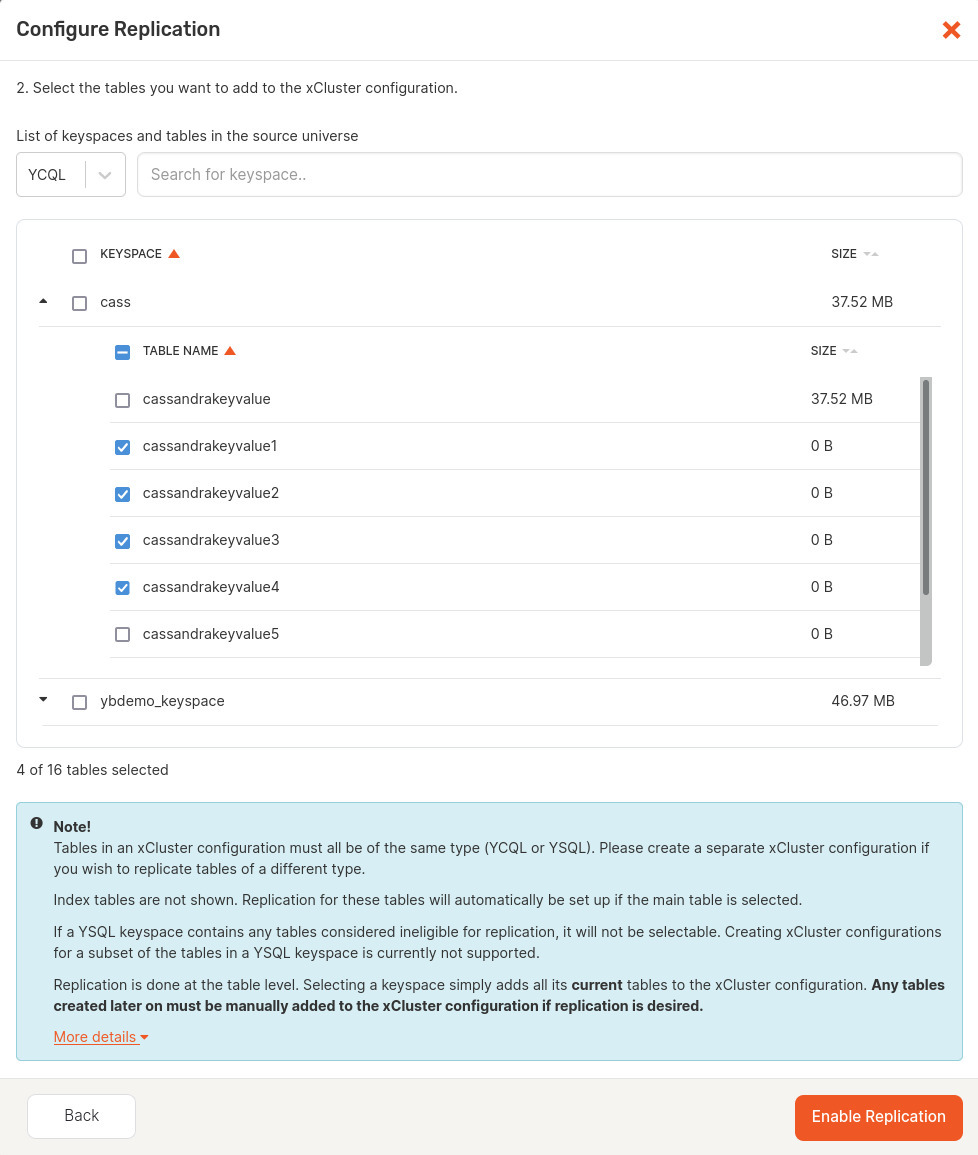
Once the source and target are identified, you’ll be given a list of common tables between the source and target universes. Select the tables you want to include in the replication.
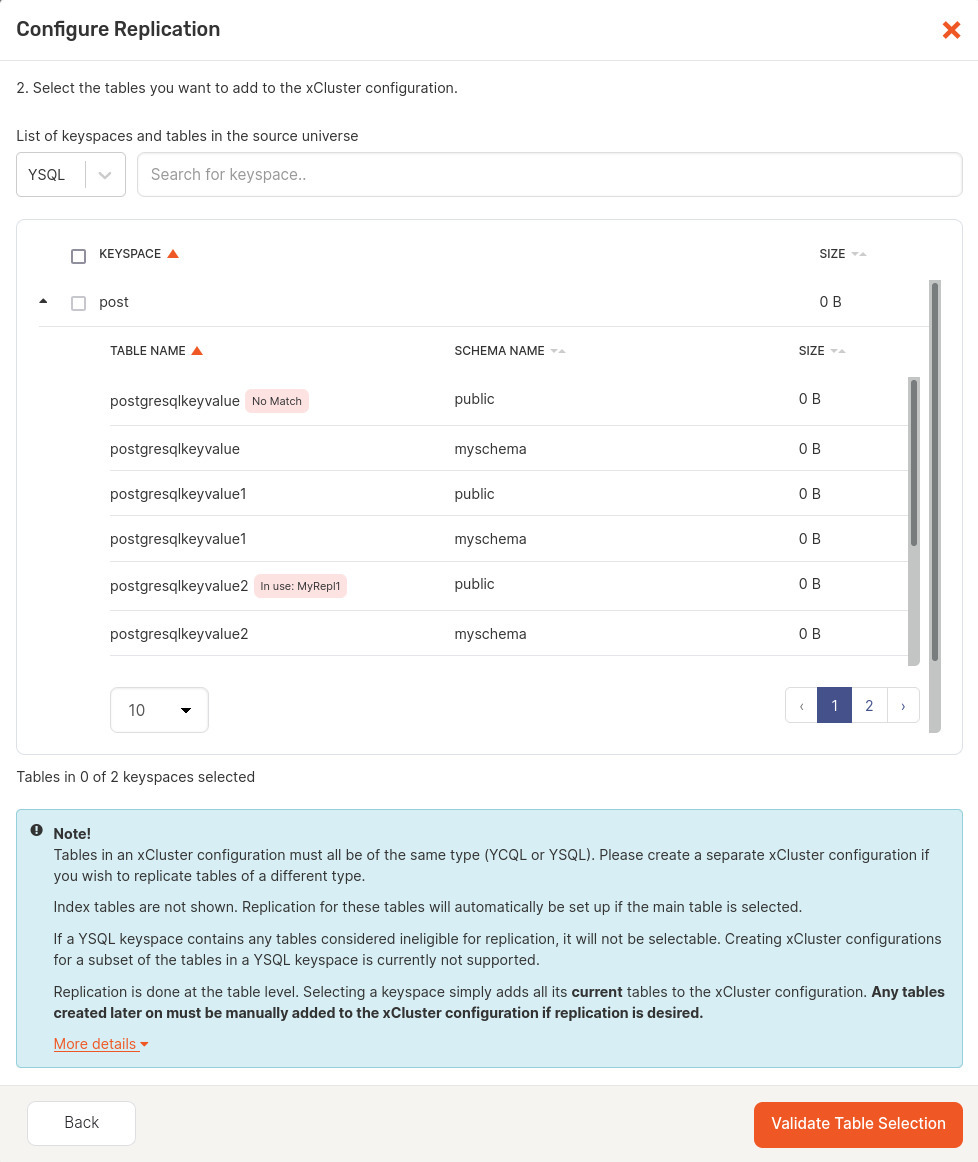
NOTE: Even though index tables are not displayed in the YugabyteDB Anywhere UI, the replication is automatically set up for them if it is set up for their main table. If a new index table is created after the replication has been set up, it is not added to the replication configuration automatically. To add the new index table to the replication configuration, you need to restart the replication for the main table.
By clicking the Validate Table Selection button, you trigger YugabyteDB Anywhere to check whether or not bootstrapping is required for the selected database and its tables. If bootstrapping is not required, Validate Table Selection changes to Enable Replication, which you need to click in order to set up replication—shown below.
If bootstrapping is required, Validate Table Selection changes to Next: Configure Bootstrap which you need to click in order to access the bootstrapping settings. Complete the fields in the dialog window. This is shown in the following illustration.
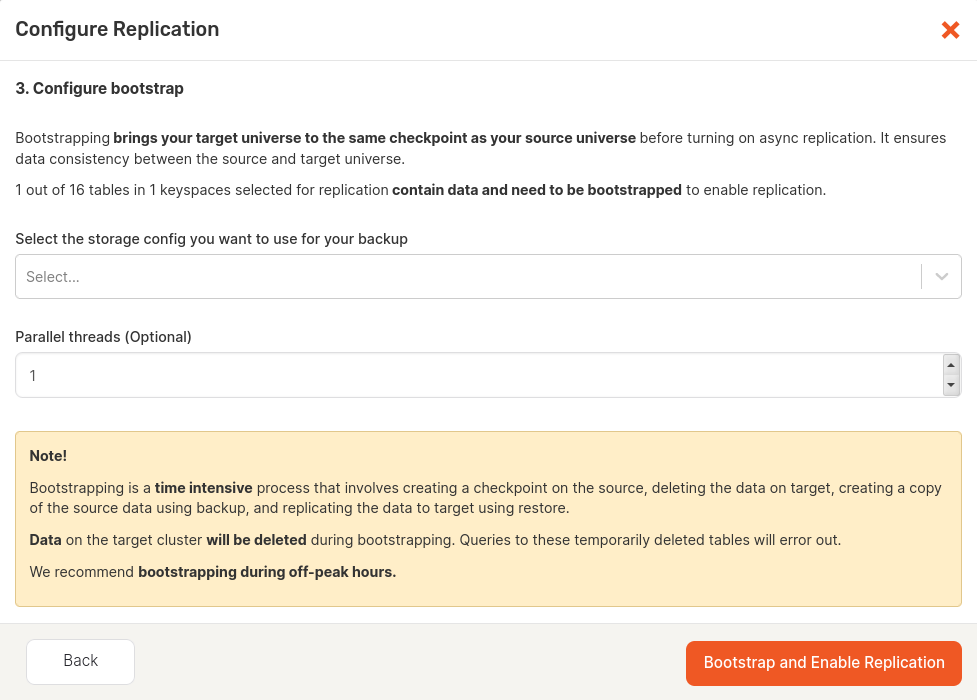
Select the storage configuration to be used during the backup and restore part of bootstrapping. You can optionally specify the number of parallel threads that are run during bootstrapping. The greater number results in a more significant decrease of the backup and restore time, but puts more pressure on the universes.
When done, click the Bootstrap and Enable Replication to start the process of setting up replication. Tables that do not require bootstrapping are set up for replication first, followed by tables that need bootstrapping, database per database.
You can view the progress on xCluster tasks by navigating to Universes, selecting the source universe, and then selecting Tasks.
New xCluster Transaction Atomicity and Global Ordering
With the basics of xCluster replication configured, let’s look at some of the key new enhancements delivered in YugabyteDB 2.17.
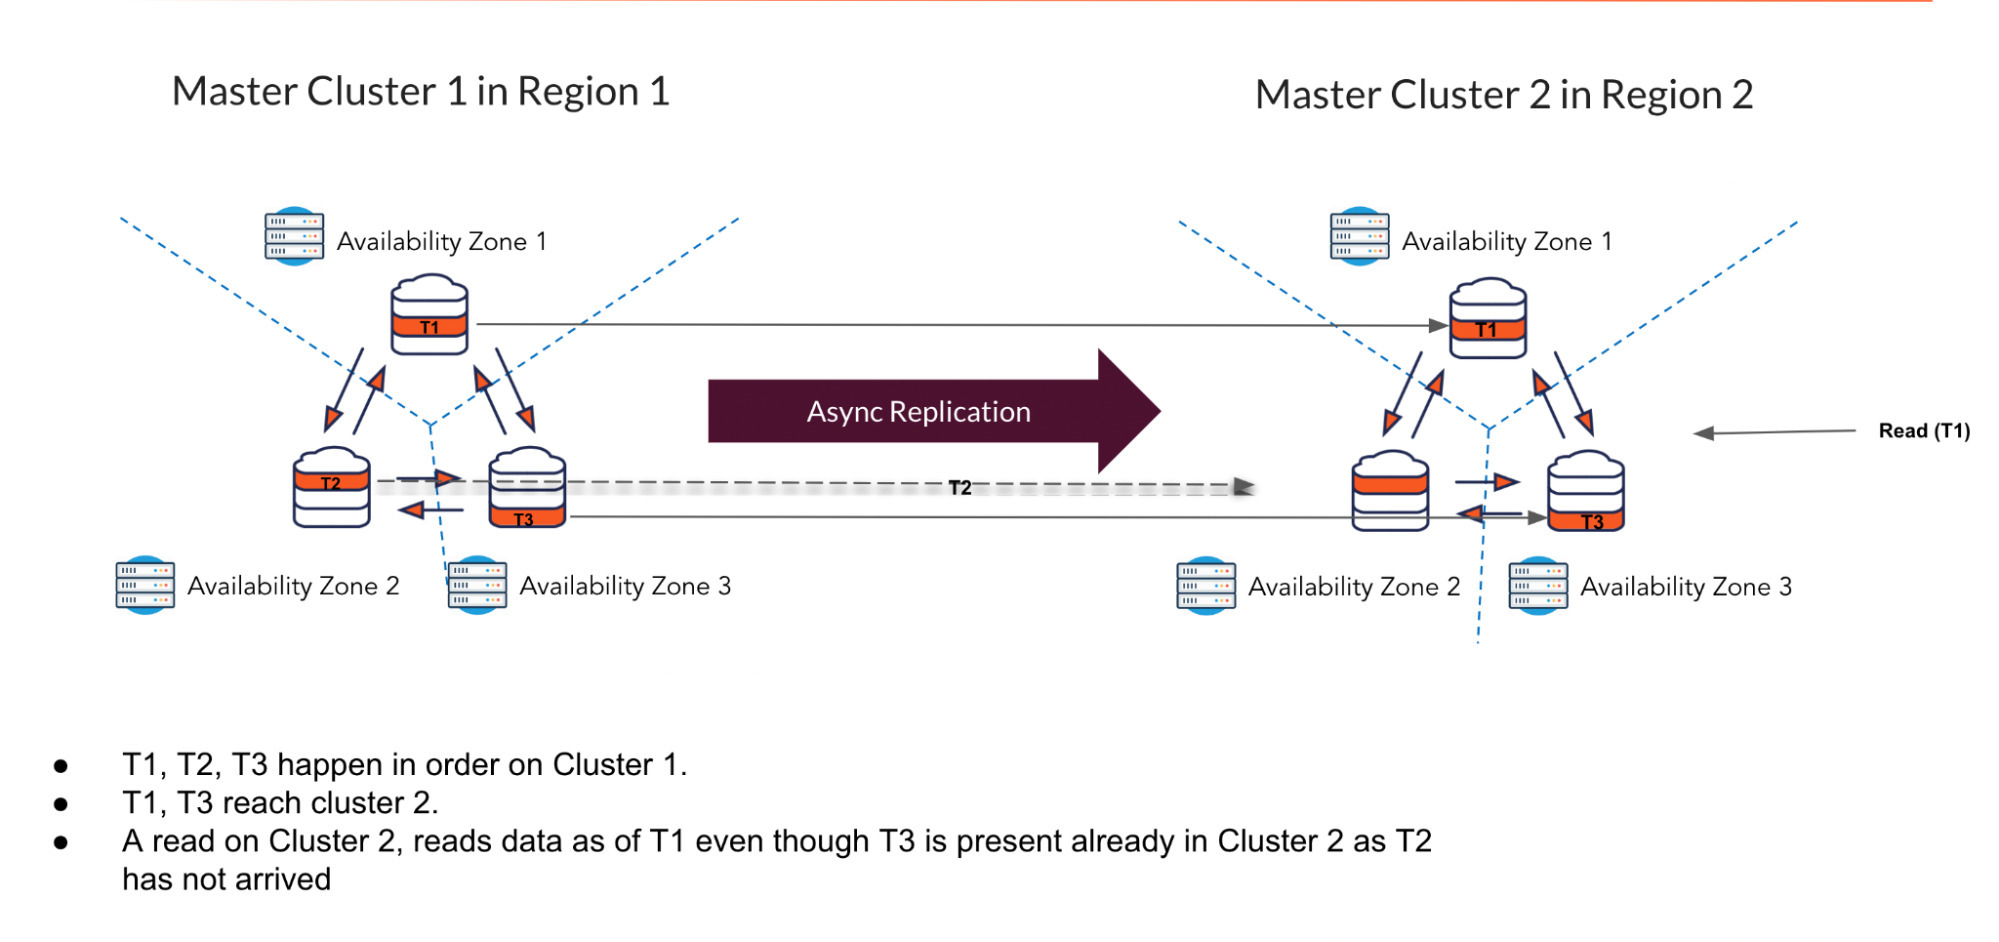
One of the biggest xCluster improvements introduced in 2.17 are the consistency guarantees on the target database. Prior to 2.17, xCluster would preserve atomicity and ordering only within a single tablet. For any transaction that spanned across multiple tablets, you could observe it partially complete on the target. For example, let’s say you execute a transaction that updates two rows—A and B—that happen to reside in different tablets. Even though it’s successfully committed on the source, it’s possible that you see only one of the rows updated, while the other is still in flight.
A similarly important issue around data integrity involves transaction ordering. If you execute two transactions in a particular order on the source, in the past you may have observed those transactions being applied in a different order on the target. Starting with 2.17, xCluster transparently applies additional internal logic to guarantee both cross-tablet atomicity, as well as global ordering of transactions.
The feature is currently in preview state, so it’s disabled by default. To switch to the new behavior, you need to set the enable_replicate_transaction_status_table GFlag on both the source and target clusters.
Using xCluster for disaster recovery
Let’s see how to utilize xCluster to increase the level of data protection, while maintaining the best possible performance. For that, you need to create two independent YugabyteDB clusters—active and standby—and configure xCluster replication between them.

All updates happen within the active cluster, which is contained within a single region, so update latencies are not negatively affected in this setup. However, keep in mind that cross-cluster replication is asynchronous, so you will possibly lose some of those updates if the region hosting the active cluster goes down.
There are a couple of other requirements you need to meet to support a smooth disaster recovery solution, before you begin the failover workflows described next.
- Even though updates are allowed only in the active cluster, xCluster has to be configured bi-directionally. You also need to enable replication from the standby cluster to the active cluster. This replication channel will not be used initially, but will allow a smooth failover to the standby cluster if needed.
- Point-in-time-recovery (PITR) needs to be enabled on both clusters. YugabyteDB will internally use PITR to maintain transaction atomicity in case of failover.
Once these prerequisites are met, you can use YugabyteDB 2.17 features (described below) to complete the setup and handle disaster recovery workflows.
New Cluster Roles and Failover API
As noted, there are two distinguished roles in the disaster recovery setup: active cluster and standby cluster. An active cluster accepts both writes and reads from the applications. A standby cluster, on the other hand, assumes that writes come only through xCluster. It monitors for partially replicated transactions, so that the applications can still issue reads to this cluster without losing atomicity and consistency guarantees.
NOTE: Currently a standby cluster is not enforced to be read-only, so it’s up to you to make sure it doesn’t receive any updates from the applications; read-only mode will be added in one of the upcoming releases of YugabyteDB.
Since active and standby clusters behave differently, you need to let YugabyteDB know which cluster plays which role. Starting with 2.17, you can explicitly assign roles using a straightforward command line API:
yb-admin -master_addresses <cluster-1> change_xcluster_role ACTIVE
yb-admin -master_addresses <cluster-2> change_xcluster_role STANDBY
When the active cluster goes down, you can use the same command to perform failover – just promote the standby cluster to become the new active:
yb-admin -master_addresses <cluster-2> change_xcluster_role ACTIVE
New Planned Failover and Wait for Replication Drain API
One of the most common reasons to execute failover is to perform a “fire drill”— switch applications from one cluster to another to verify that disaster recovery mechanisms work as expected. Such drills are usually performed on a regular basis, as prescribed by internal policies or external regulations.
The following is typical for such planned failovers:
- They happen within a maintenance window, so it’s possible to stop application workloads for the duration of the failover.
- Data loss is not expected; therefore, the database must provide zero RPO in this scenario.
To achieve the latter, you need to wait for pending updates to get replicated before promoting the standby cluster. For that, you can use the new “wait for replication drain” API that was added to YugabyteDB 2.17.
yb-admin -master_addresses <cluster-2> wait_for_replication_drain <xCluster-stream-id>
Having this API in the toolbox means you can perform the planned failover by executing the following steps. Assuming cluster A is the current active cluster and cluster B is the current standby cluster:
- Stop the application traffic to ensure no more updates are attempted.
- Demote A to standby role.
- Invoke the “wait for drain” API to force pending updates to be propagated and ensure that the replication lag is zero, thus guaranteeing zero RPO.
- Promote B to active role.
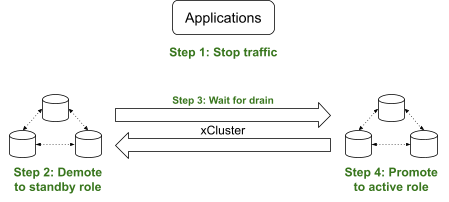
After completing the steps above, cluster B becomes the new primary cluster, and cluster A becomes the new secondary cluster. No updates are lost during the process, so the RPO is zero. At this point, it’s safe to resume application traffic, but note that updates have to go to the new active cluster, which is cluster B in our example. You can still issue reads to the new standby (formerly active cluster).

New Unplanned Failover and Estimated Data Loss API
The main reason to set up disaster recovery, however, is to handle an outage of the region where the active cluster resides. If the region becomes unavailable, applications should continue working with minimal possible downtime. To achieve this, the standby cluster should be promoted and the applications should be failed over to the new active cluster.

In this scenario, you should expect a certain amount of data loss. Due to the asynchronous nature of xCluster, some of the updates will be caught up in the middle of the replication process and won’t make it to the standby cluster. Therefore, before performing a failover, you might want to get an estimation of how much data is going to be lost, which you can do by running the following command:
yb-admin -master_addresses <cluster-2> get_xcluster_estimated_data_loss
The unplanned failover workflow is shown below. Similar to the planned failover, cluster A is the current active cluster and cluster B is the current standby cluster:
- Stop the application traffic to ensure no more updates are attempted.
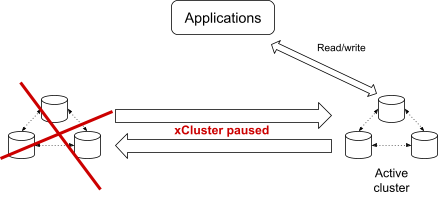
- Invoke the “pause xCluster replication” API on B for both replication channels. This step is required to avoid unexpected updates arriving through replication, which can happen if A comes back up before the failover process is completed.
- Invoke the “get estimated data loss” API on B. This API provides an approximate value for the data loss that would occur if the failover process is complete. At this point you can make a decision on whether you want to actually proceed with the failover. In a rare case that actual data loss is outside your expected RPO SLA, you can opt for downtime and a full data restore after the failed region comes back up.
- If you want to proceed, promote B to active role. Under the hood, this switch uses PITR to restore the cluster to a consistent state that cuts off any partially replicated transactions. The point in time the cluster is restored to corresponds to the data loss estimation acquired in the previous step.
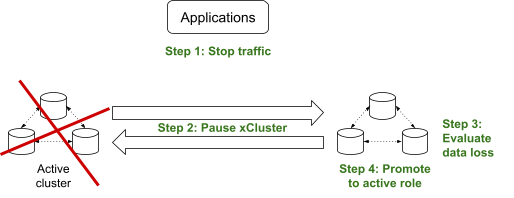
After completing the steps above, cluster B becomes the new primary cluster. There is no stand-by cluster, until A comes back up and is rebootstrapped with the current data.
New Automatic Handling of Schema Modifications
Another important improvement in 2.17 is automation of the schema modification workflow. Prior to 2.17, if you wanted to apply a DDL command (like add a column to a table), you would have to go through four manual steps.
- Pause the replication.
- Apply the DDL command on the source database.
- Apply the DDL command on the target database.
- Resume the replication.
The process is error-prone. If something goes wrong on any of the steps, the target database could end up in an inconsistent state. In some cases, the only way to recover from such a state is to fully rebootstrap the data from the source.
YugabyteDB 2.17 has the ability to automatically pause and resume replication on schema changes. You still need to apply the DDL command on both source and target databases, but YugabyteDB takes care of the rest: automatically pause and resume the replication if needed, and verify that DDL changes are equal on both ends.
Additionally, you can apply the schema change in any order – on the source cluster first, and then on the target cluster, or vice versa.
If a DDL is executed on the source side first, YugabyteDB will pause the replication prior to applying the change. It will then automatically resume once you execute the same command on the target side, making the process completely transparent.
./ysqlsh -h <source> -c "ALTER TABLE t ADD COLUMN c INT"  # Automatically pause replication
./ysqlsh -h <target> -c "ALTER TABLE t ADD COLUMN c INT"  # Automatically resume replication
In the opposite case, when you execute a DDL on the target side first, pause is not required, however you still need to make sure the command is equally executed on the source.
./ysqlsh -h <target> -c "ALTER TABLE t ADD COLUMN c INT"  # Do not pause replication
./ysqlsh -h <source> -c "ALTER TABLE t ADD COLUMN c INT" # Do not pause replication
The new behavior is enabled by default, so you can start following the improved workflow described here once you upgrade to 2.17. However, it still can be controlled using the master GFlag – xcluster_wait_on_ddl_alter, which you can use if you need to fallback to the older behavior.
Conclusion
Mission-critical data cannot tolerate downtime, and organizations have very little tolerance for even non-critical data delays. In this climate, BCDR has a higher profile than ever. Almost a fifth of outages are classified as severe or serious, meaning they resulted in considerable financial, reputational, and other, consequences.
An important goal of YugabyteDB xCluster replication is to ensure the integrity of the data replicated to the standby cluster. When a failover occurs and the standby cluster becomes active, applications must be able to access a consistent set of data at the standby cluster.
YugabyteDB 2.17 introduces a range of improvements to xCluster replication:
- Atomicity and ordering guarantees
- APIs for disaster recovery workflows
- Better handling of schema changes across clusters
Together, these improvements allow users to significantly simplify xCluster usage and better protect mission critical data from region-level failures.
NOTE: Following YugabyteDB release versioning standards, YugabyteDB 2.17 is a preview release. New features included are under active development and made available for development and testing projects.


