Automatic Failover With JDBC Smart Driver and Hikari
July 12, 2023
Developers must actively manage connections to the cluster when client applications are connected to distributed systems. If certain nodes or server instances become unavailable, the application needs to reconnect to other available nodes in the cluster.
With YugabyteDB, this can be done easily and automatically using its JDBC smart driver and a pooling mechanism like Hikari.
It’s important to note that YugabyteDB provides two APIs: SQL, which is PostgreSQL-compatible, and YCQL, which is Cassandra-compatible. In this blog, we will focus on the JDBC smart driver that connects to YugabyteDB through the YSQL API.
Introducing YugabyteDB Smart Drivers
Since the YugabyteDB YSQL API is compatible with PostgreSQL, the standard drivers written for PostgreSQL do work natively for YugabyteDB YSQL. However, these standard drivers cannot fully leverage the database’s distributed nature. Therefore, we have added enhancements (or “smarts”) on top of these drivers and made them available as YugabyteDB smart drivers.
One such enhancement to our smart drivers is connection load balancing. The smart driver intelligently distributes new connection requests from clients across different servers in the YugabyteDB cluster.
The YugabyteDB smart drivers are available across multiple languages including Java, Golang, Python, Node.js, and C#.
NOTE: The smart driver client needs to have direct access to all the servers in a cluster to load balance the connection requests equally.
Smart Driver Feature: Connection Load Balancing
Connection load balancing is governed by two policies.
- Cluster Aware (also known as Uniform Load Balancing)
- Topology Aware
The Cluster Aware Load Balancing (LB) policy ensures that connection requests are equally distributed to all servers in the cluster, no matter which zone or region they reside in. This is enabled through the connection property load-balance=true.
The Topology Aware Load Balancing (LB) policy allows users to target servers in specific regions or zones of the cluster for connection requests. This is done by providing targeted placements (i.e. regions or zones) via the connection property topology-keys in the format cloud.region.zone in addition to load-balance=true. With Topology Aware, you can also specify multiple placements, separated by a comma. All nodes across these zones are considered equal in distributing the client connections.
For example, to connect to nodes in zones ap-south-1a and ap-south-1b, in region ap-south-1 of aws cloud, specify the property as topology-keys=aws.ap-south-1.ap-south-1a,aws.ap-south-1.ap-south-1b
The driver refreshes the list of servers in the cluster at regular intervals. The default interval time is 300 seconds, but it can be changed via the connection property yb-servers-refresh-interval. The refresh is actually attempted only while handling a new connection request. The list is also marked for refresh when an attempt fails due to a specific failure (PSQLState 08001).
The Fallback Option with Topology Aware
The Topology Aware LB policy also allows users to specify one or more hierarchical placements which act as fallback placements. When all nodes in the primary placement are unavailable, the driver “falls back” to nodes in these fallback placements to make new connections.
The fallback placements are specified with a preference value between 1 and 10, prefixed with a colon (:). A value of 1 means it is the primary placement. A value of 2 means it is the first fallback placement and so on.
topology-keys=aws.ap-south-1.ap-south-1a:1,aws.ap-south-1.ap-south-1b:1,aws.ap-south-1.ap-south-1c:2
So, for each new connection request, the driver starts by attempting to connect to nodes with a preference value of 1 and continues to higher fallback levels until it succeeds.
The Role of the Hikari Connection Pool
HikariCP is a high-performance JDBC connection pooling framework that provides various configurations for the connection pool so that users can tune the behavior in ways most suitable to their application’s needs.
We will primarily rely on two such configuration properties— maximumPoolSize and keepaliveTime—in our application. These, along with other configs, help the framework monitor connections and attempt to replace the failed connections with new ones.
Hikari Properties Relevant to YugabyteDB
Let’s take a look at some Hikari properties which are more relevant to YugabyteDB.
connectionTimeout: If a connection is not made available from the pool within this time, an SQLException is thrown. In case some of the servers in the cluster are down, the smart driver may have to make several attempts until it establishes a connection. This means the time taken to create a connection could be more than what it would take to establish a connection in the first attempt itself.So, it is advisable not to keep the value too low (in a few milliseconds) forconnectionTimeout. A default value of 3000 milliseconds would just be fine.connectionInitSql: This property lets the application specify the initialization SQL that gets executed before each new connection is added to the pool. For example, you can specify some warm-up queries to load the catalog, which is useful in a multi-region deployment of YugabyteDB.
Explore more Hikari properties.
Walk Through An Example of JDBC Smart Driver and Hikari
The application we will use here is a simple JDBC client which initializes a Hikari connection pool with a configuration to connect to one node of a YugabyteDB cluster and enable Topology Aware load balancing.
The load balancing feature enables the pool to discover and establish connections to all nodes in the cluster. The pool uses YBClusterAwareDataSource which extends PGSimpleDataSource and has load balancing enabled by default.
poolProperties.setProperty("dataSource.url", "jdbc:yugabytedb://127.0.0.1:5433/yugabyte");
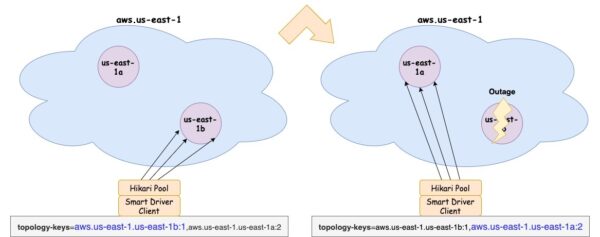
poolProperties.setProperty("dataSourceClassName", "com.yugabyte.ysql.YBClusterAwareDataSource");The Topology Aware policy is configured with a fallback option so that the Hikari connection pool will primarily connect to nodes in placement aws.us-east-1.us-east-1b. The fallback is configured as those nodes in placement aws.us-east-1.us-east-1a.
poolProperties.setProperty("dataSource.topologyKeys", "aws.us-east-1.us-east-1b:1,aws.us-east-1.us-east-1a:2");We have configured the pool to be at a fixed size of twelve by setting maximumPoolSize to 12 and keeping minimumIdle (not shown below) unchanged. minimumIdle, by default, is equal to maximumPoolSize.
Also, by setting the Hikari property keepaliveTime to 30000, we ensure that idle connections are kept alive by pinging them every 30 seconds.
poolProperties.setProperty("maximumPoolSize", "12");
poolProperties.setProperty("keepaliveTime", "30000");
As we bring down one node at a time from the cluster, we can verify that the pool size is maintained by Hikari with the help of the driver. This is achieved by automatically recreating failed connections (“failover”) to other available nodes in the cluster.
Note that this failover mechanism can also be achieved with the Cluster Aware Load Balancing.
The complete application program is given below.
package com.yugabyte;

import com.zaxxer.hikari.HikariConfig;
import com.zaxxer.hikari.HikariDataSource;

import java.sql.Connection;
import java.sql.ResultSet;
import java.sql.SQLException;
import java.sql.Statement;
import java.util.Properties;
import java.util.Scanner;

public class HikariCPApp {

    public static void main(String[] args) throws ClassNotFoundException, SQLException {

        Class.forName("com.yugabyte.Driver");
        HikariDataSource ds = configureHikari("jdbc:yugabytedb://127.0.0.1:5433/yugabyte");

        System.out.println("Configured the HikariDataSource");

        // Verify connection with a DDL and an INSERT statement
        Connection connection = ds.getConnection();
        Statement stmt = connection.createStatement();
        stmt.execute("DROP TABLE IF EXISTS employee");
        stmt.execute("CREATE TABLE employee" +
                "  (id int primary key, name varchar, age int, language text)");
        System.out.println("Created table employee");

        String insertStr = "INSERT INTO employee VALUES (1, 'John', 35, 'Java')";
        stmt.execute(insertStr);
        System.out.println("Inserted a row");
        connection.close();

        System.out.println("You can now bring down nodes in steps and verify connection counts");
        try { Thread.sleep(5000); } catch (InterruptedException e) {}
        System.out.print("Press enter or return key to exit: ");
        Scanner in = new Scanner(System.in);
        in.nextLine();
        ds.close();
    }

    private static HikariDataSource configureHikari(String url) {
        String ds_yb = "com.yugabyte.ysql.YBClusterAwareDataSource";
        Properties poolProperties = new Properties();
        poolProperties.setProperty("poolName", "yugabytedb_demo");
        poolProperties.setProperty("dataSourceClassName", ds_yb);
        poolProperties.setProperty("dataSource.url", url);
        poolProperties.setProperty("dataSource.topologyKeys", "aws.us-east-1.us-east-1b:1,aws.us-east-1.us-east-1a:2");
        poolProperties.setProperty("maximumPoolSize", "12");
        poolProperties.setProperty("maxLifetime", "0"); // default
        poolProperties.setProperty("keepaliveTime", "30000");
        poolProperties.setProperty("dataSource.user", "yugabyte");

        HikariConfig hikariConfig = new HikariConfig(poolProperties);
        hikariConfig.validate();
        return new HikariDataSource(hikariConfig);
    }
}
Set Up the Project
Use Maven command to set up an empty project and then add the code above as a source file.
mvn archetype:generate -DgroupId=com.yugabyte -DartifactId=yugabytedb-hikari-app -DarchetypeArtifactId=maven-archetype-quickstart -DarchetypeVersion=1.4 -DinteractiveMode=false

cd yugabytedb-hikari-app

vi src/main/java/com/yugabyte/HikariCPApp.java
Include the dependencies below in your pom.xml.
<dependency>
  <groupId>com.yugabyte</groupId>
  <artifactId>jdbc-yugabytedb</artifactId>
  <version>42.3.5-yb-3</version>
</dependency>
<dependency>
  <groupId>com.zaxxer</groupId>
  <artifactId>HikariCP</artifactId>
  <version>5.0.1</version>
</dependency>
Check that your project compiles fine by running maven compile.
Create a YugabyteDB Cluster
Create a multi-region YugabyteDB cluster. Download the YugabyteDB binary to install locally in your environment. Ensure that you have enough processing power and memory in your system to launch the cluster.
NOTE: For this example, the YugabyteDB cluster and the application were run on a single centOS 7 system with 16GB memory and 8 cores.
Launch the Cluster
The commands below launch a 6-node cluster on a local machine. The nodes are configured with placement values that put them in two zones. So there are three nodes in each zone.
# On macO, configure loopback addresses for the additional nodes
sudo ifconfig lo0 alias 127.0.0.2
sudo ifconfig lo0 alias 127.0.0.3
sudo ifconfig lo0 alias 127.0.0.4
sudo ifconfig lo0 alias 127.0.0.5
sudo ifconfig lo0 alias 127.0.0.6

./bin/yb-ctl start --rf 3 --placement_info "aws.us-east-1.us-east-1a"
./bin/yb-ctl add_node --placement_info "aws.us-east-1.us-east-1b"
./bin/yb-ctl add_node --placement_info "aws.us-east-1.us-east-1b"
./bin/yb-ctl add_node --placement_info "aws.us-east-1.us-east-1b"
Verify if the cluster is up successfully by running a few commands. Log in to the ysqlsh shell and query yb_servers() function. It will return the list of servers in the cluster.
$ ./bin/ysqlsh
ysqlsh (11.2-YB-2.18.0.1-b0)
Type "help" for help.
yugabyte=# select * from yb_servers();
   host    | port | num_connections | node_type | cloud |  region   |    zone    | public_ip |               uuid
-----------+------+-----------------+-----------+-------+-----------+------------+-----------+----------------------------------
 127.0.0.6 | 5433 |               0 | primary   | aws   | us-east-1 | us-east-1b |           | 32f7317acc894be5b04188f4ad0c4898
 127.0.0.5 | 5433 |               0 | primary   | aws   | us-east-1 | us-east-1b |           | 2c0b1e3bddcb4211ba9400a5e9b214bf
 127.0.0.4 | 5433 |               0 | primary   | aws   | us-east-1 | us-east-1b |           | 9084361186fa4951b196287687403b74
 127.0.0.1 | 5433 |               0 | primary   | aws   | us-east-1 | us-east-1a |           | f063adac2a14466890555535f89cf8b7
 127.0.0.2 | 5433 |               0 | primary   | aws   | us-east-1 | us-east-1a |           | 1e022dce8ef646808e3b48436908901c
 127.0.0.3 | 5433 |               0 | primary   | aws   | us-east-1 | us-east-1a |           | edb48febe4aa4a719d91cf22585f459b
(6 rows)
Start Your Application
Run the command below to start the application, which will initialize the Hikari connection pool, create a table, and insert a record.
mvn exec:java -Dexec.mainClass=com.yugabyte.HikariCPApp
Keep the application running until it receives a user input to separately verify the connections count across the nodes while the application runs.
Now check where these 12 connections are created. The curl command (below) lists all live client connections for the endpoint 127.0.0.4 (node4) which is then piped to the grep command to count the number of connections. Run this command in a separate terminal window. You can run it for other nodes as well.
curl -s https://127.0.0.4:13000/rpcz | grep -c "client backend"
You will see that node4, node5, and node6 have 4 connections each. The other nodes do not have any connections.
Bring Nodes Down
Now, let’s bring node4 down.
./bin/yb-ctl stop_node 4
Since the application is not running any queries, the connections are idle. And since keepaliveTime is set to 30000 milliseconds, the pool will ping each idle connection every 30 seconds. While doing so, if it notices that a connection has failed, it will attempt to recreate those failed connections. So, you will see that node4’s four connections are recreated on node5 and node6 in the primary placement—maintaining the total count at 12. It may take up to keepaliveTime time (in this case, 30 seconds) before we see the connections recreated on new nodes.
In case of an active or in-use connection, if the connected node goes down, the failure is promptly reported to the application layer, allowing it to take remedial action like retry attempts.
Use the curl command to verify that node5 and node6 now have 6 connections each.
$ curl -s https://127.0.0.5:13000/rpcz | grep -c "client backend"
6
$ curl -s https://127.0.0.6:13000/rpcz | grep -c "client backend"
6
Now we’ll bring down the other two nodes (node5 and node6), so that there are no available nodes in the primary placement.
./bin/yb-ctl stop_node 5
./bin/yb-ctl stop_node 6
This will force the pool to recreate failed connections and the driver to look for nodes in the fallback placement. After about 30 seconds, the pool will create 12 connections to the nodes in placement aws.us-east-1.us-east-1a.
With the curl command you can verify that nodes 1, 2 and 3 get four connections each since they all are in the fallback placement aws.us-east-1.us-east-1a.
$ curl -s https://127.0.0.1:13000/rpcz | grep -c "client backend"
4
$ curl -s https://127.0.0.2:13000/rpcz | grep -c "client backend"
4
$ curl -s https://127.0.0.3:13000/rpcz | grep -c "client backend"
4
Press hit the enter or return key to exit the application. Use the command above to stop the remaining nodes in the cluster.
When Primary Nodes Come Back Up
You might wonder what happens if the primary nodes come back up later. Will the pool continue to use the nodes in the fallback placement or will it switch back to the primary nodes?
Well, the pool can definitely switch back to the primary nodes if configured accordingly.
In our setup above, if any nodes in the fallback placement experience an outage, the pool will attempt to recreate the failed connections. The driver will then guarantee that these connections are established on the nodes in the primary placement, provided it has knowledge of their restoration.
Alternatively, you can configure the minimumIdle to be less than maximumPoolSize or set maxLifetime to a value greater than 0. In either of the cases, the pool will retire the eligible connections and replace them with new ones on the primary nodes.
Conclusion
As we have laid out, the YugabyteDB JDBC Smart Driver allows pooling frameworks like HikariCP to seamlessly failover to all or specific servers from the originally connected servers in the cluster.
Furthermore, once the nodes in the primary placement become available again, the driver effortlessly manages the new connection requests through the nodes in the primary placement without any impact.
 Scenarios and the Multi-Tenancy Options That Support Them")

