Develop Azure Functions with YugabyteDB
November 28, 2023
In this tutorial, we’ll guide you through the steps required to develop and deploy a serverless function using Azure Functions and YugabyteDB.
Serverless functions serve many different use cases, including API endpoints, scheduled jobs and file processing. Azure Functions work with a number of triggers and bindings, which allow developers to define precisely when a function will be invoked and how it will interact with other services.
In the following sections, we will:
- Cover the prerequisites for developing an Azure Function backed by our fully managed DBaaS, YugabyteDB Managed
- Deploy a database cluster to Azure on YugabyteDB Managed
- Develop an Azure Function using an HTTP trigger
- Deploy this serverless function to Azure
Let’s begin by installing the dependencies required to begin effectively developing Azure Functions.
Prerequisites
- A Microsoft Azure subscription, with a resource group and storage account
- Access to the Azure Functions resource
- Node.js version v18+
- Azure Functions Core Tools
- A YugabyteDB Managed account
What We’ll Build
First, visit GitHub for the function application we will be deploying to Azure.
We’ll develop and deploy an HTTP trigger function, which connects to YugabyteDB and returns the current inventory of our shoe store, YB Shoes.
% curl https://ybazurefunctions.azurewebsites.net/api/getshoeinventory


[{"quantity":24,"model":"speedgoat 5","brand":"hoka one one"},{"quantity":74,"model":"adizero adios pro 3","brand":"adidas"},{"quantity":13,"model":"torrent 2","brand":"hoka one one"},{"quantity":99,"model":"vaporfly 3","brand":"nike"}]
Get Started on YugabyteDB Managed
Visit our documentation site to create a YugabyteDB cluster on Azure.
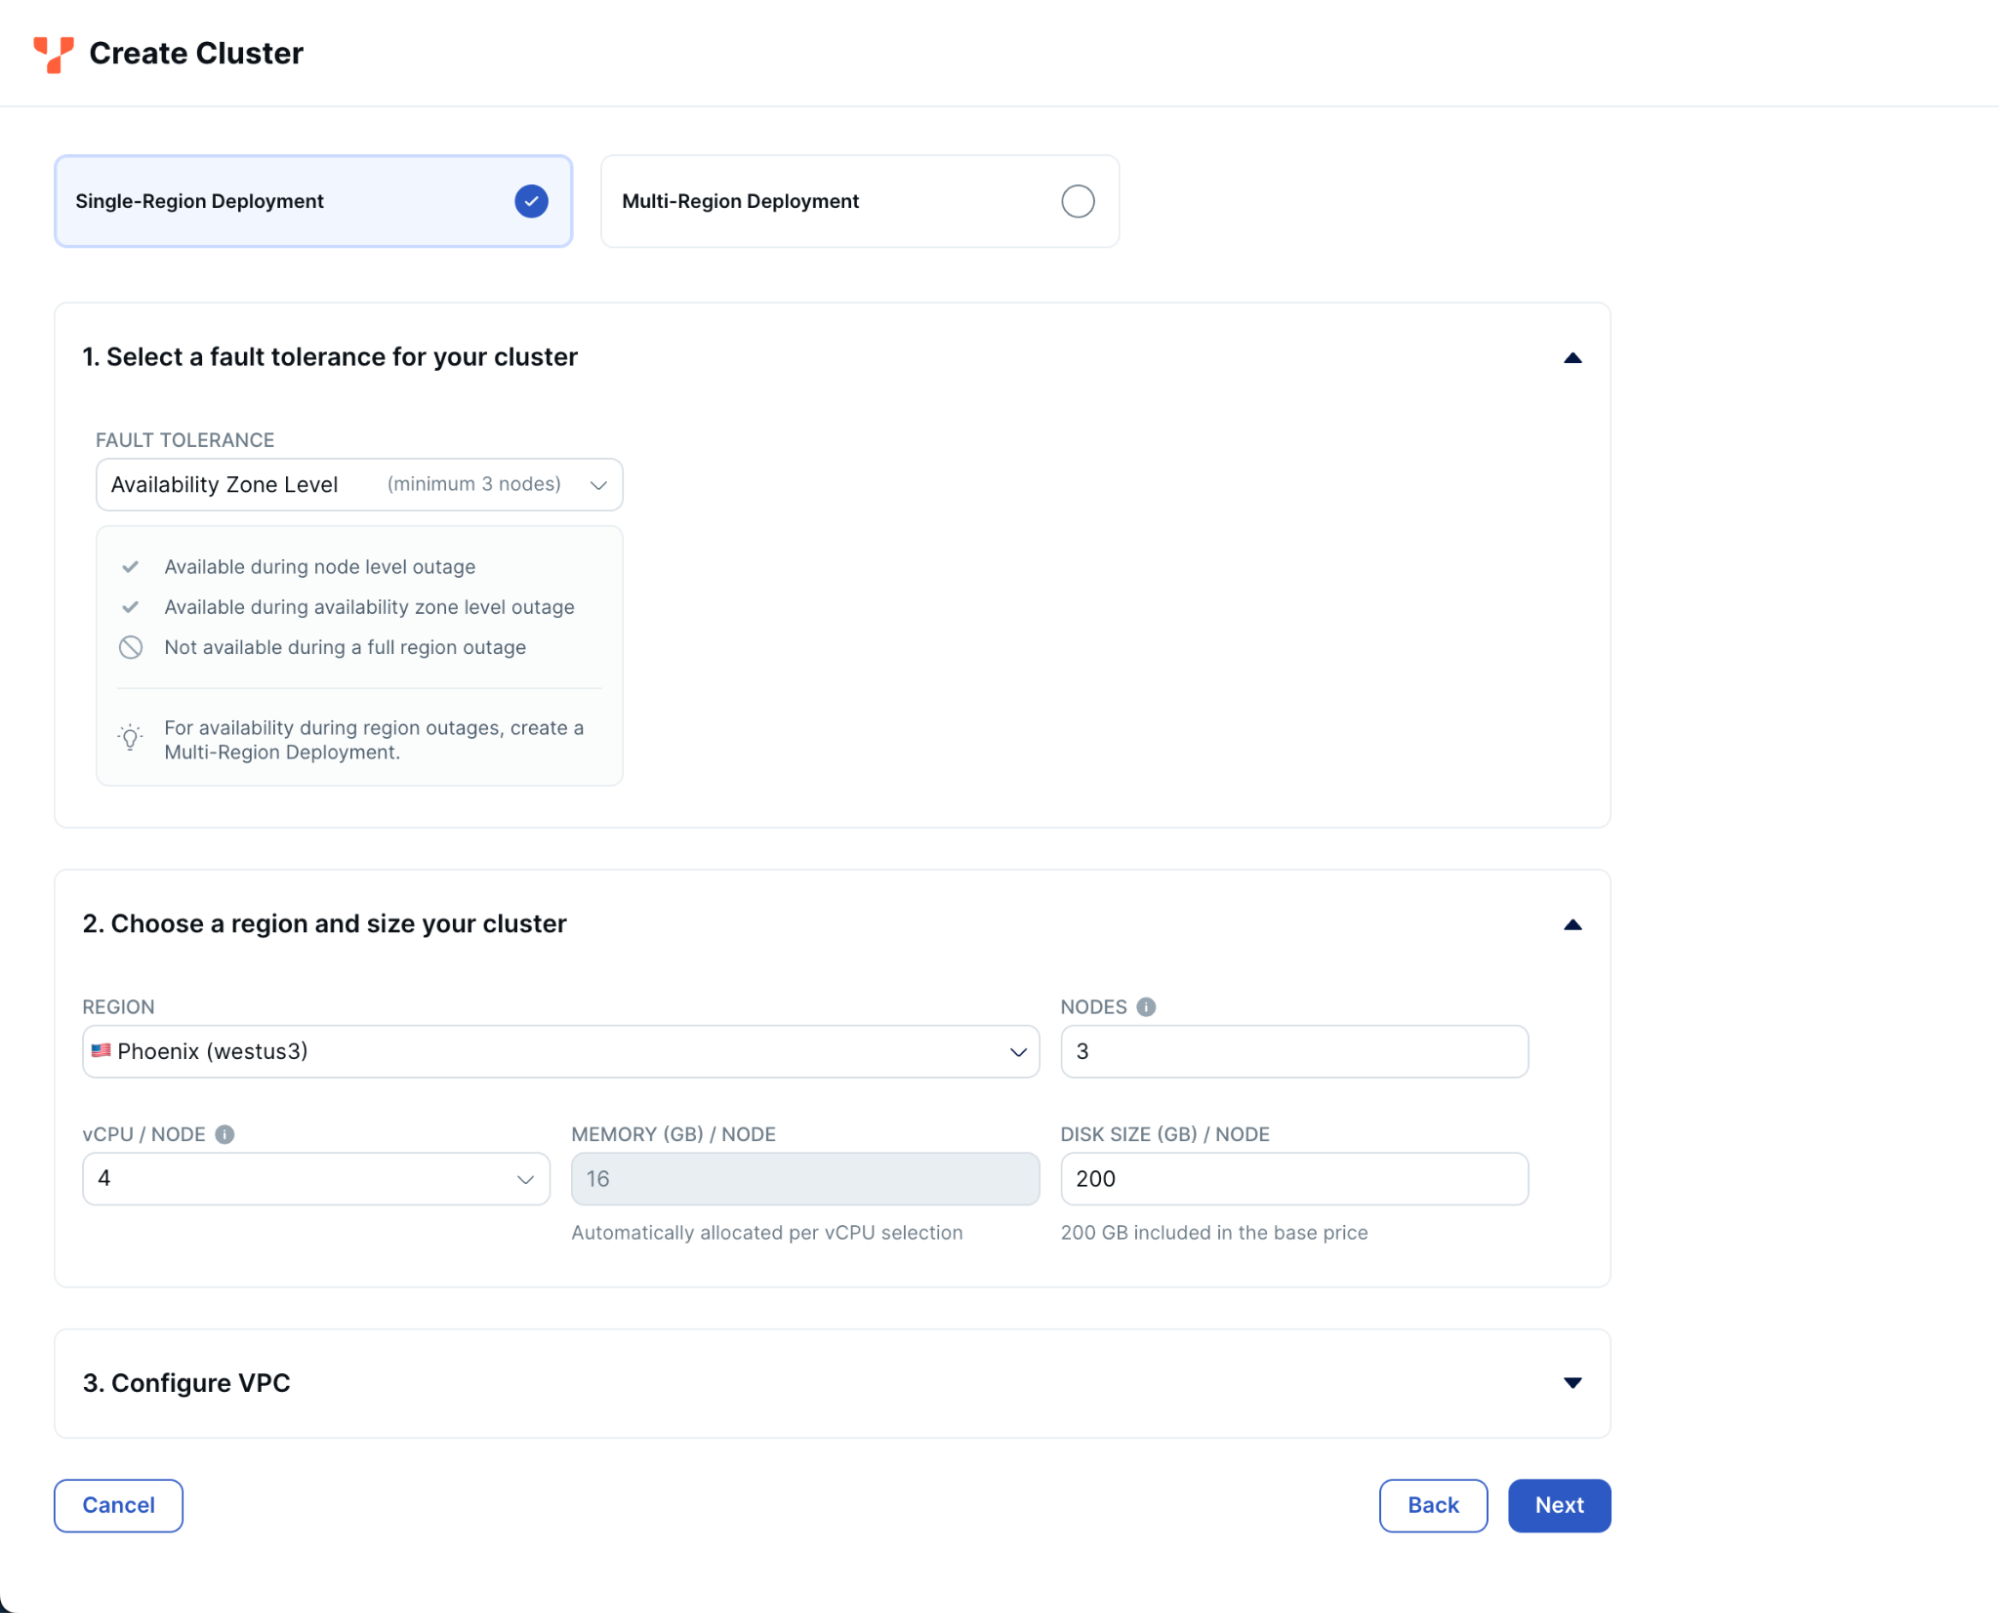
For a configuration that provides fault tolerance across availability zones, deploy a three-node cluster to Azure, in the WestUS3 region. However, you can start with an always-free single-node cluster.
Add the outbound addresses for your function app, which can be found in the networking tab of the Azure portal. This will ensure that a connection can be made between Azure Functions and YugabyteDB.
![]()
In addition to the outbound IP addresses in Azure, add your machine’s IP address to the IP Allow List in YugabyteDB Managed, to successfully run your serverless functions locally in development. Now that we have a working cluster in YugabyteDB Managed, let’s add some data.
Adding Data to YugabyteDB
Now that our cluster is running in the cloud, we can seed it with data using the provided `schema.sql` and `data.sql` files.
- Use the YugabyteDB Cloud Shell to connect to your cluster.
- Execute the `schema.sql` script against your cluster.
- Execute the `data.sql` script against your cluster.
With your cluster seeded with data, it’s time to build the serverless function to connect to it.
Serverless Function Development
The Azure Functions Core Tools provide a command-line interface for developing functions on your local machine and deploying them to Azure.
- Initialize a new Azure Functions project.
% func init YBAzureFunctions --worker-runtime javascript --model V4
- Create a new HTTP trigger function.
% cd YBAzureFunctions
% func new --template "Http Trigger" --name GetShoeInventory
- Install the YugabyteDB node-postgres Smart Driver.
% npm install @yugabytedb/pg
- Update the boilerplate code in GetShoeInventory.js.
const { app } = require("@azure/functions"); const { Client } = require("pg"); app.http("GetShoeInventory", { methods: ["GET"], authLevel: "anonymous", handler: async () => { // Read the PostgreSQL connection settings from local.settings.json console.log("process.env.DB_HOST:", process.env.DB_HOST); const client = new Client({ user: process.env.DB_USERNAME, host: process.env.DB_HOST, database: "yugabyte", password: process.env.DB_PASSWORD, port: 5433, max: 10, idleTimeoutMillis: 0, ssl: { rejectUnauthorized: true, ca: atob(process.env.DB_CERTIFICATE), servername: process.env.DB_HOST, }, }); try { // Connect to the PostgreSQL database await client.connect(); // Query YugabyteDB for shoe inventory const query = "SELECT i.quantity, s.model, s.brand from inventory i INNER JOIN shoes s on i.shoe_id = s.id;"; const result = await client.query(query); // Process the query result const data = result.rows; // Close the database connection await client.end(); return { status: 200, body: JSON.stringify(data), }; } catch (error) { console.error("Error connecting to the database:", error); return { status: 500, body: "Internal Server Error", }; } }, }); - Update local.settings.json with the configuration settings required to run the GetShoeInventory function locally.
# convert the downloaded CA certificate from YugabyteDB Managed to a single line string, then Base64 encode it
# Azure Configuration Settings forbid special characters, so this ensures the cert can be passed properly to our application
# Tip: Run this command to convert cert file to base64 encoded single line string:
# cat /path/to/cert/file | base64

local.settings.json
...
"DB_USERNAME": "admin",
"DB_PASSWORD": [YUGABYTE_DB_PASSWORD],
"DB_HOST": [YUGABYTE_DB_HOST],
"DB_NAME": "yugabyte",
"DB_CERTIFICATE": [BASE_64_ENCODED_YUGABYTE_DB_CERTIFICATE]
- Run the function locally.
% func start
Test your function in the browser at http://localhost:7071/api/GetShoeInventory.
It’s now time to deploy our function to Azure.
Deploy a Function App to Azure
We can deploy our application to Azure using the Azure CLI.
- Create a Function App.
% az functionapp create --resource-group RESOURCE_GROUP_NAME --consumption-plan-location eastus2 --runtime node --runtime-version 18 --functions-version 4 --name YBAzureFunctions --storage-account STORAGE_ACCOUNT_NAME
- Configure the application settings.
% az functionapp config appsettings set -g RESOURCE_GROUP_NAME -n APPLICATION_NAME --setting DB_HOST=[YUGABYTE_DB_HOST] DB_USERNAME=admin DB_PASSWORD=[YUGABYTE_DB_PASSWORD] DB_CERTIFICATE=[BASE_64_ENCODED_YUGABYTE_DB_CERTIFICATE]
- Publish Function App to Azure.
% func azure functionapp publish YBAzureFunctions
- Verify that the function was published successfully.
% curl https://ybazurefunctions.azurewebsites.net/api/GetShoeInventory

[{"quantity":24,"model":"speedgoat 5","brand":"hoka one one"},{"quantity":74,"model":"adizero adios pro 3","brand":"adidas"},{"quantity":13,"model":"torrent 2","brand":"hoka one one"},{"quantity":99,"model":"vaporfly 3","brand":"nike"}]
Wrapping Up
As you can see, it’s easy to begin developing and publishing database-backed Azure Functions with YugabyteDB. If you’re also interested in building a Node.js web application for YB Shoes using Azure App Service and YugabyteDB, check out the following blog:


