Getting Started with Falco Runtime Security and Cloud Native Distributed SQL on Google Kubernetes Engine
March 9, 2020
Falco is an incubating CNCF project that provides cloud native, open source runtime security for applications running in Kubernetes environments. Falco monitors process behaviors to detect anomalous activity and help administrators gain deeper insights into process execution. Behind the scenes, Falco leverages the Linux-native extended Berkeley Packet Filter (eBPF) technology to analyze network traffic and audits a system at the most fundamental level, the Linux kernel. Falco then enriches this data with other input streams, including container and Kubernetes metrics, to provide even deeper insights.
Because YugabyteDB is a cloud native, distributed SQL database that is designed to run in Kubernetes environments, it can interoperate with Falco and many other CNCF projects right out of the box.
What’s YugabyteDB? It is an open source, high-performance distributed SQL database built on a scalable and fault-tolerant design inspired by Google Spanner. Yugabyte’s SQL API (YSQL) is PostgreSQL wire compatible.
Why Falco and YugabyteDB?
When it comes to running YugabyteDB in a Kubernetes environment, implementing the recommended database security controls are a great start. However, it is also important to go one level deeper and put in place controls and monitoring to detect unexpected behavior that could be malicious.
For example, a malicious company insider can often find ways to eavesdrop on sensitive data like credit card information, social security numbers, or health records by connecting on different ports or reading the sensitive data files directly from disk or by copying backup files, completely bypassing the database engine. To safeguard against these types of vulnerabilities it makes sense to deploy multiple security layers. By using Falco with a YugabyteDB deployment, it can help create this additional layer of defense in Kubernetes environments. In this blog post we’ll show you how to get up and running with YugabyteDB and Falco on Google Cloud Platform plus implement and test some basic security policies.
Prerequisites
Below is the environment that we’ll use to run a YugabyteDB cluster on top of a Google Kubernetes cluster integrated with Falco.
- YugabyteDB (using Helm Charts) – Version 2.0.11
- Falco (using Helm Charts) – Version 0.19.0
- A Google Cloud Platform account
Setting Up a Kubernetes Cluster on Google Cloud Platform
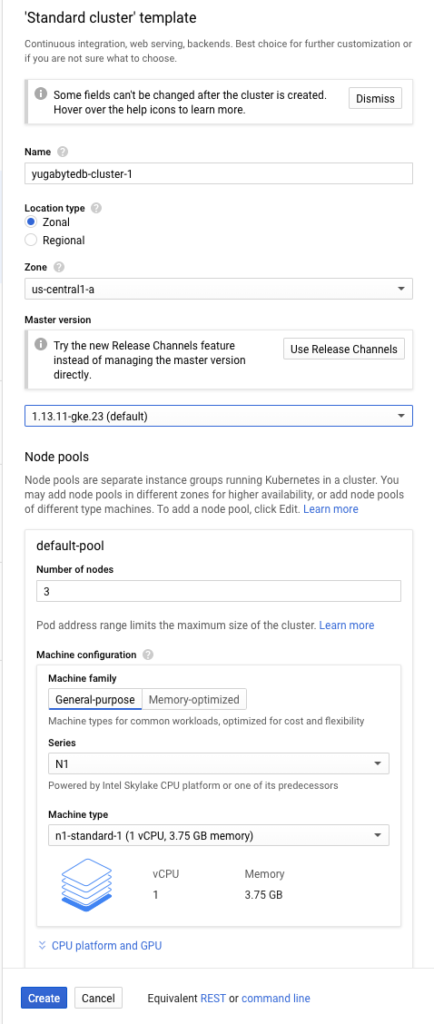
To deploy YugabyteDB on the Google Cloud Platform (GCP), we first have to set up a cluster. To create the cluster in Google Kubernetes Engine (GKE):
Go to Kubernetes Engine> Clusters > Create Cluster > Standard cluster. For the purposes of this example we’ll name the cluster yugabytedb-cluster-1 and use the default options.
Connect to the Google Cloud Shell and verify that the nodes are setup and running by using the command:
$ gcloud container clusters list
![]()
Note that in this case, we have configured the cluster with n1-standard-1 machine type.
Installing YugabyteDB
We will be using Helm charts to install YugabyteDB and Falco. However, before we dive into the steps to install YugabyteDB, let’s make sure that the Helm prerequisites are available.
Verify and upgrade Helm
First, check to see if Helm is installed by using the Helm version command:
$ helm version

Client: &version.Version{SemVer:"v2.14.1", GitCommit:"5270352a09c7e8b6e8c9593002a73535276507c0", GitTreeState:"clean"}
Error: could not find tiller
If you run into issues associated with Tiller, such as the error above, you can initialize Helm with the upgrade option:
$ helm init --upgrade --wait

$HELM_HOME has been configured at /home/jimmy/.helm.
Tiller (the Helm server-side component) has been installed into your Kubernetes Cluster.
Please note: by default, Tiller is deployed with an insecure 'allow unauthenticated users' policy.
To prevent this, run `helm init` with the --tiller-tls-verify flag.
For more information on securing your installation see: https://docs.helm.sh/using_helm/#securing-your-helm-installation
You should now be able to install YugabyteDB using a Helm chart.
Create a service account
Before you can create the cluster, you need to have a service account that has been granted the cluster-admin role. Use the following command to create a yugabyte-helm service account granted with the ClusterRole of cluster-admin.
kubectl create -f https://raw.githubusercontent.com/yugabyte/charts/master/stable/yugabyte/yugabyte-rbac.yaml

serviceaccount/yugabyte-helm created
clusterrolebinding.rbac.authorization.k8s.io/yugabyte-helm created
Initialize Helm
$ helm init --service-account yugabyte-helm --upgrade --wait

$HELM_HOME has been configured at /home/jimmy/.helm.
Tiller (the Helm server-side component) has been installed into your Kubernetes Cluster.

Please note: by default, Tiller is deployed with an insecure 'allow unauthenticated users' policy.
To prevent this, run `helm init` with the --tiller-tls-verify flag.
For more information on securing your installation see: https://docs.helm.sh/using_helm/#securing-your-helm-installation
Create a namespace
$ kubectl create namespace yb-demo

namespace/yb-demo created
Add the charts repository
$ helm repo add yugabytedb https://charts.yugabyte.com

"yugabytedb" has been added to your repositories
Fetch updates from the repository
$ helm repo update

Hang tight while we grab the latest from your chart repositories...
...Skip local chart repository
...Successfully got an update from the "yugabytedb" chart repository
...Successfully got an update from the "stable" chart repository
Update Complete.
Install YugabyteDB
By default, the YugabyteDB Helm chart will expose only the master UI endpoint using the LoadBalancer. For the purposes of this blog post, we also want to expose the various YugabyteDB APIs, like the YSQL service so you can connect external applications to the database. Additionally, since we used n1-standard-1 type servers in our cluster, we will use the Helm resource options for low resource environments.
$ helm install yugabytedb/yugabyte -f https://raw.githubusercontent.com/yugabyte/charts/master/stable/yugabyte/expose-all.yaml --set resource.master.requests.cpu=0.1,resource.master.requests.memory=0.2Gi,resource.tserver.requests.cpu=0.1,resource.tserver.requests.memory=0.2Gi --namespace yb-demo --name yb-demo --wait
To check the status of the YugabyteDB cluster, execute the command below:
$ helm status yb-demo
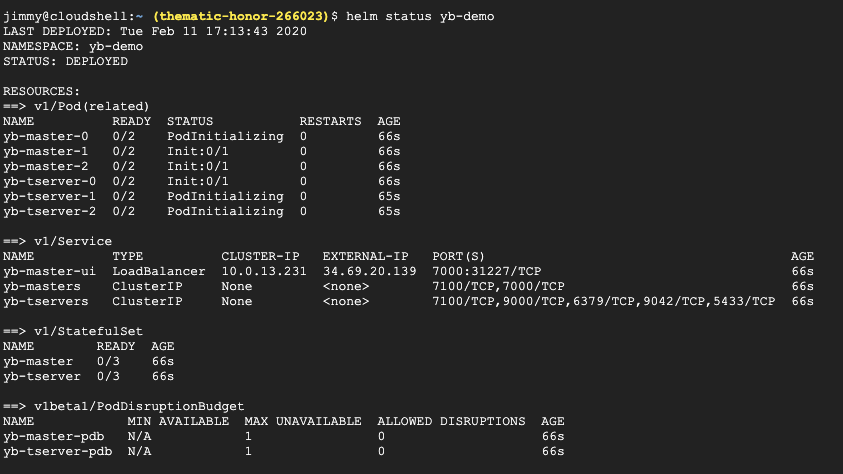
Congrats! At this point you have a three node YugabyteDB cluster running on GKE.
Installing Falco
Now, let’s proceed with installing Falco. For the purposes of this blog, we’ll be using Helm charts version 1.1.0.
As previously mentioned, Falco requires eBPF, and by default eBPF is not enabled in GKE’s Cloud OS. The Helm install command that enables eBPF and installs Falco chart version 1.1.0 can be found below:
$ helm install --name falco --set ebpf.enabled=true stable/falco --version=1.1.0
We can now check the status of the Falco pod by executing:
$ helm status falco

Alternatively, the “Workloads” tab in GKE should also indicate that Falco is running.

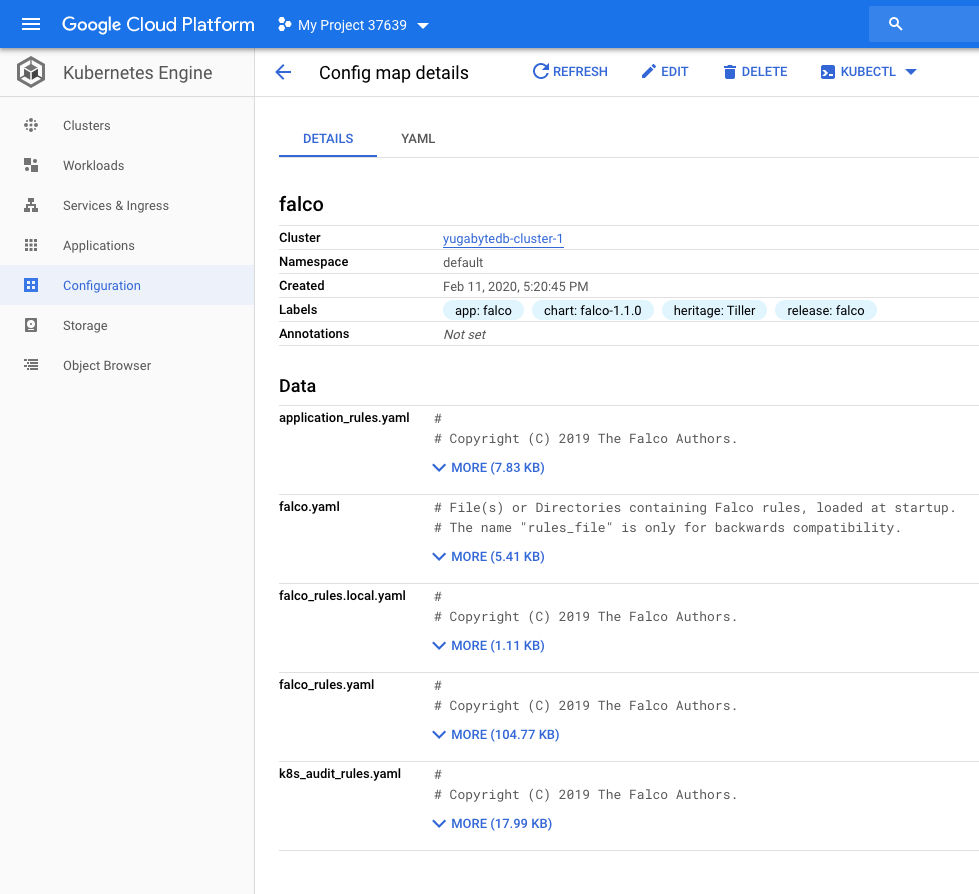
Falco Rules and ConfigMap
Out of the box, Falco comes with a rich set of predefined rules that you can edit for flagging abnormal behaviors. The rules are essentially yaml files (*_rules.yaml) that contain the checks that Falco uses to generate alerts (shells being opened, files being modified, incoming connections, etc.). In addition to the rules, there are also configuration files (such as falco.yaml) that have deamon settings such as output type, ports, etc.
In Kubernetes, ConfigMaps allow you to decouple configuration artifacts from image content to keep containerized applications portable. You can view the rules and configuration files of Falco through the “Configuration” tab in GKE, and then by selecting the Falco ConfigMap. This can be very useful when writing custom rules for Falco.
For example, Falco has preconfigured rules for databases like MongoDB, Cassandra, and Elasticsearch. These rules are set up to catch things like inbound/outbound network traffic on a port other than the standard ports. Similar rules could be configured to monitor inbound and outbound YugabyteDB traffic on unauthorized ports, for example:
# YugabyteDB ports
- macro: yugabytedb_ysql_port
  condition: fd.sport=5433
- macro: yugabytedb_ycql_port
  condition: fd.sport=9042
- macro: yugabytedb_yedis
  condition: fd.sport=6379
- macro: yugabytedb_port
  condition: yugabytedb_ysql_port or yugabytedb_ycql_port or yugabytedb_yedis

# - rule: YugabyteDB unexpected network inbound traffic
#   desc: inbound network traffic to YugabyteDB on a port other than the standard ports
#   condition: user.name = yugabyte and inbound and not yugabytedb_port
#   output: "Inbound network traffic to YugabyteDB on unexpected port (connection=%fd.name)"
#   priority: WARNING

# - rule: YugabyteDB unexpected network outbound traffic
#   desc: outbound network traffic from YugabyteDB on a port other than the standard ports
#   condition: user.name = yugabyte and outbound and not yugabytedb_port
#   output: "Outbound network traffic from YugabyteDB on unexpected port (connection=%fd.name)"
#   priority: WARNING
Auditing Connections to YugabyteDB
Finally, let’s do a quick test of the YugabyteDB and Falco integration by making use of a built-in rule found in the falco_rules.yaml:
rule: Write below root
desc: an attempt to write to any file directly below / or /root
We can test this rule by creating the user1 login and then logging in with that new role.
$ kubectl exec -n yb-demo -it yb-tserver-0 /home/yugabyte/bin/ysqlsh -- -h yb-tserver-0.yb-tservers.yb-demo

yugabyte=# CREATE ROLE user1 WITH LOGIN SUPERUSER;

\q

$ kubectl exec -n yb-demo -it yb-tserver-0 bash

$ ./bin/ysqlsh -U user1 -h yb-tserver-0 -d yugabyte

ysqlsh (11.2-YB-2.0.11.0-b0)
Type "help" for help.
yugabyte=#
Inspecting Falco Audit Logs
The login to YugabyteDB by user1 via the root user should have been logged by Falco based on the rule we highlighted earlier. To view the audit trail we can inspect the logs.
$ kubectl logs --selector app=falco | grep user1

02:55:35.245247928: Error File below / or /root opened for writing (user=root command=ysqlsh -U user1 -h yb-tserver-0 -d yugabyte parent=bash file=/root/.psql_history program=ysqlsh container_id=ac8028a3c3bc image=yugabytedb/yugabyte) k8s.ns=yb-demo k8s.pod=yb-tserver-0 container=ac8028a3c3bc k8s.ns=yb-demo k8s.pod=yb-tserver-0 container=ac8028a3c3bc
From the above output, we can see that Falco has logged an error saying that user=root has run command=ysqlsh and connected to our YugabyteDB database using the user1 login.
That’s it! At this point you can now start to build more complex rules in Falco to monitor and audit YugabyteDB in order to get an additional layer of defense in Kubernetes environments.
What’s Next?
- Compare YugabyteDB in depth to databases like CockroachDB, Google Cloud Spanner, and Amazon Aurora.
- Get started with YugabyteDB on macOS, Linux, Docker, and Kubernetes.
- Contact us to learn more about licensing, pricing, or to schedule a technical overview.
- We’re hiring! Check out our open positions and spread the word.


