Getting Started with pgbench and Distributed SQL on GKE
March 18, 2020
pgbench is a simple program for running benchmark tests on PostgreSQL. It runs the same sequence of SQL commands over and over, possibly in multiple concurrent database sessions, and then calculates the average transaction rate (transactions per second). By default, pgbench tests a scenario that is loosely based on TPC-B, involving five SELECT, UPDATE, and INSERT commands per transaction. However, it is easy to test other cases by writing your own transaction script files.
Before we dive in, we wanted to let you know that the Yugabyte team has been working from home in order to do our part with social distancing and to help with containment efforts. We have also transitioned to online meetings with our customers, partners, candidates, community, and fellow Yugabeings. We will continue with these and other measures until it’s determined to be safe otherwise. We wish everyone the best health and wellness, and our thoughts are with all those around the world who have been affected by COVID-19. If during these unprecedented circumstances, you have some time or would welcome a brief distraction, we invite you to check out this post below.
At YugabyteDB we have forked pgbench and renamed it to ysql_bench. This utility can be found in the YugabyteDB install directory under /postgres/bin/ysql_bench. You can find the source for ysql_bench on GitHub. This fork is identical to pgbench with two minor differences in the set up phase only:
- When initializing
ysql_bench, primary keys are created during theCREATE TABLEstatement, not afterwards. - When seeding the tables with data during the initialization phase we divide the data into a number of smaller batches instead of a single batch using the
COPYcommand.
What’s YugabyteDB? It is an open source, high-performance distributed SQL database built on a scalable and fault-tolerant design inspired by Google Spanner. Yugabyte’s SQL API (YSQL) is PostgreSQL wire compatible.
In this blog post we are going to walk you through how to deploy YugabyteDB on Google Kubernetes Engine (GKE) and configure ysql_bench to run against it.
Single Node PostgreSQL vs Distributed SQL
Although pgbench is a benchmarking utility designed for single node PostgreSQL deployments, it can still be used against a distributed, multi-node SQL database like YugabyteDB. As a PostgreSQL administrator it is important to remember that you will likely be making some performance trade-offs to get higher availability and geo-data distribution. Without getting into the eventually consistent, master/slave replication schemes you can use with PostgreSQL, as a general rule, PostgreSQL requires you to scale-up to achieve more performance, while YugabyteDB relies on scale-out to deliver more performance without compromising on data consistency guarantees.
Given the above, although PostgreSQL vs YugabyteDB is an “apples to oranges” comparison, pgbench can still provide some valuable insights in regards to offering a comparative starting point for cluster sizing, deployment architecture, and resource allocation. As you might imagine, your ultimate results are going to be highly dependent on your environment, machine types, default isolation levels and what (if any) database optimizations you’ve configured up front. A final bit of guidance is that we’ll be using GKE as our environment. And, as we all know, Kubernetes will introduce its own performance encumbrances, regardless of the software being benchmarked. However, for the purposes of this how-to, Kubernetes provides a relatively simple vehicle for getting a three node cluster of YugabyteDB up and running.
Ok, first things first, let’s get YugabyteDB running on GKE.
Prerequisites
Below is the environment we’ll be configuring for the purposes of this how-to:
- YugabyteDB – version 2.1.0
- A Google Cloud Platform account
Setting Up a Kubernetes Cluster on GCP
To deploy YugabyteDB on the Google Cloud Platform (GCP), we first have to set up a cluster. To create the cluster in Google Kubernetes Engine (GKE):
Go to Kubernetes Engine> Clusters > Create Cluster > Standard cluster. For the purposes of this example we’ll use the default options. As for the machine type, make sure you select the n1-standard-8 (8 vCPU, 30 GB memory) machine type at a minimum.
Connect to the Google Cloud Shell and verify that the nodes are setup and running by using the command:
$ gcloud container clusters list
Installing YugabyteDB on the GKE Cluster Using Helm
Detailed installation steps can be found here, which we’ve summarized below.
Upgrade Helm
Initialize Helm with the upgrade option:
$ helm init --upgrade --wait

$HELM_HOME has been configured at /home/jimmy/.helm.
Tiller (the Helm server-side component) has been installed into your Kubernetes Cluster.
Please note: by default, Tiller is deployed with an insecure 'allow unauthenticated users' policy.
To prevent this, run `helm init` with the --tiller-tls-verify flag.
For more information on securing your installation see: https://docs.helm.sh/using_helm/#securing-your-helm-installation
You should now be able to install YugabyteDB using a Helm chart.
Create a service account
Before you can create the cluster, you need to have a service account that has been granted the cluster-admin role. Use the following command to create a yugabyte-helm service account granted with the ClusterRole of cluster-admin.
$ kubectl create -f https://raw.githubusercontent.com/yugabyte/charts/master/stable/yugabyte/yugabyte-rbac.yaml

serviceaccount/yugabyte-helm created
clusterrolebinding.rbac.authorization.k8s.io/yugabyte-helm created
Initialize Helm
$ helm init --service-account yugabyte-helm --upgrade --wait

$HELM_HOME has been configured at /home/jimmy/.helm.

Tiller (the Helm server-side component) has been upgraded to the current version.
Create a namespace
$ kubectl create namespace yb-demo

namespace/yb-demo created
Add the charts repository
$ helm repo add yugabytedb https://charts.yugabyte.com

"yugabytedb" has been added to your repositories
Fetch updates from the repository
$ helm repo update

Hang tight while we grab the latest from your chart repositories...
...Skip local chart repository
...Successfully got an update from the "yugabytedb" chart repository
...Successfully got an update from the "stable" chart repository
Update Complete.
Install YugabyteDB
To install our YugabyteDB cluster with a replication factor of 3, we’ll be using a Helm chart and will expose the administrative UI endpoint and YSQL using LoadBalancer. YSQL is YugabyteDB’s PostgreSQL-compatible SQL API. Detailed Helm instructions can be found in the Docs.
$ helm install yugabytedb/yugabyte --namespace yb-demo --name yb-demo --wait
To check the status of the YugabyteDB cluster, execute the command below:
$ helm status yb-demo
You can also verify that all the components are installed and communicating by visiting GKE’s Services & Ingress and Workloads page.
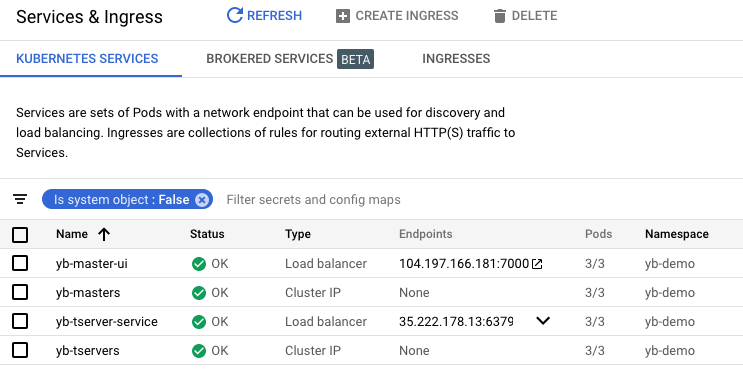
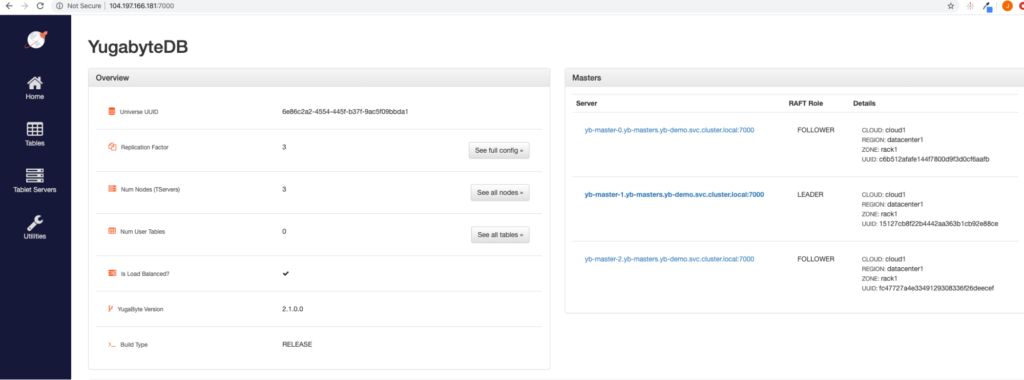
You can view the YugabyteDB install in the administrative UI by visiting the endpoint for the yb-master-ui service on port 7000.
You can also now log into YSQL, the PostgreSQL-compatible shell, by executing:
kubectl exec -n yb-demo -it yb-tserver-0 /home/yugabyte/bin/ysqlsh -- -h yb-tserver-0.yb-tservers.yb-demo

ysqlsh (11.2-YB-2.1.0.0-b0)
Type "help" for help.
yugabyte=#
Next, create the database that will hold the ysql_bench objects and data.
yugabyte=# CREATE DATABASE ysqlbenchtest;

CREATE DATABASE
Initializing ysql_bench with YugabyteDB
The next step is to initialize the ysql_bench utility after exiting YSQL and entering a shell on yb-tserver-0.
kubectl exec -n yb-demo -it yb-tserver-0 /bin/bash
Then execute:
$ ./postgres/bin/ysql_bench -h 35.222.178.13 -p 5433 -i -s 20 -U yugabyte ysqlbenchtest
Note: The default isolation level in PostgreSQL is Read Committed (Weaker), while in YugabyteDB it is Snapshot Isolation (Stronger) which maps to PostgreSQL’s Repeatable Read. Because of this, to run any “apples to oranges” tests between PostgreSQL and YugabyteDB, you might want to set both databases to Repeatable Read or Serializable.
A quick cheat sheet concerning the options we are using:
- -h – This host IP will be unique to your deployment.
- -p – This post number should be 5433 which is what the YSQL API listens on.
- -i – Specifies that this is an initialization run.
- -U – This section specifies the user and database we are running the initialization against.
- -s – Specifies the scale factor. The default scale factor for pgbench is 1. This means that the tables initially will contain this many rows:
table                   	# of rows
-------------------------------------
pgbench_branches       	1
pgbench_tellers         	10
pgbench_accounts       	100000
pgbench_history         	0
Specifying a scale factor of 20 (as in our example) would mean an initial row count of the following in ysql_bench:
table                   	# of rows
-------------------------------------
ysql_bench_branches       	20
ysql_bench_tellers         	200
ysql_bench_accounts       	2,000,000
ysql_bench_history         	0
For additional information on the various options that are available, check out the PostgreSQL Docs concerning pgbench.
After the initialization run, you should see output in your terminal similar to the below:
dropping old tables...
NOTICE:  table "ysql_bench_accounts" does not exist, skipping
NOTICE:  table "ysql_bench_branches" does not exist, skipping
NOTICE:  table "ysql_bench_history" does not exist, skipping
NOTICE:  table "ysql_bench_tellers" does not exist, skipping
creating tables (with primary keys)...
generating data...
....
done.
Running ysql_bench with YugabyteDB
We can now run ysql_bench using the following command:
./postgres/bin/ysql_bench -h 35.222.178.13 -p 5433 -r -U yugabyte ysqlbenchtest
The output should look something similar to the below:
transaction type:
scaling factor: 20
query mode: simple
number of clients: 1
number of threads: 1
batch size: 1024
number of transactions per client: 10
number of transactions actually processed: 10/10
maximum number of tries: 1
latency average = 41.204 ms
tps = 24.269731 (including connections establishing)
tps = 28.035730 (excluding connections establishing)
statement latencies in milliseconds:
         0.024  \set aid random(1, 100000 * :scale)
         0.002  \set bid random(1, 1 * :scale)
         0.002  \set tid random(1, 10 * :scale)
         0.002  \set delta random(-5000, 5000)
         0.281  BEGIN;
        12.754  UPDATE ysql_bench_accounts SET abalance = abalance + :delta WHERE aid = :aid;
         1.275  SELECT abalance FROM ysql_bench_accounts WHERE aid = :aid;
         6.645  UPDATE ysql_bench_tellers SET tbalance = tbalance + :delta WHERE tid = :tid;
         6.446  UPDATE ysql_bench_branches SET bbalance = bbalance + :delta WHERE bid = :bid;
         6.493  INSERT INTO ysql_bench_history (tid, bid, aid, delta, mtime) VALUES (:tid, :bid, :aid, :delta, CURRENT_TIMESTAMP);
         1.738  END;
Now that we can initialize the benchmarking objects and run a basic test, we are ready to start experimenting with the various option flags that are available in pgbench. For example we can rerun the test with more threads, detailed logging, latency limits and target transaction rates. As an example, let’s do a second run specifying the following options:
- scalefactor = 10
- jobs = 8
- runtime = 180 seconds
- clients = 1
Initialize the test run:
$ ./postgres/bin/ysql_bench -h 35.222.178.13 -p 5433 -i -s 10 -U yugabyte ysqlbenchtest
Run the test:
$ ./postgres/bin/ysql_bench -h 35.222.178.13 -p 5433 -r -j 8 -c 1 -T 180 -U yugabyte ysqlbenchtest
You should see output like this:
transaction type:
scaling factor: 10
query mode: simple
number of clients: 1
number of threads: 1
batch size: 1024
duration: 180 s
number of transactions actually processed: 11998
maximum number of tries: 1
latency average = 15.003 ms
tps = 66.652967 (including connections establishing)
tps = 66.854764 (excluding connections establishing)
statement latencies in milliseconds:
         0.013  \set aid random(1, 100000 * :scale)
         0.002  \set bid random(1, 1 * :scale)
         0.002  \set tid random(1, 10 * :scale)
         0.001  \set delta random(-5000, 5000)
         0.167  BEGIN;
         3.885  UPDATE ysql_bench_accounts SET abalance = abalance + :delta WHERE aid = :aid;
         0.972  SELECT abalance FROM ysql_bench_accounts WHERE aid = :aid;
         3.121  UPDATE ysql_bench_tellers SET tbalance = tbalance + :delta WHERE tid = :tid;
         2.788  UPDATE ysql_bench_branches SET bbalance = bbalance + :delta WHERE bid = :bid;
         2.478  INSERT INTO ysql_bench_history (tid, bid, aid, delta, mtime) VALUES (:tid, :bid, :aid, :delta, CURRENT_TIMESTAMP);
         1.531  END;
That’s it! You are now ready to run your own benchmarking experiments using ysql_bench, YugabyteDB’s version on pgbench!


