From Operational to Analytical: Unlock the Potential of YugabyteDB and Materialize Database Integration
June 14, 2023
In this blog, we’ll walk through how to handle fast-changing data by using both YugabyteDB and the Materialize database.
Why is Integration With a Streaming Database Needed With YugabyteDB?
YugabyteDB is a distributed SQL database that’s optimized for OLTP (online transaction processing) workloads. This typically involve handling many small transactions in real-time. However, YugabyteDB is not specifically designed to process streaming data or for real-time analytics. To do either requires different capabilities. This is where a streaming database like Materialize can be useful. Because Materialize is designed to provide real-time analytics on data streams, it works as a great complement to the Yugabyte database. By leveraging both YugabyteDB and Materialize, organizations can benefit from the following:
- YugabyteDB offers a scalable and fault-tolerant data store, ideal for operational workloads demanding high availability and low latency.
- Materialize provides real-time analytics on data streams, so organizations can extract insights from incoming data instantly, eliminating the need for batch processing delays.
Why Integrate YugabyteDB andMaterialize DB
When used together, YugabyteDB and MaterializeDB provides a powerful platform for complex data analytics workloads. Here are three possible use cases that could be relevant to your situation:
- Real-time transaction processing and analytics: A financial services company wants to process high volumes of transactional data in real-time and generate analytics on that data to detect fraud and identify trends. By leveraging YugabyteDB for data storage and processing, and Materialize for real-time analytics, they can achieve their objectives. Materialize ingests the transactional data stream from YugabyteDB through YugabyteDB CDC and runs continuous queries on the data to identify fraudulent transactions and generate real-time insights.
- IoT analytics: An IoT company needs to gather and analyze data from numerous devices to improve product performance and predict needed maintenance. By utilizing YugabyteDB to store sensor data and MaterializeB to provide event-driven analytics, they can achieve their goals. Materialize ingests the device data stream from YugabyteDB via YugabyteDB CDC, executing uninterrupted queries to uncover patterns, detect anomalies, and generate real-time insights.
- Social media analytics: A marketing company continuously monitors and analyzes social media data to track brand reputation and identify new opportunities. They use YugabyteDB to store the social media data feeds from various handles and MaterializeDB for real-time analytics.. Materialize ingests the social media data stream from YugabyteDB through YugabyteDB CDC and continuously queries the data to identify sentiment, track engagement, and generate instant analytics.
Combined, YugabyteDB and MaterializeDB can provide a powerful platform to handle complex data analytics workloads that require both real-time processing and large-scale data warehousing. By using both databases together, organizations identify issues and opportunities faster and make better, faster decisions.
High-level solution architecture
The diagram below (Figure 1) shows the integration architecture of YugabyteDB with the Materialize database using YugabyteDB’s CDC Connector and Kafka.
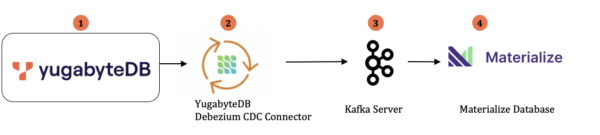
The table below shows the data flow sequences along with the operations and tasks performed.
| Data flow seq# | Operations/Tasks | Component Involved |
|---|---|---|
| 1 | YugabyteDB CDC Enabled and Create the Stream ID for specific YSQL database (e.g. your db name) | YugabyteDB |
| 2 and 3 | Install and configure Kafka server. NOTE: you canor install and configure it locally using this link. | Kafka Server, Zoo Keeper and Debezium Kafka connector for YugabyteDB |
| 4 | Create the connection and source in Materialize for continuous ingestions | Materialize database |
Decoding Method – Debezium Envelope with YugabyteDB CDC
Materialize provides a dedicated envelope (ENVELOPE DEBEZIUM) to decode Kafka messages produced by YugabyteDB Debezium connector. When using the YugabyteDB Debezium connector with Materialize, the Debezium envelope is preserved, and the “before” and “after” sections of the envelope can be accessed in the Materialize database. Materialize treats each change event as a separate row in a table, with columns representing the fields in the Debezium envelope.
By leveraging the YugabyteDB Debezium envelope in Materialize, we can perform various operations and transformations on the streaming data. For example, we can filter the events based on specific criteria, perform JOINS with other tables, aggregate the data, and apply various analytical functions.
Example:
Suppose you have a YugabyteDB Debezium CDC pipeline set up to capture changes from the Yugabyte database table called “sales_orders.” The “sales_orders” table has columns such as “sales_order_id,” “customer_id,” “sales_order_date,” and “sales_order_total.”
Now, let’s say you want to filter the change events to only include orders with a total greater than INR 50000 (50000 Rupees), perform a JOIN with a customer table (customers) to retrieve customer information, and calculate the average order total for each customer.
CREATE MATERIALIZED VIEW filtered_sales_orders AS
SELECT o.sales_order_id, o.order_date, o.order_total, c.customer_name
FROM sales_orders_source o
JOIN customers c ON o.customer_id = c.customer_id
WHERE o.order_total > 50000;

CREATE MATERIALIZED VIEW average_order_total AS
SELECT customer_name, AVG(order_total) AS avg_order_total
FROM filtered_sales_orders
GROUP BY customer_name;
By executing these queries, Materialize will continuously process the change events captured by YugabyteDB Debezium, filter the events based on the specified criteria (order total > 50000 INR), perform a JOIN with the customer table to retrieve customer names, and calculate the average order total for each customer.
You can then query the “average_order_total” materialized view to get insights (in real-time) regarding the average order total for each customer.
This example demonstrates how we can leverage the Debezium envelope in Materialize to filter, join, and perform analytical operations on the streaming data. This, in turn, enables us to derive meaningful insights and take real-time actions based on the captured changes from YugabyteDB.
NOTE: The output of this sample is captured in Figure 2 and Figure 3 below.
How to Set Up Materialize with YugabyteDB CDC
Install YugabyteDB
You have multiple options to install or deploy YugabyteDB if you don’t have one already available. Note: If you’re running a Windows Machine then you can leverage Docker on Windows with YugabyteDB.
Install and set up Kafka Schema Registry
Refer CDC Examples folder and download the docker-compose yaml file and run all the containers included on that list.
Setup and Configure CDC Stream ID in YugabyteDB
Create a database stream ID in YugabyteDB for a specific database (e.g. Orders) using this before image option as shown below; you will use this stream IDin step 4.
./yb-admin --master_addresses ${IP}:7100 create_change_data_stream ysql.yugabyte implicit allDeploy the source connector using Materialize
Create and deploy the source connector as mentioned below. Change the database hostname, database master addresses, database user, password, database name, logical server name, table include list, and StreamID as per your configuration (in yellow)
curl -i -X POST -H "Accept:application/json" -H "Content-Type:application/json" localhost:8083/connectors/ -d '{
 "name": "salesorder",
 "config": {
   "connector.class": "io.debezium.connector.yugabytedb.YugabyteDBConnector",
   "database.hostname":"10.12.1.5",
   "database.port":"5433",
   "database.master.addresses": "10.12.1.5:7100",
   "database.user": "yugabyte",
   "database.password": "xxxxxx",
   "database.dbname" : "yugabyte",
   "database.server.name": "dbserver5",
   "table.include.list":"public.sales_orders",
   "database.streamid":"b5bcab7797b64efc905e33041198066b",
   "transforms":"unwrap",
   "transforms.unwrap.type":"io.debezium.connector.yugabytedb.transforms.PGCompatible",
   "transforms.unwrap.drop.tombstones":"false",
   "key.converter":"io.confluent.connect.avro.AvroConverter",
   "key.converter.schema.registry.url":"https://schema-registry:8081",
   "value.converter":"io.confluent.connect.avro.AvroConverter",
   "value.converter.schema.registry.url":"https://schema-registry:8081",
   "snapshot.mode":"initial",
   "record_selector.allowed_types":"ALL"

 }
}'
Install Materialize database locally or setup a Materialize cloud account
Setup the Materialize database locally or sign-up for Materialize in the cloud.
CREATE SOURCE Connection and Materialized view
Login to Materialize with your default credentials (e.g. psql -U materialize -h materialized -p 6875 materialize) or custom credentials.
Connection for Kafka:
A connection describes how to connect and authenticate to an external system you want Materialize to read data from. Once created, it is reusable across multiple CREATE SOURCE and CREATE SINK statements.
For example kafka_src is the connection name created to point the Kafka broker listening in local with ‘broker:9092’
materialize=> create connection kafka_src to kafka (broker 'broker:9092');
CREATE CONNECTION
Connection for Schema Registry:
A Confluent Schema Registry connection establishes a link to a Confluent Schema Registry server. You can use Confluent Schema Registry connections in the FORMAT clause of CREATE SOURCE and CREATE SINK statements. Below we used a local schema registry server and created the same.
For example csr_connection is the connection name created to point the local Confluent schema registry server listening in local port 8081.
materialize=> create connection csr_connection to CONFLUENT SCHEMA REGISTRY (URL 'https://schema-registry:8081');
CREATE CONNECTION
Source:
To integrate Materialize with an external system (e.g., YugabyteDB), you need to specify the data source and provide the necessary instructions for decoding and interpreting the data.To create a source, you must specify a connector, a format and an envelope. Like other relations, sources are namespaced by a database and schema.
materialize=> create  source orders_source from kafka connection kafka_ybdb_src
(topic 'dbserver5.public.sales_orders') FORMAT AVRO USING CONFLUENT SCHEMA REGISTRY CONNECTION csr_connection envelope debezium  with (size='1');
CREATE SOURCE
materialize=>
Note: In this example, I used a Debezium envelope. It treats all records as change events with a different structure that indicates whether each record should be interpreted as an insert, update, or delete within Materialize with the help of before and after fields coming in the Kafka payload. YugabyteDB supports before image, so you need to ensure you have configured it during step 3 (above)
In the above image (CREATE SOURCE) we referred to “dbserver5.public.sales_orders” as the topic name that we configured in step 4. You can replace it with the topics that you wish to create in Materialize.
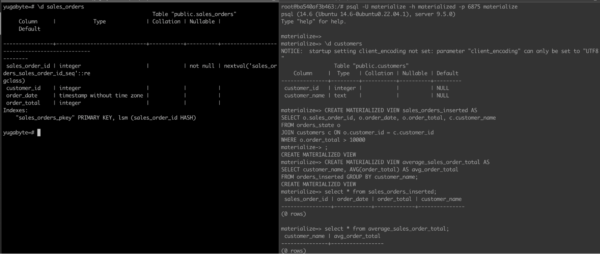
The output of YugabyteDB (tables) and Materialize DB(tables, materialized view) is shown in below diagram (Figure 2)

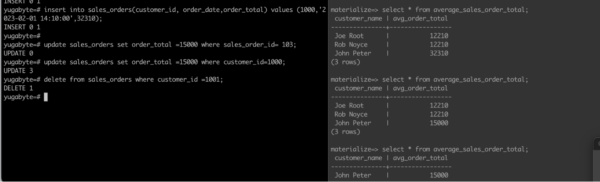
Figure 2: Output of Materialize Tables (sources) The CRUD Operation (INSERT, UPDATE, DELETE) done in YugabyteDB streams to Materialize DB through Debezium Envelope. Output is shown in Figure 3.
Figure 3: Output of CRUD Operations (and Its Impact) in Materialize DB
Conclusion and Summary
In this blog post, we walked through step-by-step how to integrate YugabyteDB Change Data Capture with the Materialize database. Use YugabyteDB and Materialize to create a powerful data pipeline that helps you handle both operational and analytical workloads with low latency and high scalability. By using these two databases together, you can build more robust and scalable applications that meet the needs of a wide variety of use cases.


