Introducing Auto Scaling in YugabyteDB Aeon

November 19, 2026
Every database team faces the same trade-off. Size the cluster for peak load, and you pay for idle capacity most of the day. Size it for average load, and someone gets a call when traffic climbs, then has to add nodes by hand (and remember to remove them later).
Today we’re introducing Autoscaling for YugabyteDB Aeon, now available in Early Access.
Autoscaling monitors your cluster’s CPU load and number of connections and automatically adds or removes nodes, always staying within the minimum and maximum sizes you set. Because YugabyteDB is a distributed SQL database that rebalances data and leaders online, these changes occur without downtime or requiring application changes.
In this blog, we explain what Autoscaling does, when it scales, how to set it up, and what to keep in mind as you roll it out.
What is Autoscaling in YugabyteDB Aeon?
Autoscaling is policy-driven horizontal scaling for YugabyteDB Aeon clusters. You define a policy, and YugabyteDB Aeon adds or removes nodes as load changes. A policy has four parts:
- Cluster limits: the minimum and maximum number of nodes the cluster may run.
- Scale-out rules: conditions that add nodes, such as average CPU above 65% over an evaluation window.
- Scale-in rules: conditions that remove nodes once load has dropped and stayed low.
- Cooldowns: waiting periods after a scaling event or maintenance, so the cluster settles before the next decision.
Autoscaling is designed for gradual or sustained shifts in demand: daily traffic cycles, seasonal peaks, steady growth, or a workload that winds down overnight. It complements manual scaling rather than replacing it. This means if you know a big spike is coming, such as a product launch, you can still scale in advance.
Autoscaling is currently in Early Access. To enable it for your account, contact Yugabyte Support. It is also supported in the YugabyteDB Aeon Terraform provider, so teams that manage clusters as code can define policies the same way.
How Autoscaling Works
Autoscaling runs a simple, predictable loop: evaluate the rules, check the guardrails, scale, rebalance, then cool down.
Autoscaling scales, rebalances, then cools down before deciding again:

Signals
Autoscaling uses two signals:
- CPU: Average CPU utilization across the cluster. This is the primary signal.
- Connections: YSQL connection usage relative to the connections available. This catches connection-heavy workloads that don’t show up as CPU pressure.
Scale out fast, scale in carefully
Scale-out and scale-in rules are deliberately asymmetric:
- Scale-out rules use OR logic. Any single rule that fires can add capacity. If CPU is high or connections are high, the cluster grows.
- Scale-in rules use AND logic. Every condition must hold before nodes are removed. For example, CPU below 40% for 60 minutes and connections below 70% for 15 minutes.
This bias means the cluster reacts quickly when it needs more capacity, and gives capacity back only when load has clearly settled.
| Rule type | Logic | Example condition | Action |
| Scale-out | OR (any rule) | CPU greater than 65% for 20 mins | Add 3 nodes |
| Scale-in | AND (all rules) | CPU below 40% for 60 min, connections below 70% for 15 min | Remove 3 nodes |
Guardrails
- Min and max nodes. The cluster never scales below the minimum or above the maximum. If it hits a limit, you get an alert through the cluster alerts system.
- Zone-aware increments. Node limits and step sizes are multiples of the cluster’s availability zone count. A 3-AZ cluster scales in steps of 3, so every zone stays balanced, and your fault tolerance holds.
- Cooldowns. Separate scale-out, scale-in, and post-maintenance cooldowns stop the cluster from thrashing. The timer starts only after the operation finishes, including data movement and cluster balancing.
- Maintenance awareness. Autoscaling pauses during backups, upgrades, rolling restarts, and other maintenance. A post-maintenance cooldown then applies after operations such as database and OS upgrades, restores, point-in-time clones, and resuming a paused cluster.
- Size disks for your minimum node count. Scale-in is blocked if the remaining nodes would be more than about 95% full, so make sure disk size per node can hold your data at the policy minimum.
Online rebalancing
When nodes are added, YugabyteDB automatically moves tablets and leaders onto them so the new capacity is used right away. When nodes are removed, data and leaders move off first. Your applications stay online throughout.
Setting up Autoscaling
Once the Support team has enabled Autoscaling for your account, setting up a policy takes just a few minutes. You need a single-region cluster and edit permission on that cluster.
- On the Clusters page, select your cluster.
- Go to Settings > Infrastructure > Autoscaling.
- Click Configure Policy.
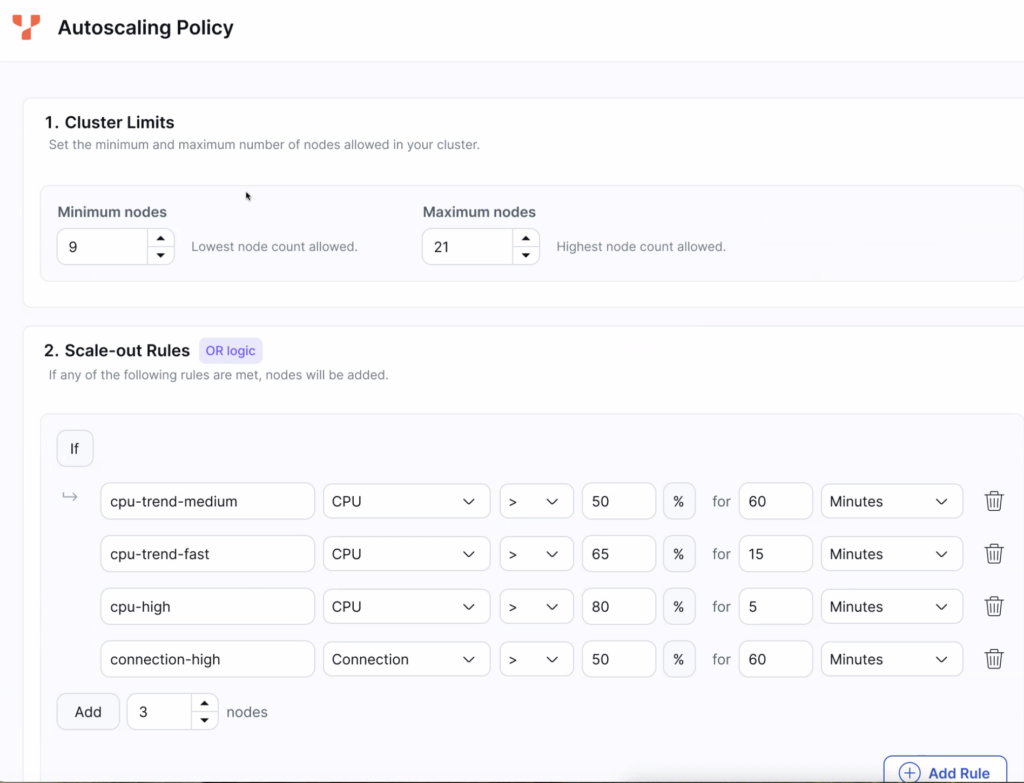
- Set Cluster Limits: the minimum and maximum node counts, for example: 9 and 21.
- Add Scale-out Rules: give each rule a name, pick a metric (CPU or connections), set a threshold and evaluation window, and choose how many nodes to add.
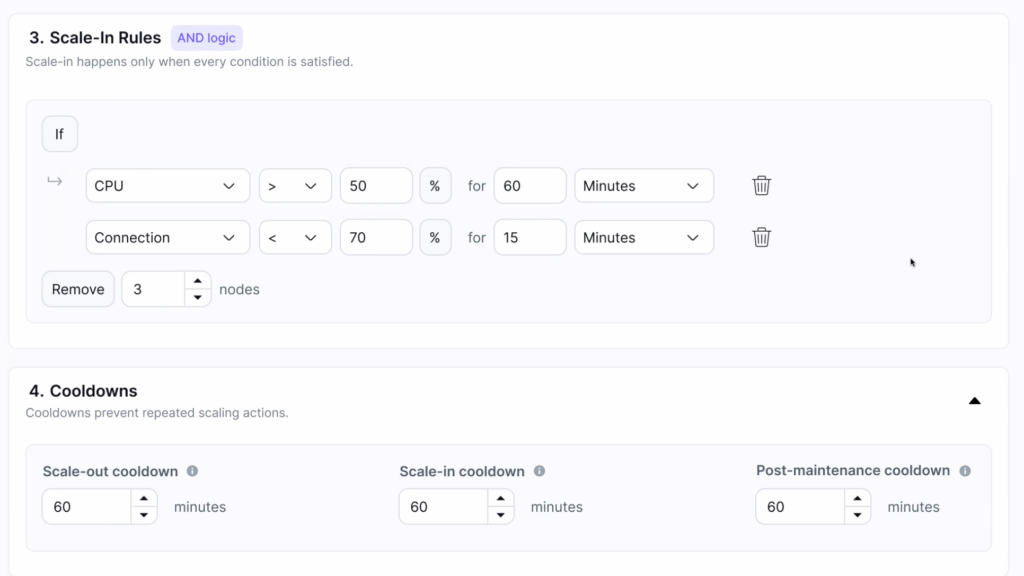
- Add Scale-in Rules: set the conditions that must all be true before nodes are removed, and how many nodes to remove.
- Set Cooldowns for scale-out, scale-in, and post-maintenance, in minutes.
- Click Enable Autoscaling.
To change the policy later, open the Autoscaling tab and click Edit Policy.
Configure Policy page with cluster limits and scale-out rules:
Scale-in rules and cooldown periods:
Managing Policies with Terraform
If you manage YugabyteDB Aeon clusters with Terraform, you can define autoscaling policies with the ybm_autoscaler_policy resource in the YugabyteDB Aeon Terraform provider. Policies apply per region.
Because the autoscaler changes a region’s node count outside Terraform, set ignore_num_nodes_changes = true on the matching cluster_region_info entry of your ybm_cluster for every region with an ACTIVE policy. Terraform then won’t treat those changes as drift and try to revert them. Changes you make to num_nodes in your configuration are still applied.
To hand node-count management back to Terraform, first update num_nodes to match the cluster’s current node count, then set ignore_num_nodes_changes = false and review the plan before applying.
resource "ybm_cluster" "example" {
  # ...
  cluster_region_info = [{
    region                   = "us-west1"
    num_nodes                = 3
    ignore_num_nodes_changes = true
  }]
}
resource "ybm_autoscaler_policy" "example" {
cluster_id = ybm_cluster.example.cluster_id
region = "us-west1"
status = "ACTIVE"
# policy_rules = [...]
}Autoscaling in Action
A 3-node, 3-AZ cluster runs with a policy of 3 to 12 nodes and a scale-out rule of CPU above 65%. Here’s the scale-out from start to finish:
- Load climbs. A workload pushes average CPU past the threshold for the full evaluation window.
- The rule fires. Autoscaling checks the guardrails: the cluster is below its maximum and not in cooldown or maintenance.
- Nodes are added. YugabyteDB Aeon adds 3 nodes, one per availability zone, taking the cluster from 3 to 6.
- Data rebalances. Tablets and leaders move onto the new nodes, and CPU per node drops.
- Cooldown. Once balancing finishes, the scale-out cooldown starts. After it ends, Autoscaling evaluates again.
Watching it happen
The Autoscaling tab shows everything you need to trust what the system is doing:
- Whether autoscaling is enabled, the current node count, and the min/max range.
- The last scaling event.
- A full scaling history, filterable by scale-out or scale-in. Each entry shows the start and end times, the rule that triggered it, the node change (for example, 3 → 6), the status, and the duration.
- Why an expected operation didn’t run, such as a cooldown, the maximum size, or maintenance in progress.
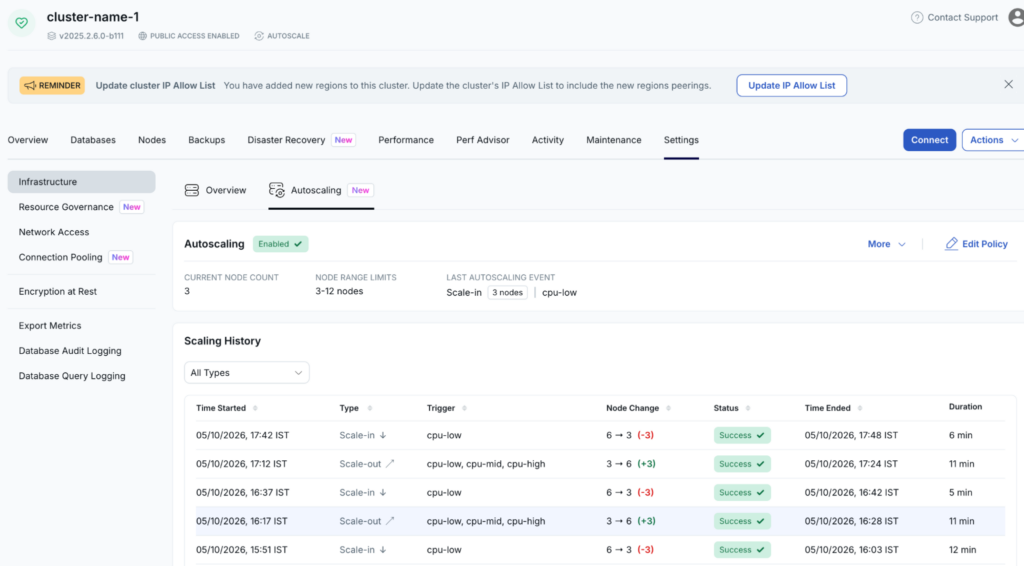
Best Practices and Current Limitations
A few tips for getting the most out of Autoscaling:
- Scale ahead of known spikes. Autoscaling responds to sustained load. For a launch or a big event, manually increase capacity beforehand. While Autoscaling is on, manual horizontal scaling stays within the policy range, so raise the policy maximum first.
- Use daily full backups. Avoid pairing Autoscaling with incremental backups. Backups in progress block scaling, and a scaling event turns the next incremental backup into an effective full backup.
- Leave headroom in the maximum. Set the maximum high enough to absorb your busiest sustained period, and watch for max-limit alerts.
- Tune cooldowns to your workload. The timer starts after rebalancing completes, so set it to the time it typically takes for the load to settle after a change.
- Scale vertically by hand. Autoscaling changes node count only. Change vCPUs, disk size, and IOPS manually.
In this Early Access release, Autoscaling only supports single-region clusters and horizontal scaling. Vertical scaling, disk autoscaling, scheduled scaling, multi-region clusters, and scaling on QPS or latency are on the roadmap.
Get Started Today
Autoscaling takes routine capacity management off your team’s plate. Set the bounds once, and YugabyteDB Aeon scales the cluster up when load rises and down when load falls, with online rebalancing and zone-aware guardrails at every step.
Autoscaling is available now in Early Access. To try it:
- Contact Yugabyte Support to enable Autoscaling for your account.
- Read the Autoscaling documentation for full configuration details.
- New to YugabyteDB Aeon? Sign up for a free account and create a cluster.
We’d love your feedback as we take Autoscaling to general availability. Tell us what you’d like to see next!