Introducing Yugabyte Platform on Microsoft Azure
November 12, 2020
We have been hard at work expanding our ecosystem to be available across major cloud infrastructure providers so we can power applications in any cloud or across clouds. In addition to deploying the YugabyteDB Anywhere (formerly YugabytDB Platform), our commercial database-as-a-service (DBaaS) offering, natively in AWS and GCP, we’re excited to announce the beta release of the Yugabyte Platform on Microsoft Azure. While it’s true Yugabyte Anywhere can already be deployed on Azure as an on premise cloud provider, with this release, the Yugabyte Anywhere is natively integrated with Azure to simplify deploying, monitoring, and managing YugabyteDB deployments. This feature automates several operations, including orchestration of instances, secure deployments, online software upgrades, scheduled backups, monitoring, and alerting.
With the Yugabyte Anywhere on Azure, developers can focus on building applications, not managing database infrastructure. They can enjoy cloud native capabilities to quickly harness the power of YugabyteDB to build modern applications and deliver the level of digital experiences that their customers expect. This offers true freedom of choice for enterprises looking to develop a fully cloud native DBaaS. You can use Yugabyte Platform on the cloud of your choice, including all public cloud platforms (AWS, GCP, and Azure), private cloud environments (on premises), and any Kubernetes distribution.
The process for configuring a Yugabyte environment on Azure looks like the following:
- Prepare the Azure cloud environment.
- Install Yugabyte Platform.
- Configure the Azure cloud provider in Yugabyte Platform.
- Create a three node multi-zone universe.
Prepare the Azure cloud environment
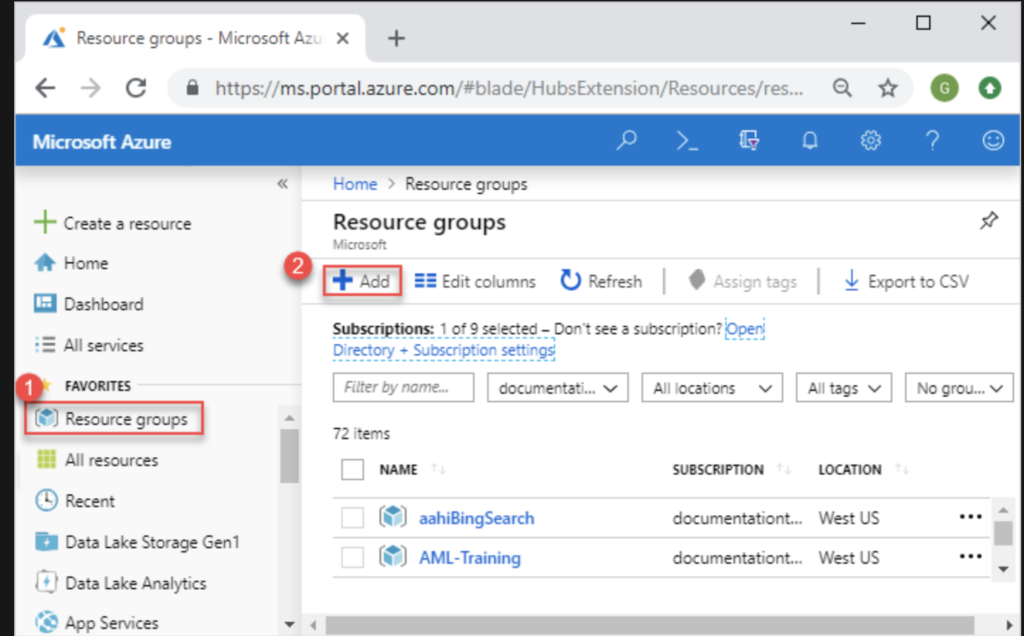
Create a resource group and network security group
We will create a new resource group to manage Yugabyte Platform resources.
To access the Yugabyte Platform from outside the Azure environment, we will assign an appropriate network security group to the Yugabyte Platform machine, including:
- Access the Yugabyte Platform instance over SSH (port tcp:22)
- Check, manage, and upgrade Yugabyte Platform (port tcp:8800)
- View the Yugabyte Platform console (port tcp:80)
Register an application with Azure AD & create a service principal
For the Yugabyte Platform to manage YugabyteDB nodes, it requires limited access to your Azure infrastructure. This can be accomplished by registering an app in the Azure portal so the Microsoft identity platform can provide authentication and authorization services for your application.
Follow these steps to create the app registration:
- Sign in to the Azure portal.
- Search for and select the Azure Active Directory.
- Under Manage, select App registrations, then New registration.
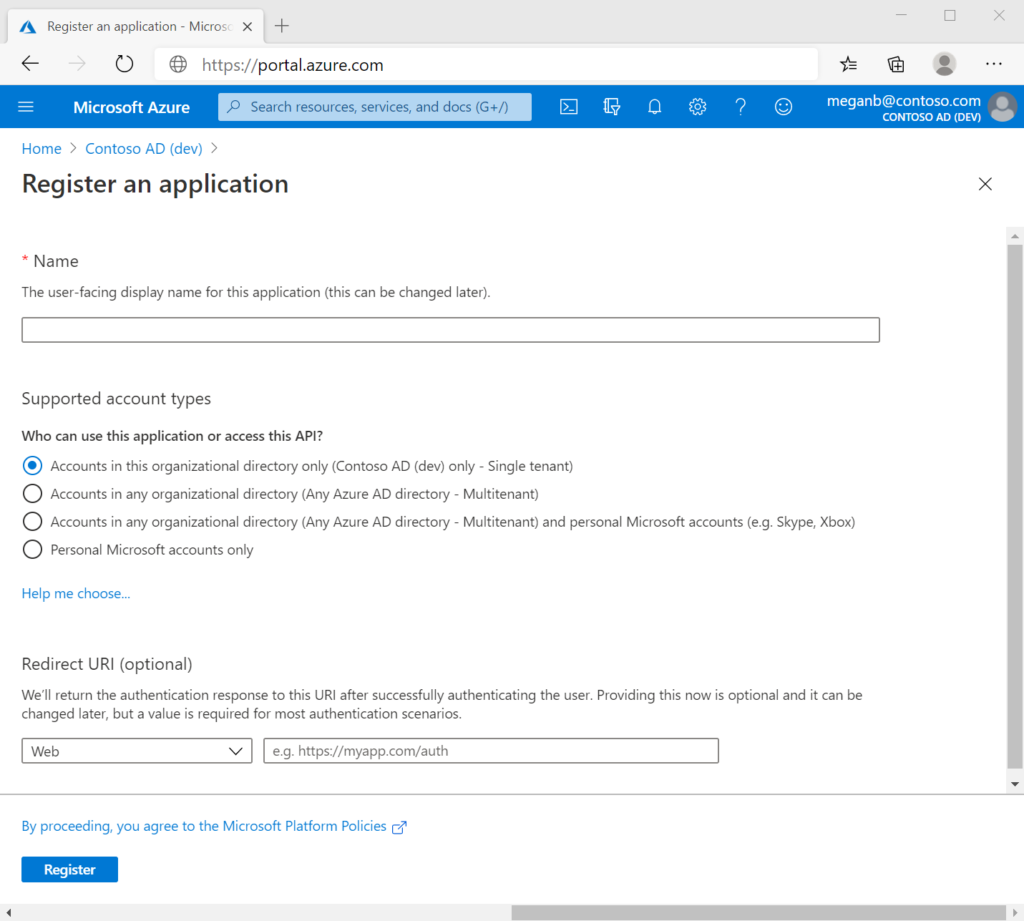
- When registration completes, the Azure portal displays the app registration’s Overview pane, including its Application (client) ID. Also referred to as just client ID, this value uniquely identifies your Microsoft identity platform application.
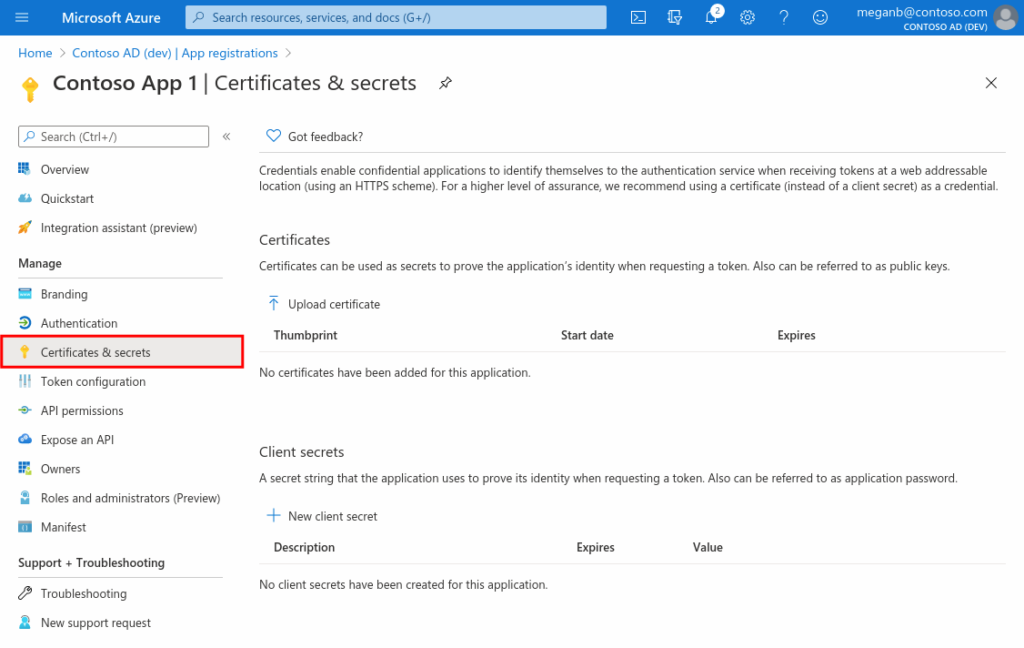
- App authentication: Select Certificates & secrets > New client secret.
- Select a duration.
- Record the secret’s value to be used later for configuring the platform – it’s never displayed again after you leave this page.
Assign a role to the application
Access to Azure infrastructure resources in a subscription (virtual machines, network configurations) is restricted by the roles assigned to your application, giving you control over which resources can be accessed and at which level. We are going to set permissions over a resource group that was created in the previous step.
- In the Azure portal, navigate to the resource group and select Access control (IAM).
- Select Add role assignment.
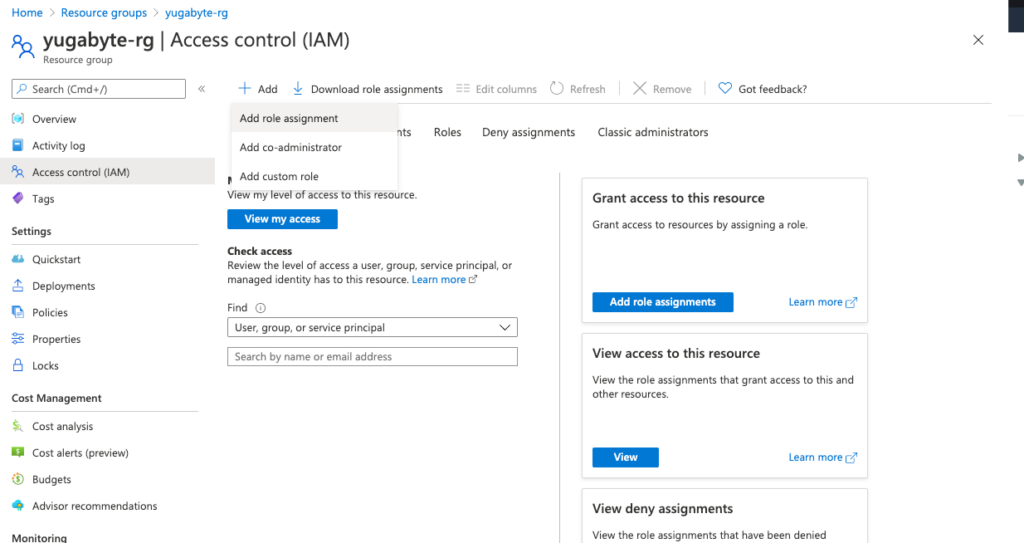
- Select “Network Contributor” and “Virtual Machine Contributor” roles.
- Select your application created in the previous step.
- Select Save to finish assigning the role. You see your application in the list of users with a role for that scope.
Your service principal is set up, and now you can start using it for configuring the platform.
Provision an instance for Yugabyte Platform
Now we will create an Azure VM to run the Yugabyte Platform server. To do so, go to Virtual Machines > Add and Fill in the following values.
- Choose your active subscription and resource group.
- Provide a name for the virtual machine.
- Choose a region where you want to deploy the platform.
- Ignore the availability options.
- Change the disk image to Ubuntu 16.04.
- Choose “Standard_D4s_v3” – 4 CPU/16GB memory instance.
- Select the authentication type as “ssh public key.” This is important for enabling ssh access to this machine.
- Select public inbound ports based on network configuration. You can disable public access if you wish to access the instance from within a private network.
- On the disks page, you can select any OS disk type.
- Increase the data disk size to at least 100GiB by creating an “attached new disk.”
- Continue to the next networking section and fill out the details for the virtual network and security group created in the previous steps.
Finally, click Review+create to launch the Yugabyte Platform VM.
Install Yugabyte Platform
Install Replicated
Connect to the Yugabyte Platform instance and do the following:
$ curl -sSL https://get.replicated.com/docker | sudo bash
After the Replicated installation completes, verify that it is running by running the following command:
$ sudo docker ps
You should see an output similar to the following:

Launch the Replicated UI by going to https://YOUR_IP:8800 to upload the license and finish the installation. Replicated will perform preflight checks to ensure that the host is set up correctly for the Yugabyte Platform.
Create the admin user
To create an admin account, go to https://YOUR_IP/register.
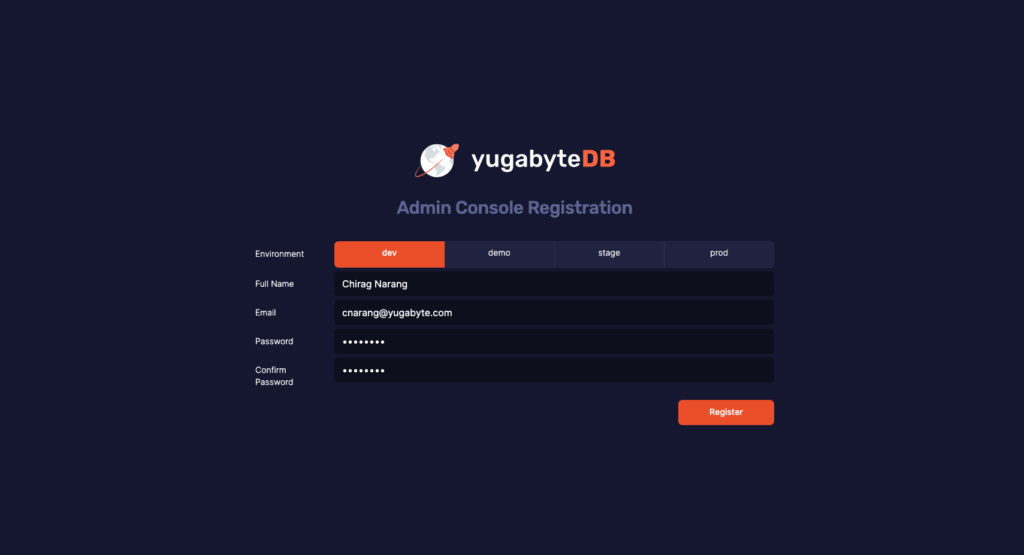
After you click Submit, you are automatically logged into the Yugabyte Platform console. Proceed to configure cloud providers.
Configure the Azure cloud provider
Click on “Configs” to add a config for Azure and enter information from your Azure cloud environment.
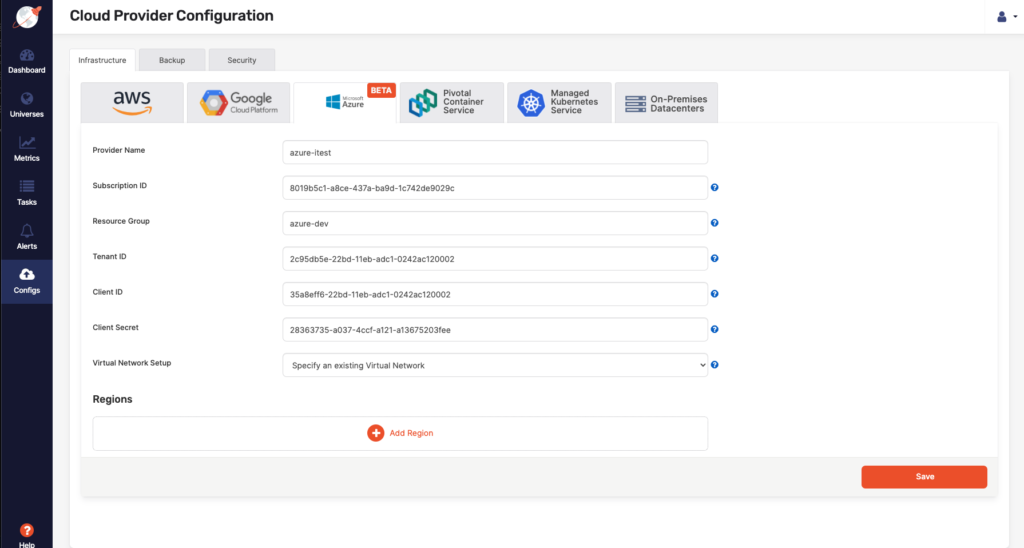
Using your custom Azure virtual network is supported. This allows you the highest level of customization for your network setup.
We will use the US West 2 (Washington) region with 3 AZs for this demo.
- Select a region and provide a virtual network name from your Azure portal.
- Security group is only needed if the database VM is in a different network than the platform.
- Provide the mapping of what Subnet IDs to use for each Availability Zone you wish to deploy. This is required to ensure the Yugabyte Platform can deploy nodes in the correct network isolation that you desire in your environment.
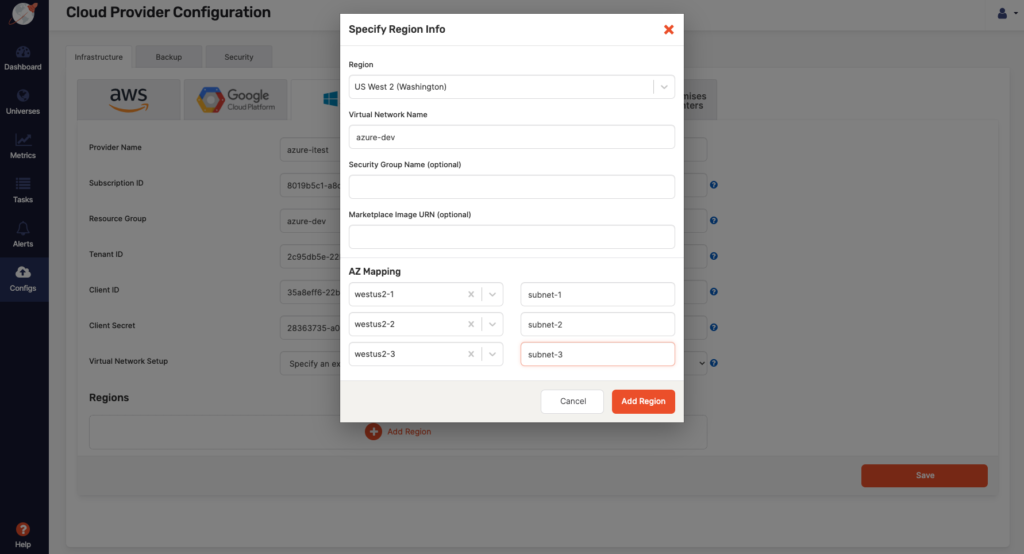
Click Save, and it will take a few minutes for the cloud provider to be configured. After that, you will be ready to create a YugabyteDB universe on Azure.
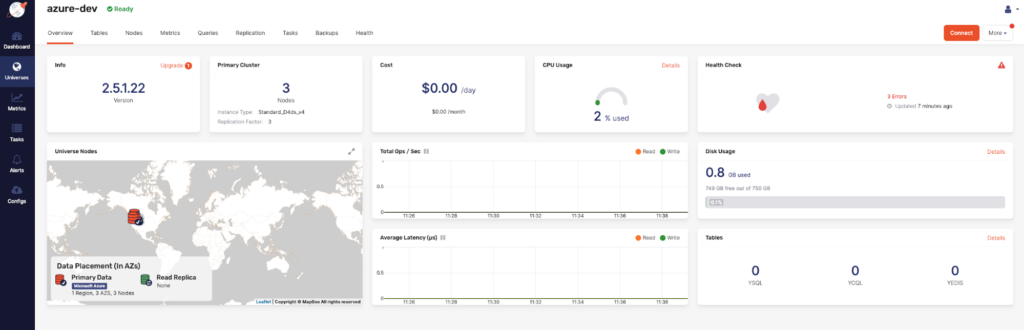
Create the universe
Click “Create Universe” to create a universe. The Provider, Regions, and Instance Type fields were initialized based on the cloud providers configured. As soon as Provider, Regions, and Nodes are entered, an intelligent Node Placement Policy kicks in to specify how the nodes should be placed across all the Availability Zones so that maximum availability is guaranteed. We are going to enter the following values to create a multi-zone universe:
- Enter a universe name (azure-dev)
- Choose the region (US West 2)
- Change instance type (Standard_D4s_v4)
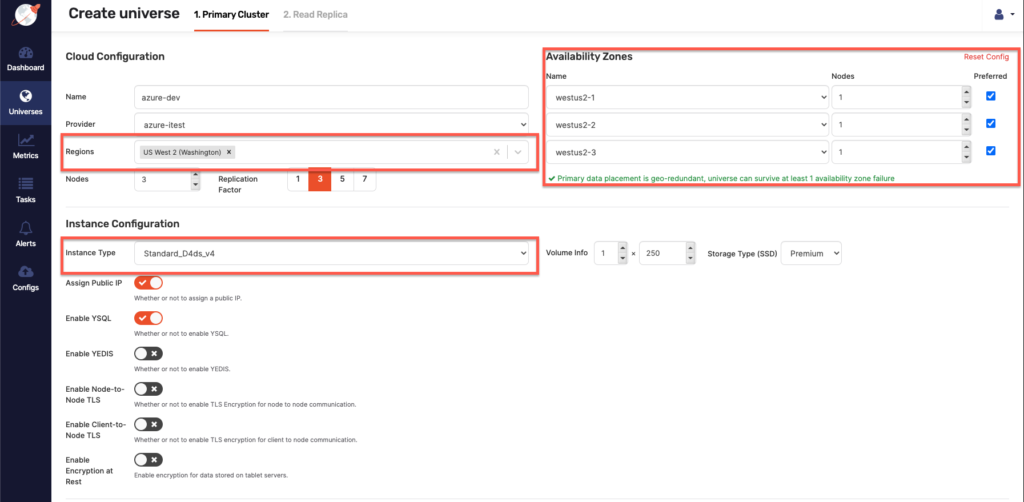
All other options are set to the default values (replication factor = 3, number of nodes = 3). Click Create.
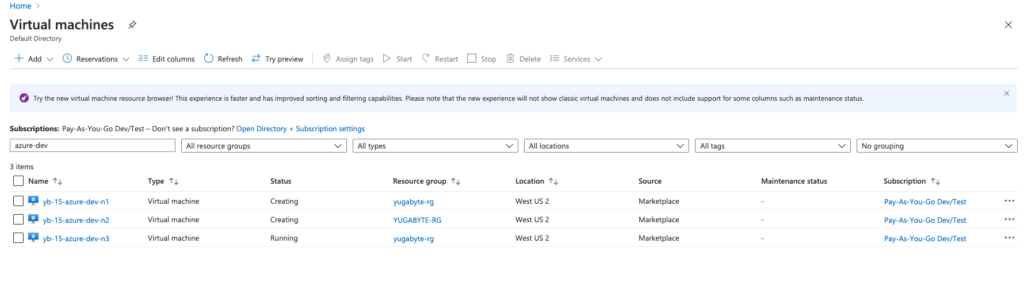
Browse to the Azure Virtual Machines page and search for instances that have azure-dev (universe name) in their name. You should see something as follows; this shows that database instances are orchestrated and provisioned by the platform.
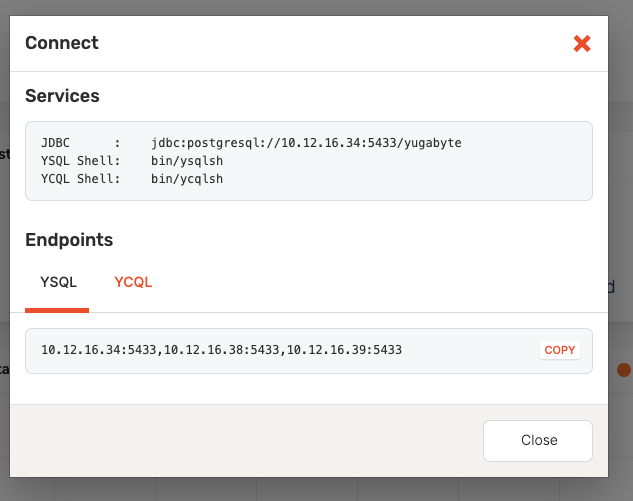
Connect to a database node
Once the universe is ready, you can click on the Connect button.
This will bring up a dialog showing how to connect to the nodes. Now your SQL and NoSQL clients can connect to this database using these IP addresses.
That’s it! Your Azure deployment is ready. Now you can now create tables, objects, and manipulate data in the database.You can also manage Day 2 operations directly from the Yugabyte Platform including orchestration of instances, secure deployments, online software upgrades, scheduled backups, monitoring, and alerting.
Conclusion
That’s all there is to creating a Yugabyte Platform deployment in Azure. Spinning up a scalable and resilient distributed SQL database for cloud native application development has never been easier. If you want to try out a robust, highly available database without any upfront infrastructure investment and easy and easy-to-use APIs for SQL and NoSQL workloads, you can certainly have a closer look at Yugabyte Platform on Azure. The beta integration is available immediately for the Yugabyte Platform 2.3.3 release and can be accessed from within the UI. Existing subscribers can reach out to Yugabyte support to turn on beta access. If you’re not yet a Yugabyte Platform subscriber and would like to try the Azure integration in beta, get in touch with us to start your free trial today. We’re very interested in collecting feedback during the beta period. We are keenly focused on bringing an integrated developer experience before reaching general availability, so please share your thoughts with us in the Yugabyte community Slack channel. If you have any ideas, comments, or support questions, the Yugabyte team would love to hear from you.
What’s next
- Explore YugabyteDB features
- Install YugabyteDB on your local machine and try out YSQL from our docs
- Contact us to learn more about licensing, pricing, or to schedule a technical overview


