Migrating from MySQL to YugabyteDB Using YugabyteDB Voyager
February 23, 2023
In this article I’m going to demonstrate how to migrate a comprehensive web application from MySQL to YugabyteDB using the open-source data migration engine YugabyteDB Voyager.
Working with PostgreSQL? Explore how easy it is to migrate from PostgreSQL to YugabyteDB with YugabyteDB Voyager.
Nowadays, many people migrate their applications from traditional, single-server relational databases to distributed database clusters. This helps to improve availability, scalability, and performance.
Migrating to YugabyteDB allows engineers to use a familiar SQL interface, while benefiting from the data-resiliency and performance characteristics of distributed databases.
Continue reading for step-by-step instructions or, if you prefer, check out the overview video.
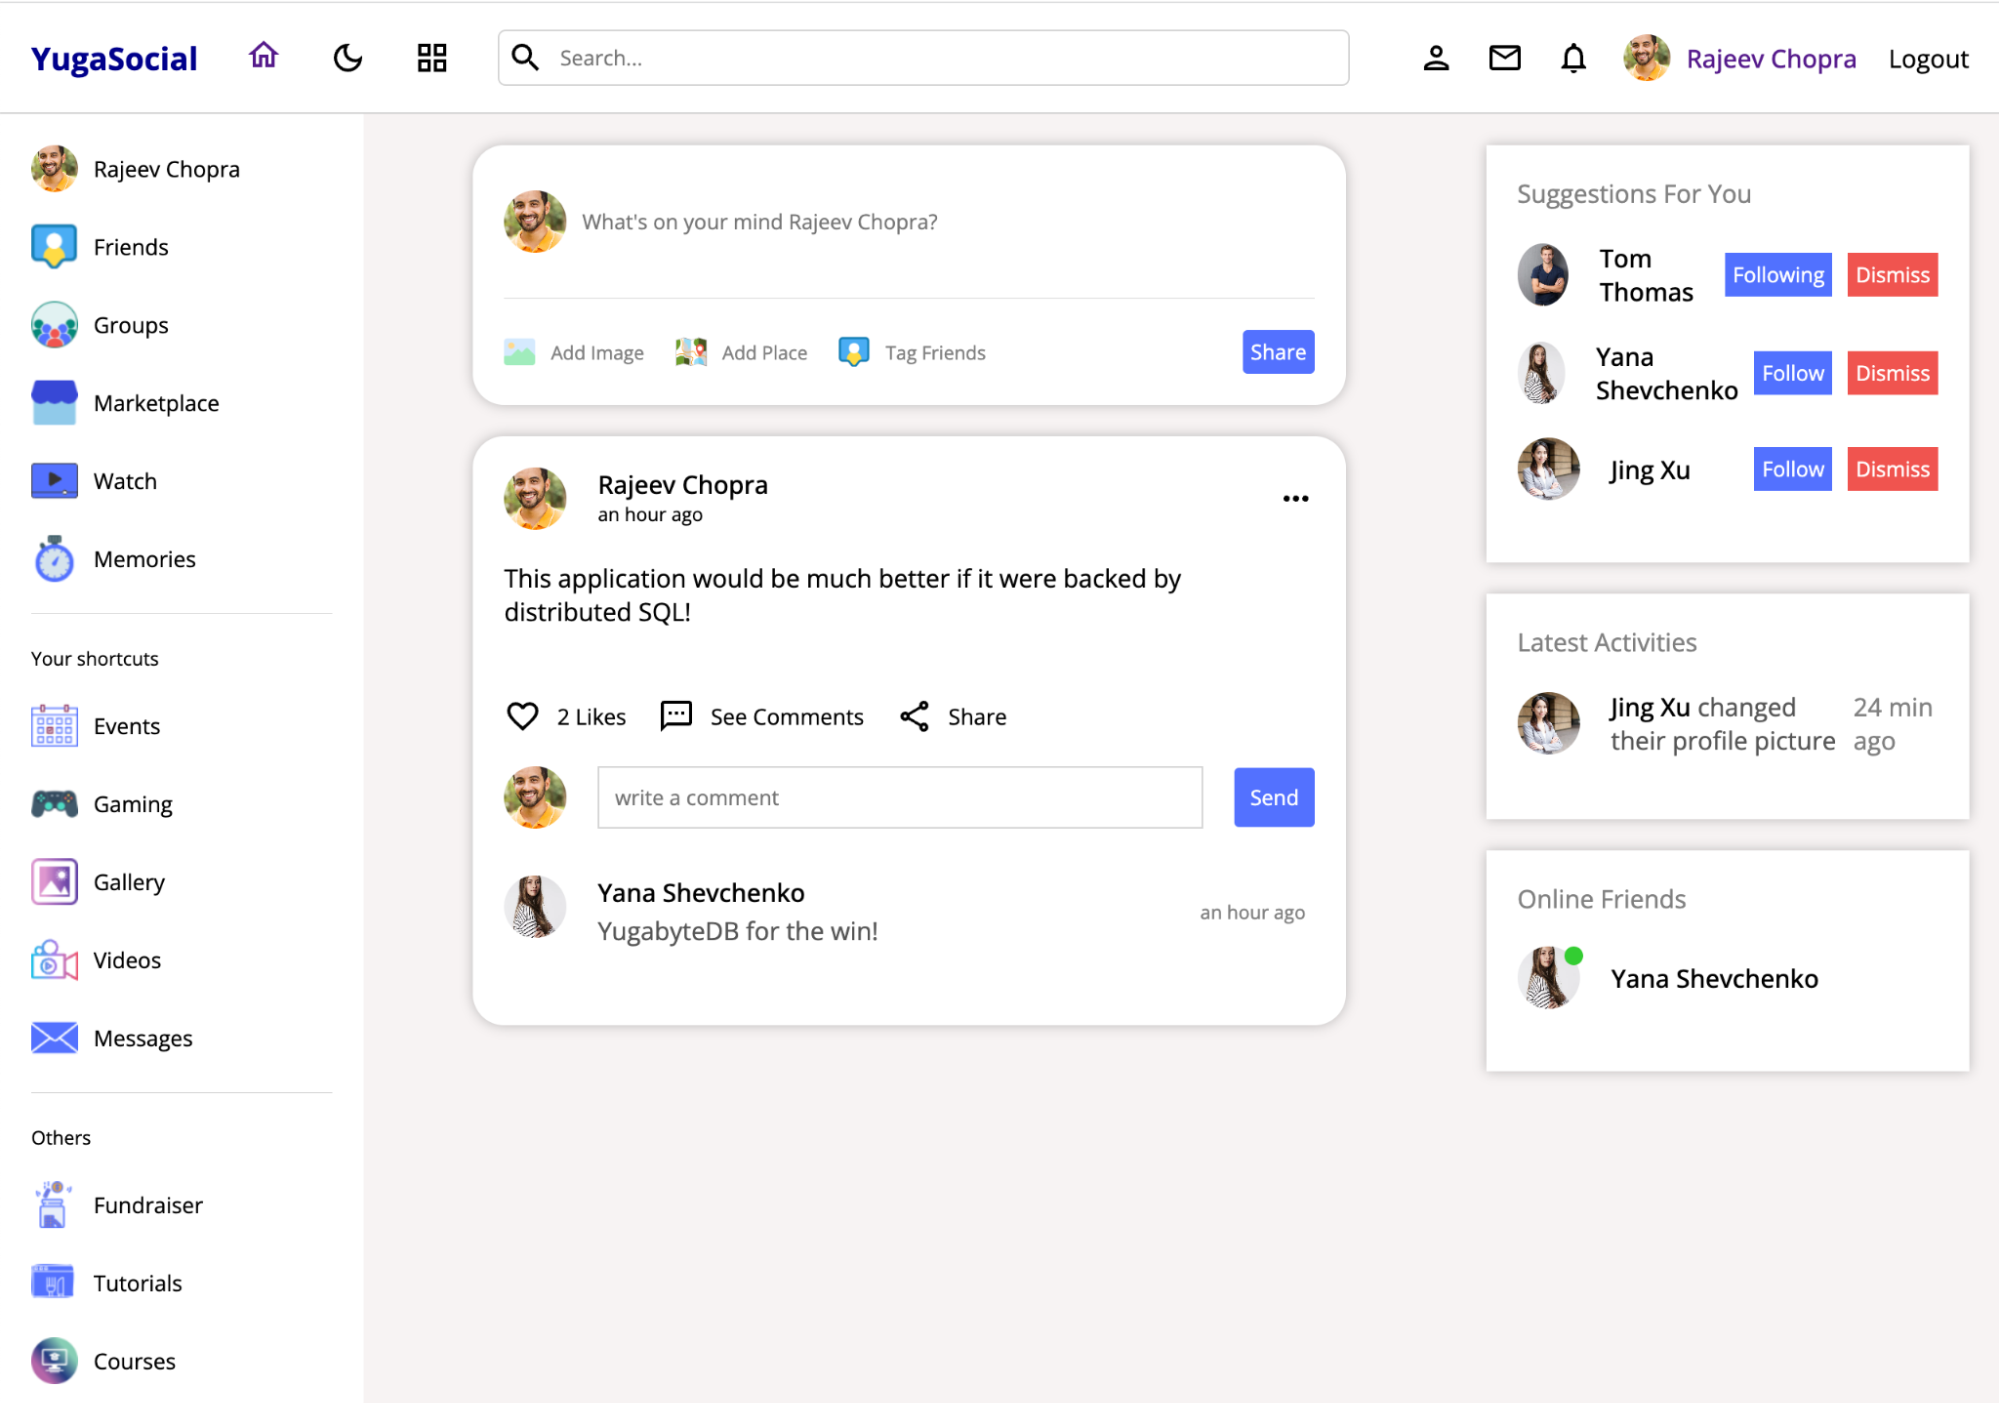
Introducing the YugaSocial Application
I’ve developed an application called YugaSocial, built to run on MySQL.
The YugaSocial application is a Facebook clone with the ability to make posts, follow users, comment on posts, and more!
Let’s start by deploying and connecting to a Google Cloud SQL database running MySQL. Later, we’ll migrate our data to a multi-node YugabyteDB Managed cluster.
Getting Started With MySQL
We could run MySQL on our machines using a local installation or in Docker, but I’m going to demonstrate how to migrate a database hosted on the Google Cloud Platform (GCP) to YugabyteDB Managed.
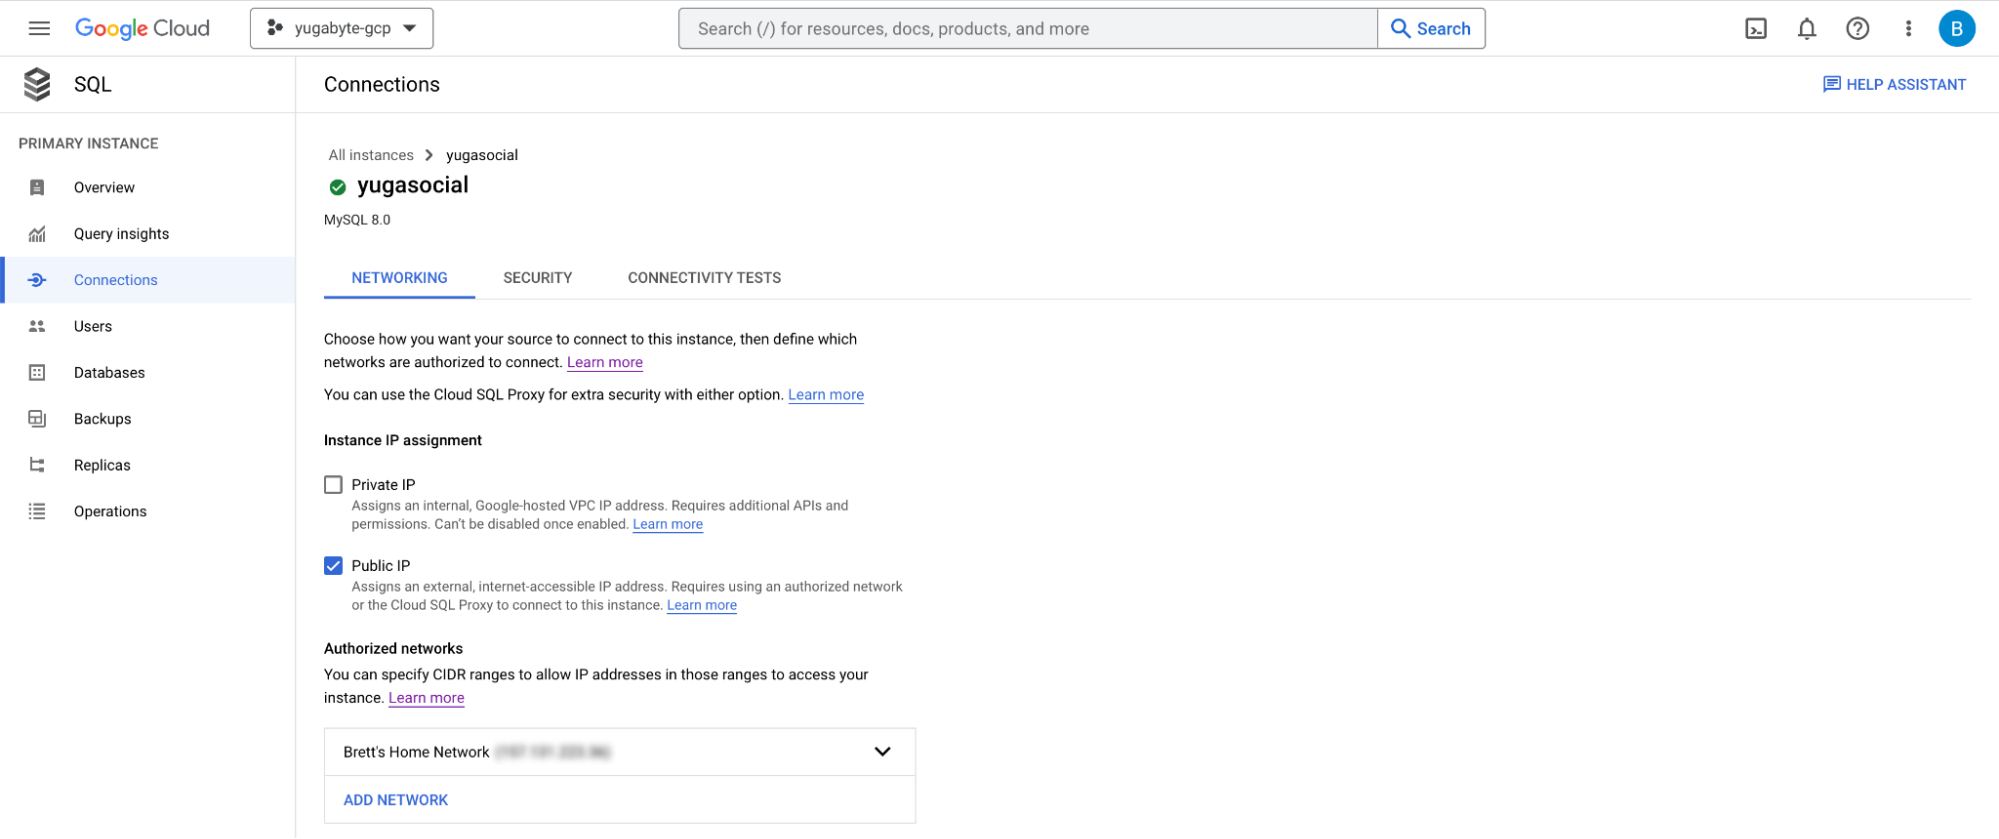
Setting Up Google Cloud SQL
I’ve deployed a MySQL instance on Google Cloud SQL named yugasocial and set my public IP address to the authorized networks list so I can connect directly from my machine.
While beneficial for demonstration purposes, I’d recommend connecting securely from inside of a VPC, with SSL certificates to properly secure your data transfers.
Connecting YugaSocial to MySQL in Node.js
Connecting to our MySQL instance in the cloud is easy with the mysql driver for Node.js.
This is an application code snippet that connects to the MySQL instance:
import mysql from "mysql";
if (process.env.DB_TYPE === "mysql") {
 const pool = mysql.createPool({
   host: process.env.DB_HOST,
   port: process.env.DB_PORT,
   user: process.env.DB_USER,
   password: process.env.DB_PASSWORD,
   database: process.env.DB_NAME,
   connectionLimit: 100,
 });
}
I’ve created a connection pool with up to 100 established connections. By setting environment variables with our Google Cloud SQL instance configuration, and running the application, we can confirm that our database has been configured properly.
DB_TYPE=mysql DB_USER=admin DB_HOST=[HOST] DB_HOST=[PASSWORD] node index.js
Connection to MySQL verified.
Server running on port 8800.
After verifying our MySQL database running in the cloud, we can start migrating to YugabyteDB Managed.
Setting up YugabyteDB Managed
It takes less than five minutes to get started with YugabyteDB Managed. You can easily create an account, and then follow the steps to create a YugabyteDB cluster.
I’ve chosen to deploy a three-node cluster to GCP, in the us-west-1 region. This configuration will provide fault tolerance across availability zones.
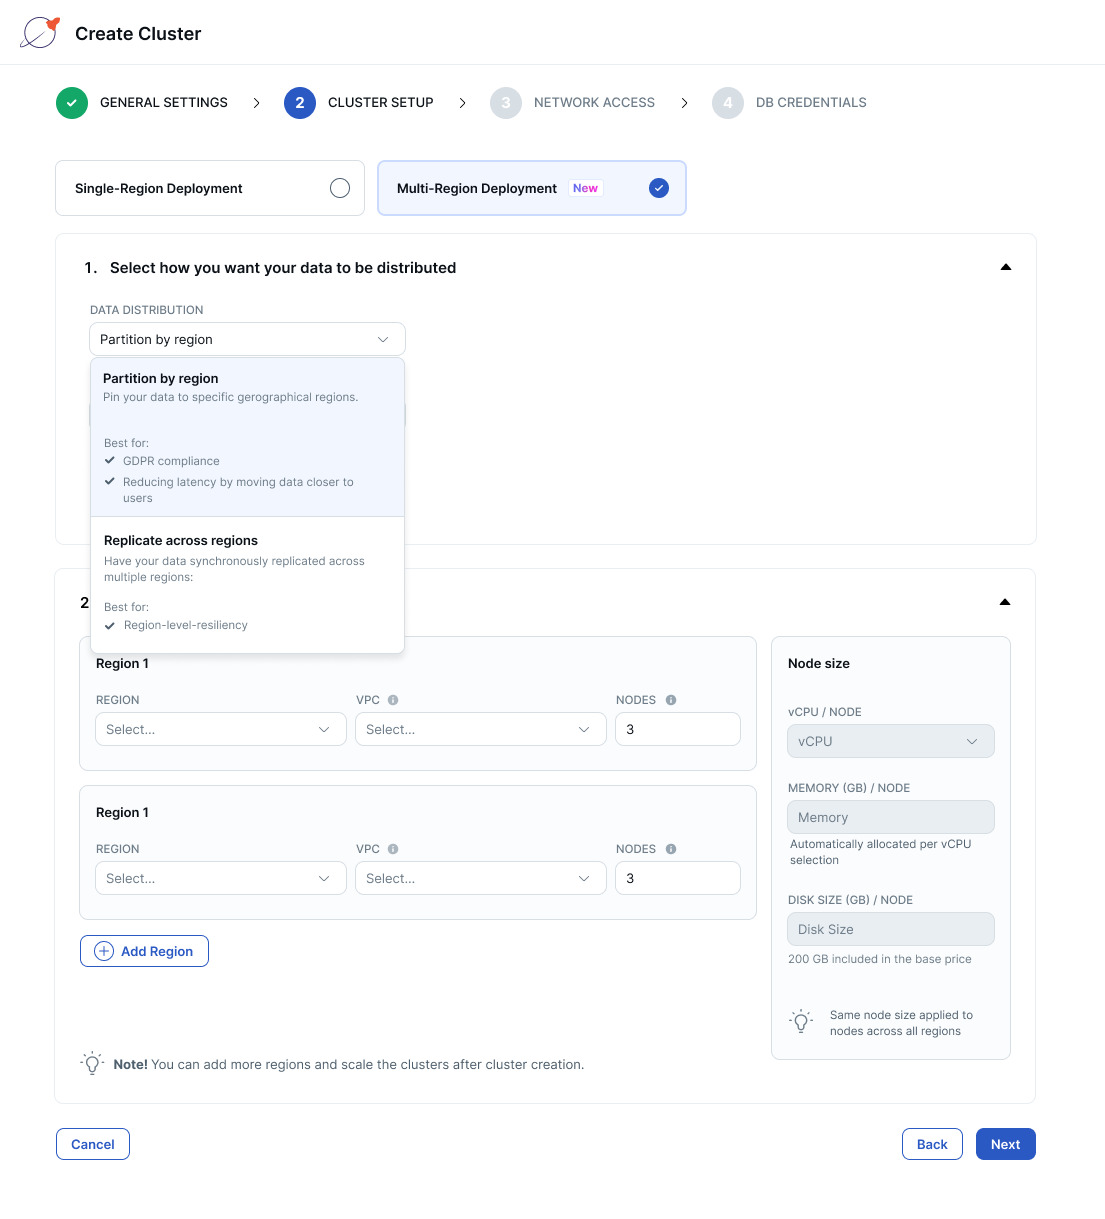
Add your IP address to the cluster allow list so that you can connect from your machine to the remote database and download the database credentials before creating your cluster.
Once we deploy our cluster, we’re ready to begin migrating with YugabyteDB Voyager.
Migrating to YugabyteDB
Having verified our MySQL deployment, it’s time to migrate from Cloud SQL to YugabyteDB using the YugabyteDB Voyager CLI.
YugabyteDB Voyager is a powerful, open-source, data-migration engine, which manages the entire lifecycle of data migration.
After installing YugabyteDB Voyager, we’ll begin by creating users in our source and target databases, and granting them roles.
I’ve chosen to use the mysqlsh command-line utility to connect to my cloud instance, but Google provides multiple connection options.
- Create the
ybvoyageruser in Cloud SQL and grant permissions:> mysqlsh root@CLOUD_SQL_HOST --password='CLOUD_SQL_PASSWORD' > \sql SQL=> \use social SQL=> CREATE USER 'ybvoyager'@'%' IDENTIFIED WITH mysql_native_password BY 'Password#123'; SQL=> GRANT PROCESS ON *.* TO 'ybvoyager'@'%'; SQL=> GRANT SELECT ON social.* TO 'ybvoyager'@'%'; SQL=> GRANT SHOW VIEW ON source_db_name.* TO 'ybvoyager'@'%'; SQL=> GRANT TRIGGER ON source_db_name.* TO 'ybvoyager'@'%'; SQL=> GRANT SHOW_ROUTINE ON *.* TO 'ybvoyager'@'%';
- Repeat this process using the YugabyteDB Managed Cloud Shell:
// Optionally, you can create a database for import. Otherwise, the target database will default to 'yugabyte'.
yugabyte=> CREATE DATABASE social;
yugabyte=> CREATE USER ybvoyager PASSWORD 'password';
yugabyte=> GRANT yb_superuser TO ybvoyager;
Now, our source and target databases are equipped to use Voyager. In order to export from Cloud SQL, we first need to create an export directory and an associated environment variable.
> mkdir ~/export-dir
> export EXPORT_DIR=$HOME/export-dir
This directory will be used as an intermediary between our source and target databases. It will house schema and data files, as well as logs, metadata, and schema analysis reports.
Let’s begin migrating our database.
- Export the schema from Google Cloud SQL:
> yb-voyager export schema --export-dir ~/export-dir \
   --source-db-type mysql \
   --source-db-host CLOUD_SQL_HOST \
   --source-db-user ybvoyager \
   --source-db-password 'Password#123' \
   --source-db-name social
export of schema for source type as 'mysql'
mysql version: 8.0.26-google
exporting      TABLE            done
exporting  PARTITION            done
exporting       VIEW            done
exporting    TRIGGER            done
exporting   FUNCTION            done
exporting  PROCEDURE            done


Exported schema files created under directory: /export-dir/schema
- Analyze the exported schema:
> yb-voyager analyze-schema --export-dir ~/export-dir --output-format txt
-- find schema analysis report at: /export-dir/reports/report.txt
By analyzing our schema before exporting data, we have the option to make any necessary changes to our DDL statements. The schema analysis report will flag any statements which require manual intervention.
In the case of YugaSocial, Voyager migrated the MySQL schema to PostgreSQL DDL without needing any manual changes.
- Finally, Export the data from Google Cloud SQL.
> yb-voyager export data --export-dir ~/export-dir \
   --source-db-type mysql \
   --source-db-host CLOUD_SQL_HOST \
   --source-db-user root \
   --source-db-password 'CLOUD_SQL_PASSWORD' \
   --source-db-name social


export of data for source type as 'mysql'
Num tables to export: 6
table list for data export: [comments likes posts relationships stories users]
calculating approx num of rows to export for each table...
Initiating data export.
Data export started.


Exported tables:- {comments,  likes,  posts,  relationships,  stories,  users}


TABLE        	ROW COUNT
comments     	1000
likes        	502
posts        	1000
relationships	1002
stories      	1000
users        	1004


Export of data complete ✅
After successfully exporting our schema and data, we’re ready to move our database to YugabyteDB Managed.
- Import the schema to YugabyteDB Managed:
> yb-voyager import schema --export-dir ~/export-dir \
   --target-db-host YUGABYTEDB_MANAGED_HOST \
   --target-db-user ybvoyager \
   --target-db-password 'password' \
   --target-db-name yugabyte \
   --target-db-schema social \
   --target-ssl-mode require \
   --start-clean

schemas to be present in target database "yugabyte": [social]
creating schema 'social' in target database...
table.sql: CREATE TABLE comments (  id bigserial,   description varchar(200) NOT NULL,  crea ...
table.sql: ALTER SEQUENCE comments_id_seq RESTART WITH 1;
table.sql: ALTER TABLE comments ADD UNIQUE (id);
table.sql: CREATE TABLE likes (     id bigserial,   userid bigint NOT NULL,     postid bigint NOT  ...
table.sql: ALTER SEQUENCE likes_id_seq RESTART WITH 1;
table.sql: ALTER TABLE likes ADD UNIQUE (id);
table.sql: CREATE TABLE posts (     id bigserial,   description varchar(200),   img varchar(200) ...
...
As you can see from the terminal output, I’ve chosen to import into the
socialschema. - Import the data to YugabyteDB Managed:
> yb-voyager import data --export-dir ~/export-dir \
   --target-db-host YUGABYTEDB_MANAGED_HOST \
   --target-db-user ybvoyager \
   --target-db-password 'password' \
   --target-db-name yugabyte \
   --target-db-schema social \
   --target-ssl-mode require \
   --start-clean


import of data in "yugabyte" database started
Using 2 parallel jobs by default. Use --parallel-jobs to specify a custom value
skipping already imported tables: []
Preparing to import the tables: [comments likes posts relationships stories users]


All the tables are imported
setting resume value for sequences
YugabyteDB Voyager handles this data import with parallelism, making quick work of it.
- To wrap things up, import indexes and triggers.
> yb-voyager import schema --export-dir ~/export-dir \
   --target-db-host YUGABYTEDB_MANAGED_HOST \
   --target-db-user ybvoyager \
   --target-db-password 'password' \
   --target-db-name yugabyte \
   --target-db-schema social \
   --target-ssl-mode require \
   --start-clean \
   --post-import-data
INDEXES_table.sql: CREATE INDEX comments_postid ON comments (postid);
INDEXES_table.sql: CREATE INDEX comments_userid ON comments (userid);
INDEXES_table.sql: CREATE INDEX likes_postid ON likes (postid);
...
We no longer need the
ybvoyageruser in YugabyteDB Managed. To change ownership of the imported objects to another user in the YugabyteDB Managed Cloud Shell, run:> REASSIGN OWNED BY ybvoyager TO admin; > DROP OWNED BY ybvoyager; > DROP USER ybvoyager;
It’s time to verify that our database was successfully migrated to YugabyteDB Managed, by reconfiguring our YugaSocial application.
Connecting YugaSocial to YugabyteDB Managed in Node.js
As mentioned, YugaSocial was developed to run on MySQL. However, I also added support for PostgreSQL. Since YugabyteDB is PostgreSQL-compatible, we can use the
node-postgresdriver for Node.js to connect to our YugabyteDB Managed cluster.In fact, Yugabyte has developed its own smart drivers which add load-balancing capabilities to native drivers. This can drastically improve performance by avoiding excessive load on any single cluster node.
After installing Yugabyte’s fork of node-postgres, we’re ready to connect to our database.
// connect.js
...
const { Pool } = require("@yugabytedb/pg");
if (process.env.DB_TYPE === "yugabyte") {
const pool = new Pool({
   user: process.env.DB_USER,
   host: process.env.DB_HOST,
   password: process.env.DB_PASSWORD,
   port: 5433,
   database: process.env.DB_NAME,
   min: 5,
   max: 100,
   ssl: {
     rejectUnauthorized: false
   },
});
}
This configuration is very similar to the MySQL driver. By restarting our application with the proper environment variables for our connection details, we’re able to confirm that our data was migrated successfully.
// Shell
> DB_TYPE=yugabyte DB_USER=admin DB_HOST=[HOST] DB_HOST=[PASSWORD] node index.js
Our application functions just the same as before.


