YugabyteDB 1.1 New Feature: Public IPs to Simplify Multi or Hybrid Cloud Database Deployments
October 2, 2018
Welcome to another post in our ongoing series that highlights new features from the latest 1.1 release announced last week. Today we are going to look at the importance of public IP addresses and hostnames in simplifying multi-cloud and hybrid cloud deployments.
In modern cloud deployments, servers often have a combination of private IP addresses (used in the private LAN and often the IP address of the network interface on the server), public IP addresses (a globally unique addresses that can be directly accessed over the internet) and DNS-based hostnames (a way to identify a server in case the public IP address changes). The servers themselves are not typically aware of their public IP addresses or DNS hostnames, but these are essential in order to communicate with these servers.
Benefits of Public IP & Hostname Based Access
Cloud providers often provide public IP address support via port forwarding, making it important to distinguish between the various ways to reach a node. The following are commonly encountered issues when working with public clouds.
- In multi-region or multi-cloud deployments, the servers in different regions may be required to communicate over public IP address.
- In hybrid cloud deployments (where some servers are in the private datacenter and others in public clouds) the preferred way to communicate between servers might be using public IP addresses.
- In Kubernetes environments, the pod name is stable when using StatefulSets. However, upon a pod death and restart, the pod’s IP address may change, requiring all inter-pod communication to be resolved by the DNS hostname.
In all of the above scenarios, cost is an additional aspect to keep in mind. Public clouds (such as AWS, Google Cloud, Azure, etc) have different billing strategies depending on how the traffic is routed. Routing traffic through public IP addresses is typically much more expensive than through private IP address, hence it is desirable to use private IP addresses where possible.
With our mission of building a cloud native database, these are scenarios we very much intend to solve at YugaByte. In this post, we will examine how to achieve the simple scenario of communicating setting up a YugabyteDB instance in AWS (or any public cloud) and interacting with it using a public IP, a DNS hostname and a private IP address.
How the Public/Private IP Combination Works in YugabyteDB?
YugabyteDB supports the following flags at startup that helps achieve the functionality by which you can specify the private bind address as well as a list of hostnames or public IP addresses.
rpc_bind_addressesis the network interface address (along with an optional port) to which the YugabyteDB process will bind. This is typically the private IP address of the machine on which the server is running. Default value for YB-Master is 0.0.0.0:7100 and YB-TServer is 0.0.0.0:9100.server_broadcast_addressesis the public IP or DNS hostname of the server (along with an optional port) on which a YugabyteDB process runs. This value might be used by servers to communicate with one another depending on the connection policy parameter.- use_private_ip is the policy that determines when to use private IP addresses. For example, if this value is set to cloud, then all servers inside the cloud would use the private IP address and those outside would use the server_broadcast_addresses to communicate with each other. Note that valid values for this policy are:
never: always use broadcast addresszone: use private IP inside a single zone, broadcast address outsideregion: use private IP across all zones in a region, broadcast address outsidecloud: use private IP inside the same cloud, broadcast address outside
placement_zone,placement_regionandplacement_cloudare used to specify the zone, region and cloud names for each YugabyteDB process. Note that these flags are optional and the default values ofrack1,datacenter1andcloud1are respectively used when they are not explicitly provided.
Multi-Region or Multi-Cloud or Hybrid Cloud Deployments
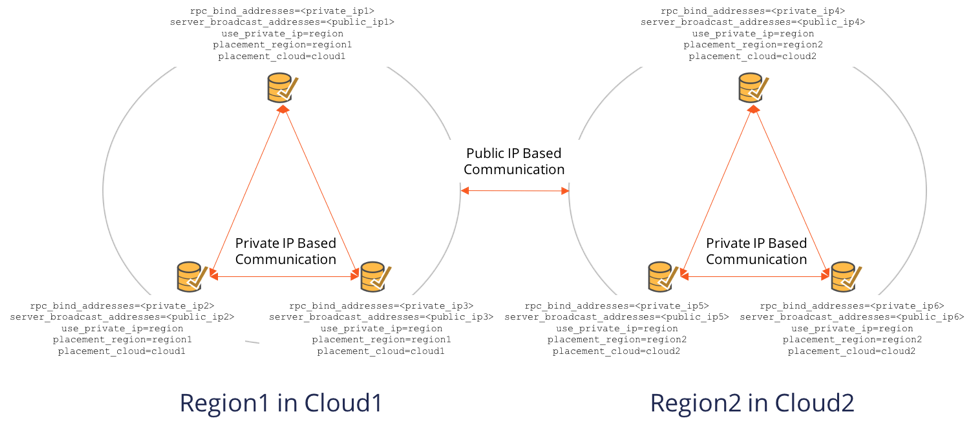
For public cloud providers, inter-region traffic has to use public IPs because private IPs are only for a given region. In such cases, we want to use private IP address for inter-server communication inside a region, and public IP address across regions. The same is true if we want to run on 2 independent cloud providers altogether. In both these cases, we would set:
rpc_bind_addressesto the private IP address.server_broadcast_addressesto the public IP address .use_private_ippolicy to region.
The following deployment uses the above values in the context of a 6 node YugabyteDB cluster running in 2 regions of 2 clouds, namely Region1 of Cloud1 and Region2 of Cloud2.
Kubernetes Deployments
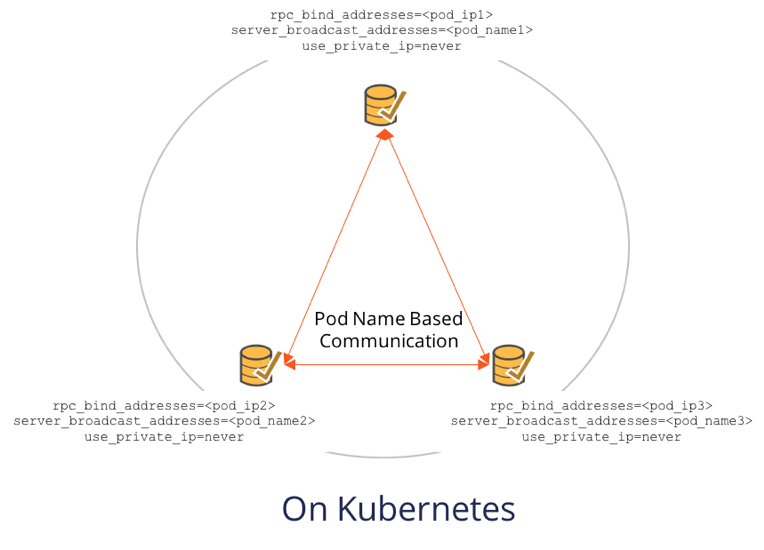
In the case of Kubernetes deployments where pod name is the only constant (pod IP can change across pod restarts), we set:
rpc_bind_addressesto the private IP address of the pod which can change on restartsserver_broadcast_addressesto the ordinal name of the pod which is stable across restartsuse_private_ippolicy toneverto always use the broadcast address.
The figure below shows how a 3 node YugabyteDB cluster on Kubernetes would be configured.
AWS Example
We will bring up a single node YugabyteDB on AWS and connect to it using:
- Private IP from inside the AWS
- Public IP from outside AWS
In order to try this scenario, you would need a machine in a public cloud with a private IP address, a public IP address as well as a DNS name. Below are the details of the example setup that you could customize according to your needs.
Create an ec2 instance on AWS with the following specs.
- Machine type: c5.xlarge
- OS: Ubuntu 16.04
- Disk: One 50GB EBS volume (gp2 SSD)
- Ensure that ntp is running on the machine
Make sure to create a machine that has both a public and a private IP address. AWS should assign a DNS hostname automatically. In our setup, the public and private IP addresses are as follows.
- Public DNS hostname: ec2-52-12-222-212.us-west-2.compute.amazonaws.com
- Public IP: 52.12.222.212
- Private IP: 172.151.22.109
You will notice that the public DNS hostname resolves to the private IP when inside the AWS region. When outside the AWS region, it resolves to the public IP address. Hence, our task is really to connect to the database over public and private IP addresses.
Install YugabyteDB
Download and install the latest version of YugabyteDB. The steps are shown below, but check here for the latest version of YugabyteDB and the install steps.
$ wget https://downloads.yugabyte.com/yugabyte-ce-1.1.0.0-linux.tar.gz
$ tar xvfz yugabyte-ce-1.1.1.0-linux.tar.gz && cd yugabyte-1.1.0.0/
$ ./bin/post_install.sh
Now let’s configure YugabyteDB such that you can connect to it using both the public and the private ip address. First bring up YB-Master as follows based on the above. We set the use_private_ip policy parameter to cloud below to ensure that we use private IP addresses inside the cloud.
$ ./bin/yb-master                                     \
      --master_addresses 172.151.22.109:7100          \
      --fs_data_dirs /mnt/data                        \
      --replication_factor=1                          \
      --rpc_bind_addresses 172.151.22.109:7100        \
      --server_broadcast_addresses 52.12.222.212:7100 \
      --use_private_ip=cloud                          \
      2>&1 > yb-master.out &
Next bring up YB-TServer.
$ ./bin/yb-tserver                                    \
      --tserver_master_addrs 172.151.22.109:7100      \
      --fs_data_dirs /mnt/data                        \
      --rpc_bind_addresses 172.151.22.109:9100        \
      --server_broadcast_addresses 52.12.222.212:9100 \
      --use_private_ip=cloud                          \
      2>&1 > yb-tserver.out &
Connect using Public IP
From outside the cloud, you should be able to connect using the public IP address.
$ ./bin/cqlsh 52.12.222.212
Connected to local cluster at 52.12.222.212:9042.
[cqlsh 5.0.1 | Cassandra 3.9-SNAPSHOT | CQL spec 3.4.2 | Native protocol v4]
Use HELP for help.
cqlsh>
Connect using Private IP
From within the cloud, you should be able to connect to the cluster using cqlsh using the private IP address. Note that the public IP addresses will not resolve within the AWS cloud environment.
$ ./bin/cqlsh 172.151.22.109
Connected to local cluster at 172.151.22.109:9042.
[cqlsh 5.0.1 | Cassandra 3.9-SNAPSHOT | CQL spec 3.4.2 | Native protocol v4]
What’s Next?
- Install YugabyteDB and try the above scenarios out.
- Read the YugabyteDB 1.1 technical deep dive blog to catch up on all the new features
- Check out all the in-depth 1.1 features and the corresponding blog posts in the series
 Scenarios and the Multi-Tenancy Options That Support Them")

