Integrating YugabyteDB Anywhere Metrics with Dynatrace
January 20, 2026
This blog provides a detailed, step-by-step guide to using YugabyteDB Anywhere metrics export configuration (OTLP/HTTP) with Dynatrace (Observability Platform).
OTLP stands for OpenTelemetry Protocol, the standard protocol for sending OpenTelemetry data (metrics, logs, traces) from a source to an observability backend.
YugabyteDB Anywhere 2025.2 and later versions provide built-in log and metrics export capabilities, enabling integration with third-party observability platforms. Dynatrace is one of these supported integrations (similar to Datadog) and can be used to export YugabyteDB universe telemetry directly from YugabyteDB Anywhere into Dynatrace, without the need to deploy separate collection pipelines.
You do not need to set up Prometheus scraping, deploy collectors on every node, or maintain separate monitoring pipelines. You can enable the feature once in YugabyteDB Anywhere, register a Dynatrace destination (endpoint + token), then switch on export per universe.
This blog covers
- What is integrated, and how data flows from YugabyteDB Anywhere to Dynatrace
- Prerequisites (access, token permissions, and network requirements)
- Detailed configuration steps in YugabyteDB Anywhere and Dynatrace
- Validation checks, troubleshooting, and token rotation runbook
- A practical starter dashboard blueprint for day-1 and day-2 operations
Architecture at a Glance
Figure 1 below depicts the integration architecture diagram for YugabyteDB with Dynatrace.
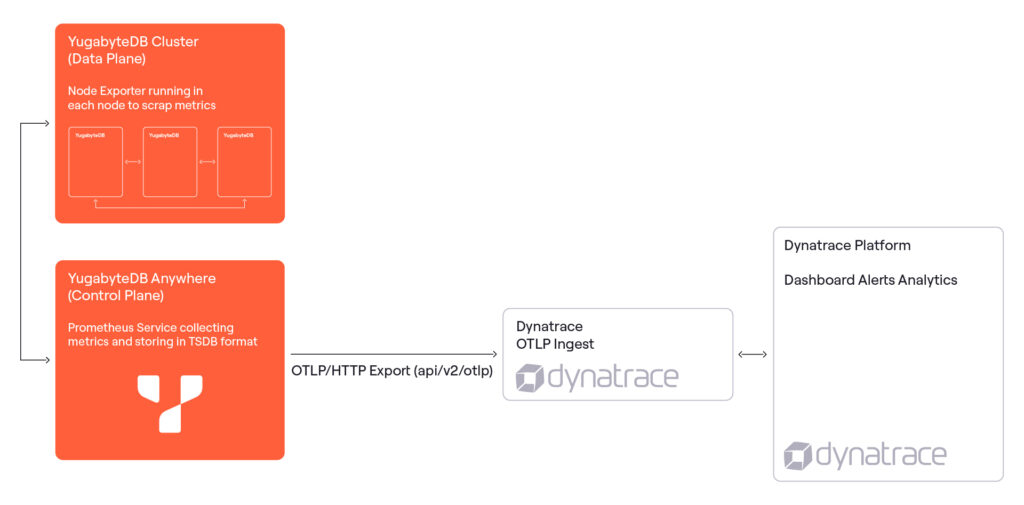
At a high level, YugabyteDB Anywhere acts as the control plane for our YugabyteDB universes and the export hub for operational telemetry. Instead of running separate collectors or scrapers, you can configure a single Dynatrace integration in YugabyteDB Anywhere and then enable export per universe.
Components and roles:
- YugabyteDB Universe (Data Plane)
- Database nodes (masters + tservers) generate runtime metrics continuously (storage, RPC, query latency, compactions, node health, etc.)
- These metrics are the “ground truth” signals that reflect cluster behavior and performance
- YugabyteDB Anywhere (Control Plane + Export Orchestrator)
- YugabyteDB Anywhere manages the universe and also acts as the metrics exporter
- Enables metrics export globally (feature flag), define a Dynatrace export configuration once, and then enable export for each universe using that configuration
- YugabyteDB Anywhere handles the mechanics of packaging and pushing metrics out. This means you don’t need Prometheus scraping, pushgateway, or node agents.
- Dynatrace OTLP Ingest (Observability Backend)
- Dynatrace receives incoming telemetry over OTLP/HTTP
- Once ingested, Dynatrace stores the data as time-series metrics, enabling dashboards, SLOs, alerts, and cross-correlation with other telemetry sources already present in Dynatrace
Data flow (end-to-end)
- Metrics are generated inside the universe
- Every YugabyteDB node produces metrics continuously as the workload runs
- YugabyteDB Anywhere collects and prepares the metrics for export
- YugabyteDB Anywhere identifies which universes have “Export Metrics” enabled
- It aggregates/organizes the metrics stream in the required format and attaches metadata that helps Dynatrace interpret the series
- YugabyteDB Anywhere pushes metrics to Dynatrace using OTLP/HTTP
- Export happens over HTTPS (OTLP/HTTP)
- Authentication is handled using the Dynatrace access token configured in YugabyteDB Anywhere
- Connectivity depends on network reachability from YugabyteDB Anywhere to the Dynatrace endpoint (SaaS or Environment ActiveGate)
- Dynatrace ingests and stores metrics as time series
- Dynatrace indexes the incoming metrics and makes them searchable
- You can immediately plot these metrics, build dashboards, configure alerting thresholds, and correlate with other signals (logs/traces/infrastructure metrics) already in Dynatrace
Prerequisites
Before you configure anything, you should confirm the following. Getting this configured correctly up front prevents most setup failures.
YugabyteDB Anywhere prerequisites
- Super Admin privileges in YugabyteDB Anywhere (required to change Global runtime configuration).
- YugabyteDB Anywhere version 2025.2.0 includes Log and Metrics Export for Dynatrace.
Dynatrace prerequisites
- A Dynatrace OTLP ingest endpoint that is reachable from the YugabyteDB Anywhere network (SaaS/Managed or Environment ActiveGate)
- A Dynatrace access token with permissions to ingest metrics
- Outbound connectivity from the YugabyteDB Anywhere host to the Dynatrace ingest endpoint over the required port (typically HTTPS)
Note: This blog only focuses on the YugabyteDB Anywhere export configuration workflow, not on Prometheus scraping.
Step-by-step Setup
Follow the steps below in order. Steps 1 to 3 are Dynatrace-side preparation and network readiness. Steps 4 to 6 are the YugabyteDB Anywhere configuration. Steps 7 and 8 validate and operationalize the integration.
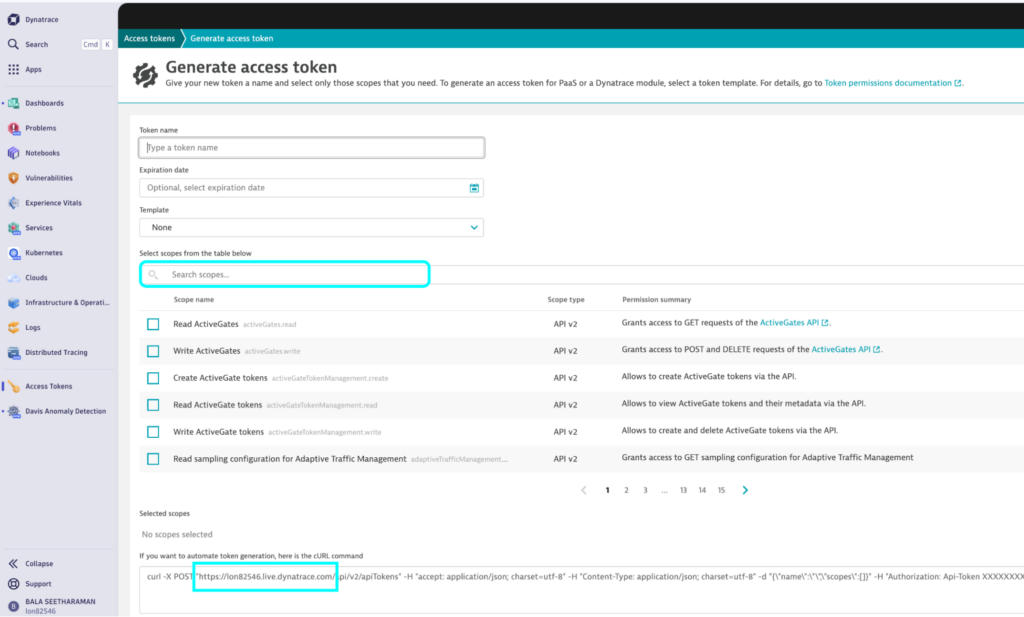
Step 1: Identify the correct Dynatrace OTLP ingest endpoint
Dynatrace ingests OpenTelemetry Protocol (OTLP) data over HTTP. YugabyteDB Anywhere requires the OTLP ingest base endpoint for your Dynatrace environment to push metrics reliably.
Retrieve the OTLP ingest endpoint from your Dynatrace environment settings. Be careful not to copy a UI or application domain by mistake. An incorrect domain typically results in validation errors even if the token is correct.
Capture these details for later steps:
- The Dynatrace OTLP ingest base endpoint (metrics ingest enabled). Figure 2 below shows how to generate an access token in Dynatrace and select the scopelist as highlighted below
- Read API tokens
- Ingest Metrics
- Ingest logs
- Ingest OpenTelemetry traces

Figure 2 – Dynatrace – API Generation Steps with scope list - Whether you use SaaS/Managed ingest or an Environment ActiveGate endpoint. (In this example we use a SaaS-based Dynatrace setup)
- Any proxy settings or allowlists required for outbound access from YugabyteDB Anywhere
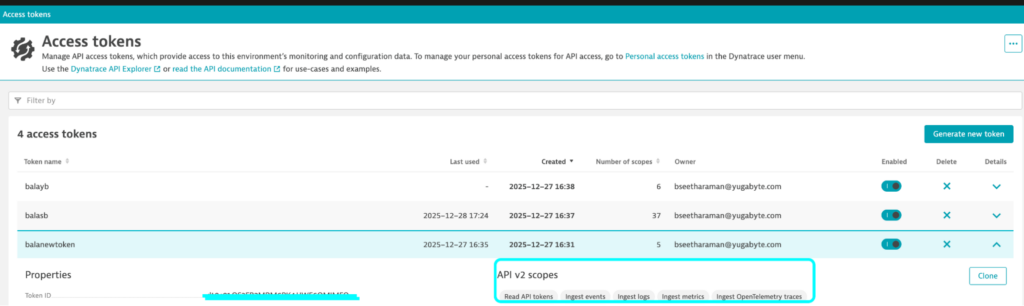
Step 2: Create a Dynatrace access token for ingest
Create a dedicated token for YugabyteDB Anywhere exports. Keep permissions minimal but sufficient. At a minimum, the token must allow metrics ingestion. If you plan to export logs or traces in the future, include those ingest permissions as well.
Recommended token hygiene:
- Use separate tokens per environment (Prod, PPD, QA)
- Name tokens clearly (example: yba-metrics-export-prod)
- Store the token securely and rotate on a schedule (and during personnel changes)
The diagram below shows the generated token with the scope selected.
Step 3: Confirm network connectivity from YugabyteDB Anywhere to Dynatrace
Most integration failures are due to network reachability issues. Before you create the configuration in YugabyteDB Anywhere, confirm that the YugabyteDB Anywhere host can reach the Dynatrace ingest endpoint.
Network checklist:
- DNS resolution works for the Dynatrace ingest endpoint from the YugabyteDB Anywhere host.
- Outbound firewall rules allow the required port (typically HTTPS).
- If you use an outbound proxy, the proxy allows the ingest endpoint and supports TLS correctly.
Step 4: Enable metrics export in YugabyteDB Anywhere (global runtime configuration)
YugabyteDB Anywhere controls feature access through runtime configuration. Metrics export must be enabled globally before it can be enabled on any universe.
In the YugabyteDB Anywhere UI, do the following:
- Sign in to YugabyteDB Anywhere using a Super Admin account.
- Navigate to Admin – Advanced (runtime configuration).
- Open Global configuration.
- Locate the key yb.universe.metrics_export_enabled.
- Set the value to true and save the change.
The diagram below shows the runtime configuration needed to enable metrics export (Environment variable set to true).
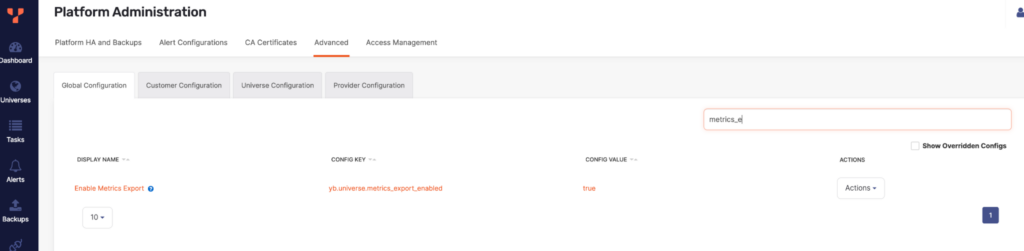
Important: In some YugabyteDB Anywhere versions, once the metrics export is enabled for any universe, the global setting cannot be turned off. Plan the rollout (and token governance) accordingly.
Step 5: Create a Dynatrace export configuration in YBA
An export configuration stores the Dynatrace destination details (endpoint and token) once, so you can reuse it across multiple universes. Treat this as a reusable connector.
In YugabyteDB Anywhere, create the configuration:
- Go to Integrations
- Open the Log and Metrics Export section
- Click Add Configuration
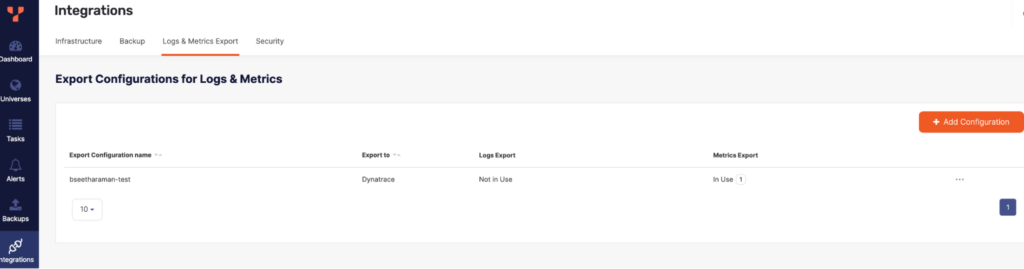
The diagram below shows the Log & Metrics export configuration that you need to enable for Dynatrace Metrics export.
- Choose Dynatrace as the export type
- Provide a configuration name (example: dynatrace-prod-otlp)
- Enter the Dynatrace OTLP ingest endpoint base URL
- Paste the Dynatrace access token
- Click Validate and Create Configuration
Figure 6 below shows the metrics export configuration for Dynatrace, which captures the Dynatrace endpoint URL and the Dynatrace access token
")
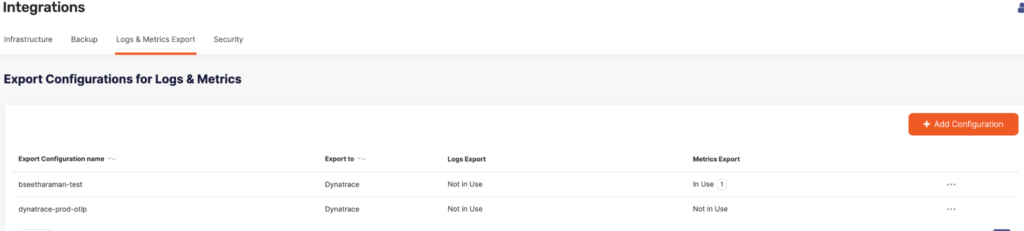
The diagram below shows the output (Export Configuration Name, Export To, Metrics Export, Log Export) after successfully validating and creating the configuration steps in Figure 6 above.
If validation fails, it is usually caused by an incorrect endpoint, insufficient token permissions, or blocked outbound connectivity. Fix the root cause and retry.
Operational note: Some YugabyteDB Anywhere versions do not allow you to edit an export configuration after creation. For token rotation or endpoint changes, create a new configuration and reassign universes.
Step 6: Enable metrics export for a universe
With the integration configuration ready, enable export per universe. This allows us to roll out safely: start with one universe, validate it, and then expand to the rest.
For each universe you want to export:
- Open the universe in YugabyteDB Anywhere
- Go to the Metrics tab
- Open Export Metrics (typically under a settings gear icon)
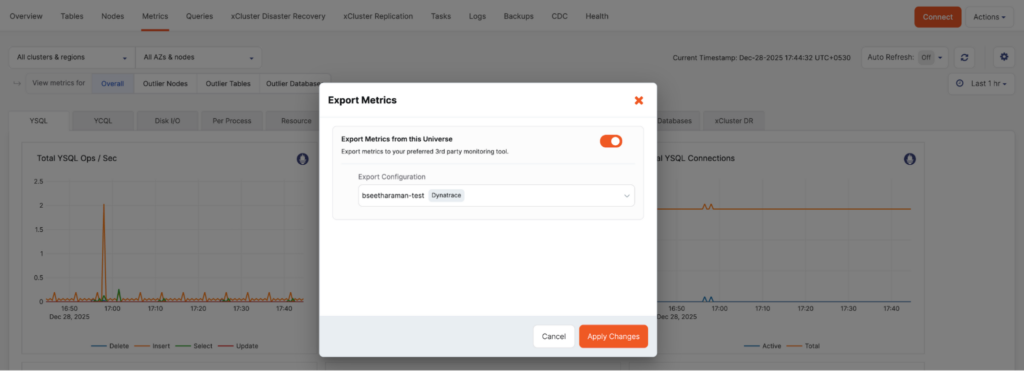
Figure 8 below shows where you need to enable export metrics in the metrics tab (Gear Icon -> Export Metrics) of Universe from YugabyteDB Anywhere.

- Enable Export Metrics from this Universe
- Select your Dynatrace export configuration
- Apply changes
The diagram below shows the successful enablement of export metrics from the Universe and selects the export configuration name that you created for Dynatrace (as per Figure 6).
Repeat these steps for additional universes. If you follow strict separation by environment, you should use different export configurations for Prod, PPD, and QA.
Step 7: Validate metrics in Dynatrace
After enabling export, validate in Dynatrace that the metrics are arriving and updating over time. Use the Metrics or Data Explorer to search for newly ingested time series and confirm continuity.
Figure 10 below shows the data explorer in Dynatrace, which depicts the YugabyteDB metrics that are ingested in Dynatrace through OTEL.
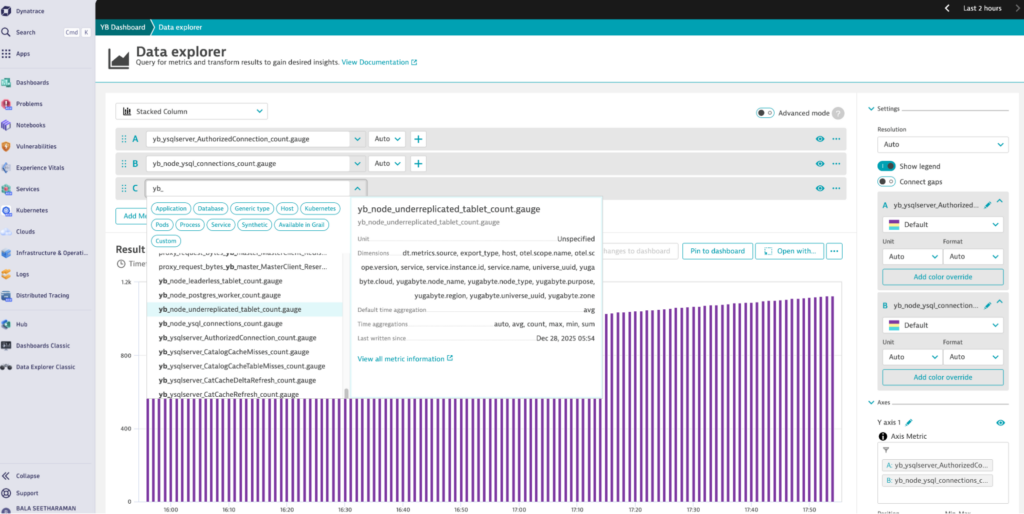
Validation tips:
- Start with the universe that you first enabled and search for time series associated with that environment
- If Dynatrace shows authentication errors, re-check your token permissions and ensure the token was rotated recently
- If you don’t see data, confirm the universe export toggle is still enabled and that the configuration is still assigned
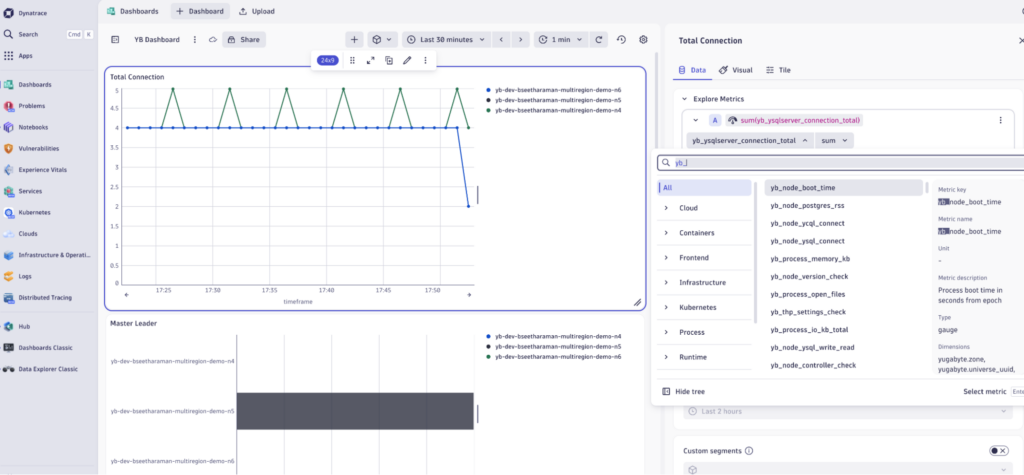
Step 8: Operationalize (starter dashboard)
YugabyteDB exposes a large number of metrics. A strong day-1 dashboard focuses on high-signal indicators that catch incidents early.
Add deeper troubleshooting charts only after the basics are stable. The diagram below shows the sample dashboard with metrics that are exported to Dynatrace.
Troubleshooting
Use this section to quickly diagnose issues. In most cases, the issue is related to endpoint correctness, token permissions, or network reachability.
A) Configuration validation fails in YugabyteDB Anywhere
- Endpoint is not the OTLP ingest endpoint (verify you used the ingest base endpoint)
- Token lacks required ingest permissions (recreate token with correct permissions)
- YugabyteDB Anywhere host cannot reach Dynatrace due to firewall, proxy, or allowlist restrictions
B) Validation succeeds, but Dynatrace shows no metrics
- Confirm export is enabled on the universe and the correct configuration is selected
- Confirm the global runtime key remains enabled
- Check for token rotation events and whether the assigned configuration still uses a valid token
- Re-check outbound connectivity from the YugabyteDB Anywhere host to the ingest endpoint
C) Token rotation or endpoint change runbook
If your YugabyteDB Anywhere version does not allow editing an existing export configuration, rotate safely using the following runbook.
- Create a new Dynatrace export configuration in YugabyteDB Anywhere with the new token or endpoint
- Reassign universes to the new configuration and apply changes
- Confirm metrics are flowing in Dynatrace
- Unassign the old configuration from all universes
- Delete the old configuration from YugabyteDB Anywhere
Quick reference checklist
Use this short checklist when setting up in new environments.
- Dynatrace: obtain OTLP ingest endpoint; create a dedicated ingest token
- Network: allow YugabyteDB Anywhere host to reach Dynatrace ingest endpoint (DNS + outbound port)
- YugabyteDB Anywhere (global): enable yb.universe.metrics_export_enabled = true
- YugabyteDB Anywhere (integration): create Dynatrace export configuration and validate
- YugabyteDB Anywhere (universe): enable Export Metrics and select the Dynatrace configuration
- Dynatrace: validate metrics arrival; build starter dashboard
Conclusion
YugabyteDB Anywhere’s Dynatrace export configuration is a clean, centralized way to stream universe metrics into Dynatrace. Enable the feature once, define a reusable Dynatrace destination, and roll out per universe with clear validation checks. With a small, high-signal dashboard, you achieve production-ready monitoring without requiring additional infrastructure.
Want to know more about deploying self-managed YugabyteDB Anywhere? Discover how you can easily, effectively, and securely create incremental backups for YugabyteDB Anywhere based on a full backup.


